Toilet Paper Roll Butterflies: An Incredible DIY Craft for Kids
Toilet Paper Roll Butterflies are an amazing way to transform something ordinary into a fun and creative craft project. This DIY activity is not only engaging but also allows children to express their artistic side while using recycled materials. With just a few supplies, you can create vibrant and colorful butterflies that will brighten up any space. Whether you’re hosting a craft day, looking for an educational project, or simply seeking to reduce waste, this craft fits perfectly into every category.
Crafting using toilet paper rolls provides an opportunity for children to learn about recycling and reusing materials. It also cultivates their fine motor skills and imagination as they decorate and assemble their butterflies. With minimal setup and plenty of room for creativity, kids will enjoy every moment spent making these delightful insects. Plus, adults can easily join in on the fun! Let’s explore why Toilet Paper Roll Butterflies are such a fantastic craft idea that you'll want to try today.
Why You’ll Love This Craft
Creating Toilet Paper Roll Butterflies is a wonderful way to spend quality time with your kids. Here are just a few reasons why this craft is so beloved:
- Eco-Friendly: Uses recycled materials that might otherwise be thrown away.
- Cost-Effective: This craft doesn't require expensive supplies; most items are likely found at home.
- Promotes Creativity: Kids can personalize their butterflies with colors, patterns, and decorations.
- Educational Value: Teaches children about recycling and encourages imaginative play.
- Simple Instructions: Even young children can follow the steps, making it a great family project.
- Decorative: The final product serves as charming home decor or school project displays.
The simplicity and creativity involved in making Toilet Paper Roll Butterflies provide an enjoyable experience for everyone involved. Plus, the satisfaction of creating something beautiful from everyday items is immensely rewarding.
Preparation and Crafting Time
Making Toilet Paper Roll Butterflies is quick and easy, which is perfect for busy schedules. Here’s a breakdown of the time involved in this creative project:
- Preparation Time: 10 minutes to gather materials
- Crafting Time: 30-45 minutes, depending on decoration detail
- Total Time: About 1 hour
These times may vary depending on how elaborate you want your butterflies to be, but this guide will provide a great framework for your family crafting session.
Ingredients
- 1 empty toilet paper roll
- Paint or markers (various colors)
- Googly eyes (optional)
- Adhesive: Glue or tape
- Colored paper or craft foam (for wings)
- Scissors
- Glitter, stickers, or other decorative items (optional)
- Pipe cleaners (optional for antennae)
Step-by-Step Instructions
Follow these simple steps to create your own Toilet Paper Roll Butterflies:
- Prepare the Toilet Paper Roll: Start by cleaning and drying the toilet paper roll if needed.
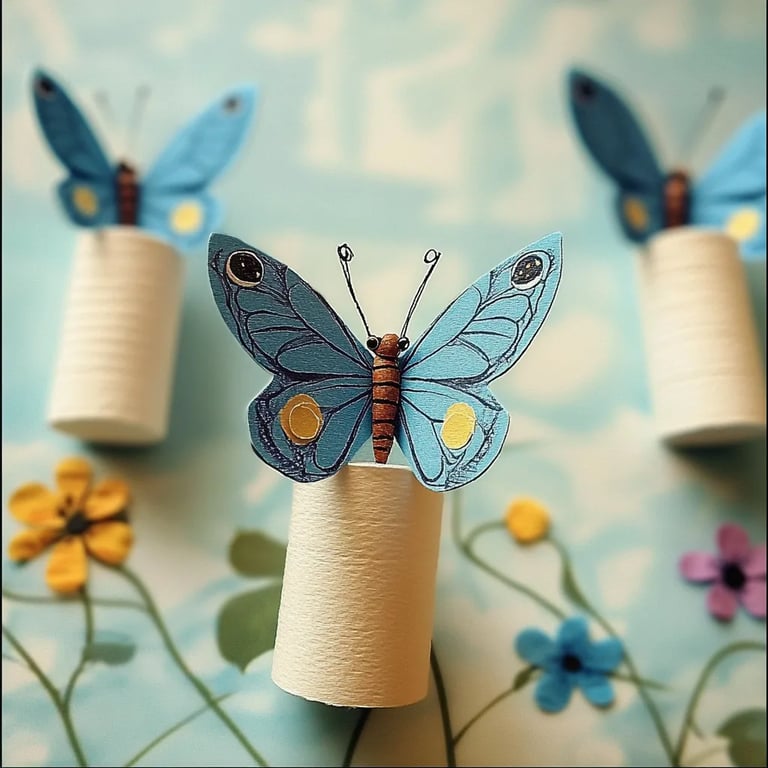
- Cut the Wings: Using colored paper or craft foam, cut out two butterfly wing shapes. Ensure they are large enough to fit the top of your roll.
- Paint the Roll: Paint the exterior of the toilet paper roll with your preferred color. This will be the body of the butterfly. Allow it to dry completely.
- Attach the Wings: Once the roll is dry, glue or tape the wings to the back of the roll. Make sure they are evenly spaced and secure.
- Add Antennae (Optional): Cut two small pieces of pipe cleaner to create antennae. Insert them into the top of the roll and secure with glue or tape.
- Decorate the Wings: Use markers, glitter, or stickers to add decorations to the wings. Let your imagination run wild!
- Attach Googly Eyes (Optional): Glue on googly eyes to the front of the roll for an added playful touch.
- Final Touches: Let everything dry completely before displaying your butterfly.
By following these straightforward instructions, you will have a lovely collection of colorful butterflies ready to brighten your indoor or outdoor spaces.
How to Serve
To showcase your Toilet Paper Roll Butterflies beautifully, consider the following options:
- Display Options: Arrange the butterflies on windowsills, tables, or as part of a seasonal decoration.
- Craft Corner: Set up a dedicated craft area where kids can create and display their new art.
- Toys and Puppets: Encourage imaginative play by turning the butterflies into puppets for storytelling.
- Gifts: Use them as personalized gifts for family members or friends; children can create customized butterflies for someone special.
- Classroom Decoration: Encourage kids to create butterflies for classroom displays or themed events.
These ideas can help maximize the enjoyment and creativity stemming from your Toilet Paper Roll Butterflies project, ensuring it remains a cherished activity for kids and adults alike.
Additional Tips
- Explore Different Materials: While toilet paper rolls are the main focus, don’t hesitate to use paper towel rolls or other similar tubes. They can create even larger butterflies!
- Get Creative with Paint: Use different types of paint such as watercolor or spray paint for varied textures and effects.
- Incorporate Nature: Encourage kids to use real leaves or flowers as part of the decoration for a more organic look.
- Host Butterfly Craft Parties: Set aside special days to make Toilet Paper Roll Butterflies with friends, making it a fun community event.
- Use LED Lights: For an added touch, place small LED lights behind the butterflies to create a luminous effect when displayed.
Recipe Variation
Feel free to switch things up! Here are a few variations to try:
- Themed Butterflies: Adapt the design to match seasons or holidays, such as fall colors or Halloween designs.
- Different Wing Shapes: Experiment with cutting the wings in unique shapes or sizes to create diverse butterfly species.
- Mixed Media: Combine different materials such as yarn, fabric scraps, or buttons to give the butterflies a unique flair.
- Interactive Butterflies: Create butterflies with movable wings by attaching them with brads, allowing them to flap!
- DIY Butterfly Garden: After crafting, kids can create a butterfly garden outdoors, using the crafted butterflies as decor.
Freezing and Storage
- Storage: Keep your finished Toilet Paper Roll Butterflies in a dry place away from moisture. They can be stored in a box or on a shelf.
- Longer Lifespan: If you want to keep them for longer, consider sealing them in plastic wrap to prevent dust buildup.
Special Equipment
You will need a few essential tools to prepare this craft successfully:
- Scissors
- Paintbrushes (for painting the rolls)
- Glue or tape
- Optional: Hole punch for additional decorations
- Craft knives (for older children under supervision)
Frequently Asked Questions
What age is this craft suitable for?
Toilet Paper Roll Butterflies are great for children aged 5 and up, with adult supervision for younger kids.
How can I encourage my child’s creativity during this project?
Allow them to choose their colors and designs freely. Encourage storytelling about the butterflies they create.
Can this craft be used for educational purposes?
Absolutely! Use this craft as an opportunity to teach kids about butterflies, their habitats, and the importance of recycling.
What if I don’t have some supplies?
Get creative! Many supplies can be substituted with household items like old magazines or extra cardboard.
How can I turn this into a longer project?
Consider creating a whole series of insects or animals from recycled materials, or incorporate a nature walk to collect items for decoration.
Conclusion
Engaging in Toilet Paper Roll Butterflies offers an exciting blend of fun, creativity, and environmental awareness. This craft project not only allows children to explore their artistic abilities but also teaches them the importance of reusing materials. Whether displayed in your home or gifted to loved ones, these butterflies are sure to bring joy and color to any setting. So gather your supplies and let your imagination take flight!