The Joy of Baking Soda Painting: A Complete Guide to Crafting Magic
Hello there, fellow crafting enthusiast! Today, I'm thrilled to share with you one of my all-time favorite DIY projects: Baking Soda Painting. If you’re looking for a fun, creative, and slightly unconventional way to express your artistic side, you’ve stumbled upon the right place. This delightful technique combines baking soda with paint to create an artwork that is not only visually striking but also rich in texture. It’s perfect for all ages, making it a fantastic family activity or an engaging solo project.
Let’s dive into what makes Baking Soda Painting so popular and when you can use this technique. The beauty of this craft lies in its simplicity and the magical transformation of regular paint into something truly extraordinary! You can use this method for anything from kid-friendly art sessions to stunning decor, wall murals, or thoughtful gifts.
Why Baking Soda Painting Stands Out
Baking Soda Painting is all about adding texture and dimension to your artwork. The baking soda reacts with the paint during the drying process, creating a puffy, raised effect. This technique not only captivates the eye but invites touch, making your art pieces unique in more ways than one! Plus, it’s an affordable option since most of us usually have baking soda and some sort of paint lying around the house.
Use this method for various occasions—birthdays, holidays, or simply as a way to unwind at the end of a long day. I’ve made everything from vibrant abstracts to whimsical landscapes using this technique, and each piece brought me joy and a sense of accomplishment.
Materials You'll Need
To get started, you’ll require some basic materials that are easily accessible. Here’s what I use in my crafting kit:
- Acrylic Paints: Choose your favorite colors—acrylic works best because it dries quickly.
- Baking Soda: This handy ingredient is the star of the show!
- Water: To create the right consistency for your paint mixture.
- Mixing Bowls: For mixing your paint and baking soda—these can be disposable to make cleanup easier.
- Stirring Stick or Spoon: Something to mix your concoction.
- Canvas or Thick Paper: I prefer canvases for a more professional look, but heavy paper works great, too.
- Paintbrushes: Multiple sizes for different detailing and effects.
- Optional – Glitter or Food Coloring: To add extra flair to your artwork!
Step-by-Step Tutorial to Create Your Masterpiece
Step 1: Prepare Your Workspace
Find a comfortable and well-lit area to set up your crafting station. Lay down newspaper or a plastic sheet to protect your surfaces. I always make sure to have a cup of water handy for cleaning brushes in between colors—this makes the whole process smoother!
Step 2: Mix the Paint and Baking Soda
In a mixing bowl, pour a few tablespoons of your chosen acrylic paint. Then, for every tablespoon of paint, add about one teaspoon of baking soda. You can adjust the quantities based on how much paint you need.
Why This Matters: The baking soda is responsible for that delightful texture, so getting the ratio right is key! Start small; it’s easy to add more than to remove excess.
*What Could Go Wrong?* If you find your mixture is too thick, add a drop of water to smooth it out. Conversely, if it’s too runny, add more baking soda. Finding the right consistency might take a few tries, but don’t be discouraged!
Step 3: Experiment with Color and Texture
Before diving into your canvas, I recommend doing a test on a scrap piece of paper. Use different amounts of baking soda to see how the texture varies. You might discover combinations that surprise you!
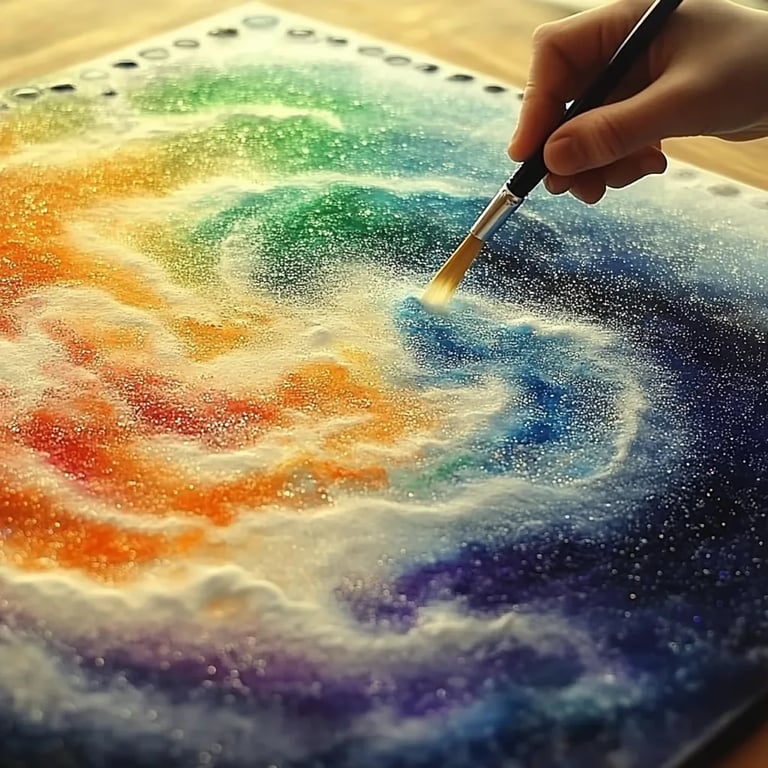
Step 4: Start Painting!
Grab your paintbrush and start applying the mixture to your canvas. I love using a larger brush for broad strokes and a finer brush for details. Don’t be afraid to layer colors; this can add depth to your artwork.
*Creative Tip*: Try using a palette knife for a more textured application. The technique will give you varied results, enriching your piece!
Step 5: Add Fun Elements
Here’s where the magic happens! If you want to add a little sparkle, sprinkle some glitter while the paint is still wet. If you’re feeling adventurous, experiment with food coloring to create vibrant shades.
Step 6: Let It Dry
After you finish painting, let your masterpiece dry completely. This can take several hours depending on the amount of paint used. Be patient! The longer you wait, the better the texture will be once dry.
*What Could Go Wrong?* If you’re in a rush, avoid placing your artwork in direct sunlight to speed up the drying process; this can cause the paint to bubble or crack. Instead, let it air dry at room temperature.
Personal Anecdote: The Beauty of Embracing Imperfection
I remember my first time trying Baking Soda Painting vividly. I had a vision of a stunning abstract landscape, but halfway through, I spilled a whole container of paint! Instead of giving up, I learned to incorporate the blue splatters into my design. The final piece turned out completely different from my original idea—but it was beautiful in its own right! This taught me that sometimes, creativity shines through imperfections.
Tips and Tricks for Success
- Storage: If you have leftover paint mixture, cover it tightly for a short period. I usually store it in an airtight container to use the next day.
- Safety Considerations: Always work in a well-ventilated area, especially when using acrylic paint. If you're crafting with kids, supervise them during the project and remind them not to ingest any materials.
- Alternative Methods: If you don’t have acrylic paints on hand, you can substitute with tempera, though the texture may not be as pronounced. Experiment with watercolor paints, but keep in mind, the results will be different.
Final Thoughts: Embark on Your Baking Soda Painting Journey!
As I wrap up this detailed guide on Baking Soda Painting, I hope you feel inspired and ready to embark on your own creative journey. Remember, art is a personal expression, and the beauty lies in the enjoyment of the process itself. Don’t worry about perfecting every detail; embrace the journey, and let your imagination run wild!
Whether you’re crafting with your children, creating decor for your home, or simply taking some time for yourself to unwind, Baking Soda Painting offers a unique blend of creativity and fun. Gather your materials, set up your space, and create something truly magical today! Happy crafting! 🎨