Painted Log Garden Seats: An Incredible 7-Step Guide to Transform Your Outdoor Space
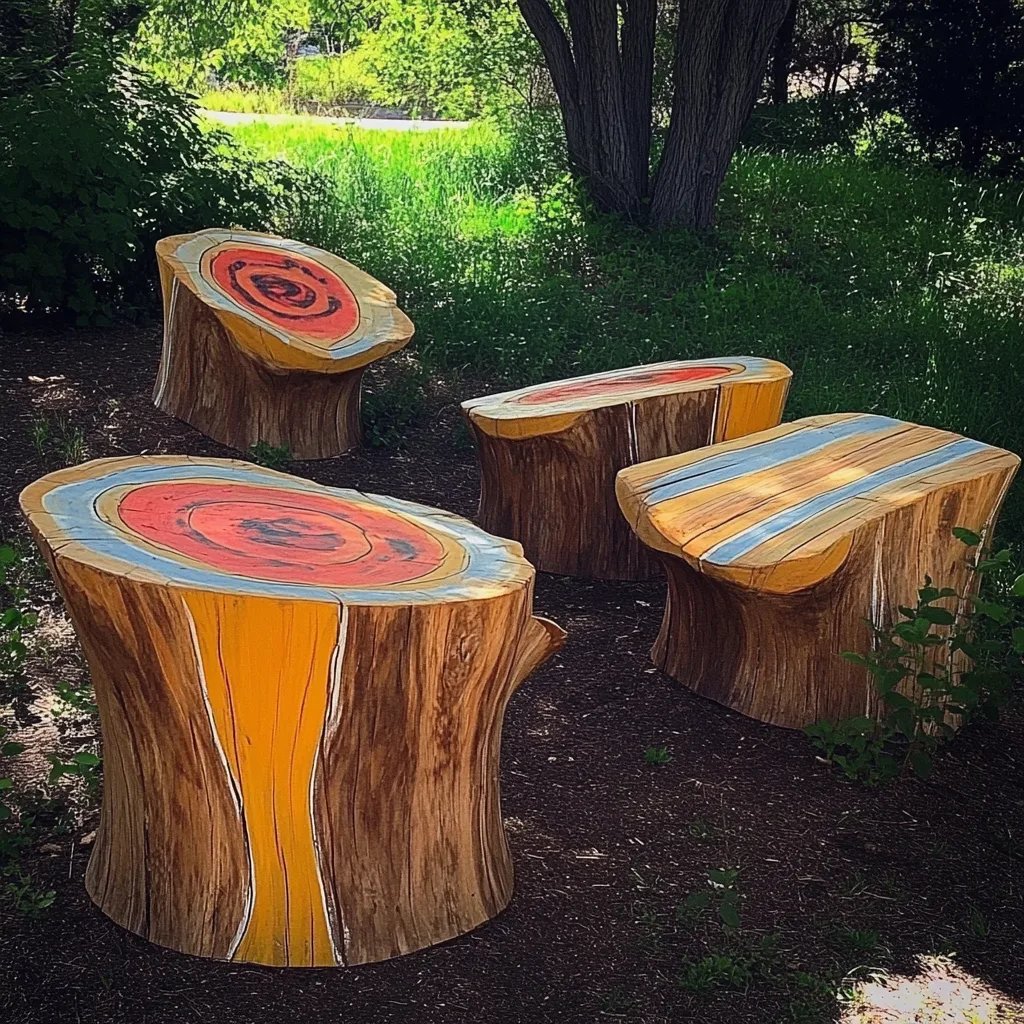
Painted Log Garden Seats are an amazing addition to any outdoor environment, offering both functionality and beauty. They not only provide seating but also become a focal point in your garden or patio. With their rustic charm, painted log seats can transform a simple garden into a stunning retreat. Imagine vibrant colors and unique designs that reflect your personality while embracing the natural elements of your garden.
These seats can be made from a variety of logs, and with a little imagination, they can reflect your artistic flair. The process of creating painted log garden seats is rewarding, allowing you to connect with nature while showcasing your creative side. You can choose colors that complement your garden decor, making your outdoor space inviting for family gatherings or peaceful solitude.
In this article, we’ll explore why you’ll love creating your painted log garden seats, what materials you need, and provide simple step-by-step instructions to guide you through the process.
Why You’ll Love Painted Log Garden Seats
Creating painted log garden seats not only enhances your outdoor aesthetics but also presents a delightful project for DIY enthusiasts. Here are several reasons why painted log seats are perfect for your garden:
- Unique Aesthetic: Each piece is one-of-a-kind, showcasing your style.
- Natural Materials: Using logs preserves the natural beauty of wood.
- Budget-Friendly: Affordable compared to commercially made furniture.
- Custom Designs: You can paint them any color you like or even add patterns.
- Durability: Logs are sturdy and withstand various weather conditions.
- Environmentally Friendly: Repurposing wood reduces waste.
- Fun Project: An engaging way to spend time outdoors while being creative.
With these advantages, it's clear that painted log garden seats are not just practical; they also bring joy and character to your outdoor space.
Preparation and Cooking Time
Creating your painted log garden seats can take about 2-4 hours, depending on your design complexity. Here’s a breakdown of the time you’ll need:
- Preparation Time: 30 minutes (gathering materials and planning designs)
- Painting Time: 1-2 hours (depending on your techniques and drying times)
- Drying Time: 1-2 hours (or overnight, depending on paint type)
These times may vary, but with a little planning, you can set aside an enjoyable afternoon for this project.
Ingredients
While we’re creating seating and not a dish, the following materials are essential for your painted log garden seats:
- Logs (cut to desired seat height and width)
- Sandpaper (for smoothing surfaces)
- Outdoor paint or weatherproof wood stain
- Paintbrushes (various sizes)
- Primer (optional, but recommended for better color adherence)
- Clear sealant (for added protection)
- Drop cloth (to protect your work surface)
- Paint palette or mixing tray
- Rags (for clean-up)
Now that you have your materials ready, it’s time to start crafting your masterpiece!
Step-by-Step Instructions
Creating painted log garden seats can be a fun and fulfilling project. Follow these easy steps to make your own:
- Select Your Logs: Choose logs that are of a suitable length and size for seating. Ensure they're sturdy and not rotten.
- Smooth the Surface: Use sandpaper to sand down the logs. This step is vital for a smooth painting surface. Pay attention to edges and rough spots.
- Clean the Logs: Wipe down the logs to remove sawdust and debris. A clean surface helps the paint adhere better.
- Apply Primer (Optional): If you want vibrant colors, apply a coat of primer to the logs. This helps the paint colors pop and gives the surface a better finish. Allow it to dry.
- Paint the Logs: Using outdoor paint, start applying your chosen colors. You can use a single color or mix it up with patterns and designs like stripes, polka dots, or floral prints.
- Seal the Paint: Once the paint is completely dry, apply a clear sealant. This will protect the paint from the elements and prolong the life of your seats.
- Place Your Seats: Once everything is dry, choose a spot in your garden or patio and place your newly created painted log garden seats there for everyone to enjoy.
By following these detailed steps, you'll create seating that not only provides comfort but also serves as a beautiful enhancement to your outdoor space.
How to Serve
To fully enjoy your painted log garden seats, consider the following tips:
- Placement: Position the seats in a shaded area for comfort or in a sunny spot if you want to soak up the sun.
- Accessorize: Add cushions or throw pillows for comfort and color. This can also tie your seating in with the overall theme of your garden.
- Decorative Touches: Incorporate small tables or planters nearby to create a cozy conversation nook.
- Lighting: Use string lights or lanterns to illuminate the area for evening gatherings.
- Contextualize: Surround your seats with blooming flowers or ornamental plants to enhance the ambiance of your outdoor haven.
By thoughtfully placing your painted log garden seats and adding a few decorative touches, you'll create a welcoming space that invites relaxation and enjoyment. This DIY project celebrates your creativity and makes your garden a perfect retreat for gatherings or quiet moments.
Additional Tips
- Choose Outdoor-Grade Paint: For longevity, select a paint specifically designed for outdoor furniture. This can resist fading and weathering.
- Adding Texture: Consider using a sponge or brush technique for a textured look in your painting.
- Use a Clear Coat: A clear weatherproof sealant not only protects your painted log garden seats but also enhances the shine and color depth.
- Regular Maintenance: Check your painted log seats periodically for any signs of wear or fading, and touch up the paint as necessary.
Recipe Variation
While painted log garden seats can take on countless forms, consider these variations to showcase your creativity:
- Color Schemes: Opt for a monochromatic theme or pastel shades for a subtler look that complements a minimalist garden.
- Themed Designs: Paint your logs with themes such as ocean waves, nature motifs, or abstract patterns to suit your garden's aesthetic.
- Mixed Media: Add elements like stencils or decoupage, incorporating fabric or paper designs onto the logs for an artistic flair.
Freezing and Storage
- Storage: Store any leftover paint carefully in an airtight container to use for future touch-ups or small projects.
- Protecting the Seats: When not in use, consider covering your painted log garden seats with a tarp or outdoor cover to shield them from extreme weather.
Special Equipment
To create your painted log garden seats efficiently, a few specific tools will enhance your experience:
- Electric Sander: For faster and smoother log surface preparation.
- Stencils: If you’re aiming for intricate designs, stencils will help you achieve consistency.
- Drop Cloth: Protect your work area while painting by using a durable drop cloth.
- Paint Sprayer (Optional): For a smooth finish, a paint sprayer can cover larger areas more evenly than a brush.
Frequently Asked Questions
What types of logs are best for painted log garden seats?
Hardwoods like oak or maple are preferred due to their durability. However, softer woods, like pine, can also work if treated well.
How do I prolong the life of my painted log garden seats?
Regularly applying a clear sealant and storing them under cover during adverse weather can significantly prolong their lifespan.
Can I use any type of paint for outdoor logs?
No. It is vital to use weatherproof outdoor paint designed for wooden surfaces to ensure they withstand the elements.
How can I clean my painted log garden seats?
Gently wipe down with a damp cloth and mild soap. Avoid harsh chemicals that could damage the paint finish.
Can I make painted log garden seats indoors?
While it is possible to paint them indoors, ensure proper ventilation and let them dry fully in a well-ventilated area before placing them outside.
Conclusion
Creating painted log garden seats is an enjoyable and creative way to enhance your outdoor space. With unique designs, vibrant colors, and the charm of natural materials, these seats not only offer comfort but also serve as eye-catching decor for your garden. The process allows you to express personal style while enjoying the therapeutic benefits of crafting outdoors. Embrace this DIY project, and transform your garden into a haven of relaxation and beauty!