Milk Color Explosion Craft: An Incredible Ultimate Guide with 7 Steps
Milk Color Explosion Craft is an amazing activity that captivates both children and adults alike. This fun experiment combines artistry and science to create vivid, swirling colors in milk, offering a sensory feast that sparks imagination and creativity. The mesmerizing effect of food coloring swirling in milk is both stunning and easy to recreate in the comfort of your home. This engaging craft not only entertains but also educates on topics such as color mixing and scientific reactions.
In today’s fast-paced world, finding engaging and interactive activities can feel like a daunting task. Luckily, the Milk Color Explosion Craft is simple to execute, requires minimal materials, and can be done in a short amount of time. It’s perfect for family bonding, playdates, or even classroom fun. This guide will provide all the essential information you need to embark on this creative adventure. Let’s explore the reasons you’ll love this craft, its simple preparation and cooking time, a list of required ingredients, step-by-step instructions, and creative serving ideas.
Why You'll Love This Craft
Milk Color Explosion Craft is not only visually stunning but also packed with educational benefits. Here are some reasons why you’ll want to try this activity:
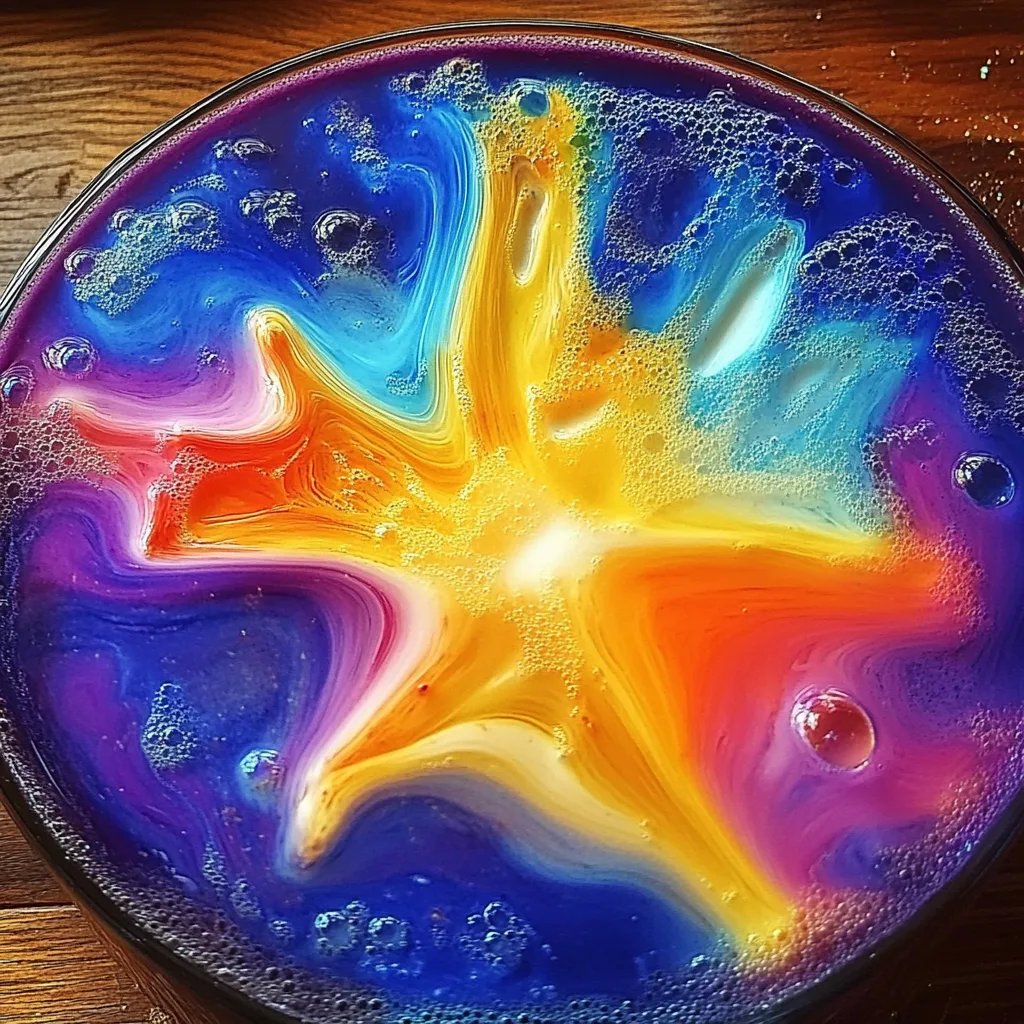
- Visual Appeal: The vibrant colors against the creamy white background create an eye-catching display that’s hard to resist.
- Easy to Prepare: With a few household ingredients, this craft can be ready in no time.
- Educational Fun: Learn about color mixing and chemical reactions in a hands-on way, making science exciting.
- Open-Ended Creativity: The craft allows for personal expression, encouraging kids to explore different color combinations.
- Interactive Experience: It’s a fun group activity, ideal for parties, classrooms, or family gatherings.
- Minimal Clean-Up: With proper preparation, the mess can be kept to a minimum, making it easy to enjoy the fun without the stress.
- Sensory Engagement: The tactile nature of the activity engages children’s senses, enhancing the overall experience.
The Milk Color Explosion Craft is a wonderful way to blend learning and play while producing a visually stunning masterpiece that everyone will enjoy.
Preparation and Cooking Time
Preparing the Milk Color Explosion Craft is straightforward and quick. Here's a simple breakdown of the time you’ll need:
- Preparation Time: Approximately 10 minutes for gathering materials and setting up.
- Activity Time: 20-30 minutes for the actual craft.
- Total Time: About 30-40 minutes to complete the whole experience.
This quick time frame makes it perfect for filling a small window of free time, whether on a rainy day or as a planned weekend craft.
Ingredients
- Whole milk (or any milk variety)
- Food coloring (various colors, including red, blue, yellow, green)
- Dish soap (liquid)
- Shallow dish or tray
- Cotton swabs or toothpicks (optional for swirling)
- A dropper (optional for added precision)
Step-by-Step Instructions
Creating the Milk Color Explosion Craft is a simple and enjoyable process. Follow these steps to bring your colorful creation to life:
- Prepare Your Work Area: Lay down newspapers or a plastic tablecloth to catch any spills.
- Pour the Milk: Fill a shallow dish with about 1-2 cups of whole milk. Ensure it covers the bottom evenly.
- Add Food Coloring: Drop several drops of various food colors into different areas of the milk. Experiment with placement and colors for the best results.
- Prepare the Dish Soap: Pour a small amount of dish soap into a separate bowl or cup for easy dipping.
- Create the Explosion: Using a cotton swab or a dropper, dip it into the dish soap and touch it to the milk's surface where you placed the food coloring.
- Watch the Magic: Observe as the colors start to swirl and explode, creating breathtaking patterns. Encourage everyone to share their reactions!
- Experiment Further: Try adding different color combinations or repeat the process to see how the reactions change with various techniques.
By following these steps, you can create your own Milk Color Explosion in no time! The delight on participants' faces as the colors dance throughout the milk makes this craft truly special.
How to Serve
While serving isn't typically necessary for a craft like Milk Color Explosion, you can enhance the experience in a few creative ways:
- Display the Result: After creating your colorful masterpiece, consider placing the dish in a well-lit area to showcase the beauty of the swirling colors.
- Photography Session: Capture the stunning visuals by taking photos of the milk colors before they settle. This provides a fun memory to cherish.
- Educational Discussion: After completion, engage everyone in a short conversation about the science behind the colors, discussing what they observed during the reaction.
- Color Mixing: Encourage participants to discuss their favorite color combinations and what they may create next.
- Snack Pairing: While enjoying the craft, you might want to serve some light snacks like finger foods or fruit. This keeps the energy high and everyone engaged.
By exploring these imaginative serving options, you add layers of enjoyment to your Milk Color Explosion Craft, making the activity even more memorable.
Additional Tips
- Experiment with Colors: Try using different food coloring brands; some may yield brighter results than others.
- Use Whole Milk for Best Results: Whole milk or even cream gives better color movement compared to skim or low-fat milk.
- Coordinate Groups: If doing this with a group, assign different color themes to each participant to see who can create the most striking patterns.
Recipe Variation
There are numerous ways to change up your Milk Color Explosion Craft. Here are a few ideas to try:
- Add Sparkles: Include edible glitter or sparkles to the milk before adding the color for an extra magical effect.
- Use Non-Dairy Alternatives: Experiment with almond milk, coconut milk, or oat milk for a dairy-free option.
- Vary the Containers: Use different shapes of containers for different visual effects, such as platters or bowls with unique patterns.
Freezing and Storage
- Storage: While this craft is best enjoyed fresh, any leftover milk can be kept in the fridge for a few hours. It’s most effective when the colors are vibrant.
- Freezing: The craft isn’t typically designed for freezing, as the colors will settle and lose their vibrant swirl. It’s best to enjoy immediately.
Special Equipment
While minimal, some tools can enhance your Milk Color Explosion Craft experience:
- Droppers or Pipettes: For precise food coloring application.
- Spoons or Stirrers: To mix and blend colors more thoroughly.
- Shallow Dishes: Different shapes can add a new dimension to your design.
Frequently Asked Questions
Can I use any type of milk?
Yes, you can use different kinds of milk, but whole milk provides the best results for this craft.
What should I do if the colors don’t swirl as expected?
Make sure you’re using enough dish soap on the cotton swab or dropper. The soap is what facilitates the swirling action.
Is this safe for younger children?
Yes, but always supervise younger children when using food coloring, as it can stain clothes or surfaces.
Can I use natural food coloring?
Absolutely! Natural food coloring made from fruits and vegetables will also work, though the vibrancy may vary.
Conclusion
The Milk Color Explosion Craft is an exciting and creative project that captivates participants of all ages. It seamlessly combines art and science, providing an unforgettable sensory experience. Whether you’re looking for an engaging activity for family bonding or a fun classroom experiment, this craft fits the bill perfectly. The versatility and ease of the craft lend themselves to endless creative possibilities, ensuring that each attempt can yield a unique masterpiece. Jump into the colorful world of Milk Color Explosion Craft and unleash your creativity!