Magic Milk Experiment: An Incredible Ultimate Guide for 5 Amazing Steps
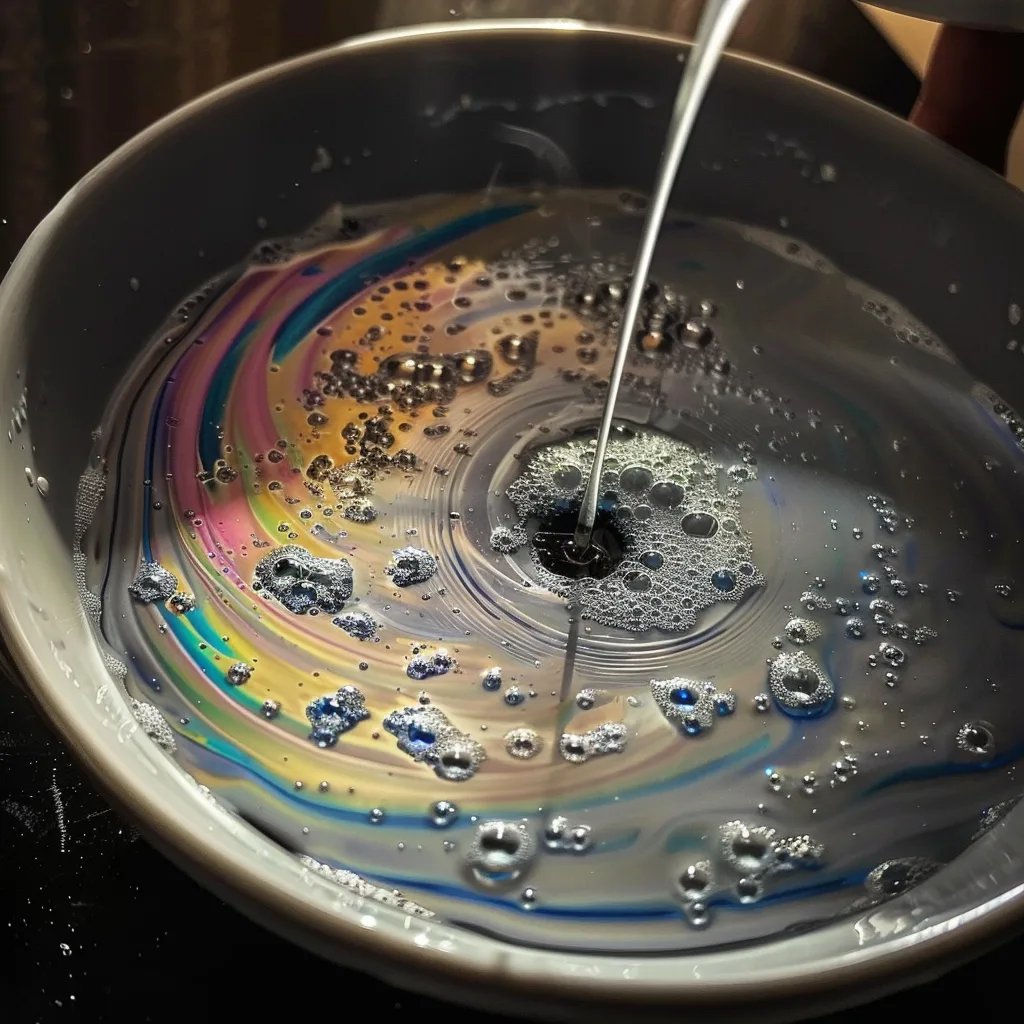
Magic Milk Experiment will leave you spellbound with its mesmerizing visuals and educational value. This creative yet simple science activity captivates both children and adults alike. When you mix milk with food coloring and dish soap, you’ll witness a display of colors swirling and dancing. It’s not just a visual treat; it’s an exciting way to delve into the science of chemistry right in your kitchen.
If you’re looking for a fun and educational activity to engage your kids, the Magic Milk Experiment is an excellent choice. The first time you watch the colors burst and leap, you’ll understand just how magical this process is. Beyond just being visually stunning, this experiment teaches fundamental concepts about surface tension and chemical reactions, making it both entertaining and instructive.
In this ultimate guide, you’ll learn why this experiment is so amazing, the simple preparation steps involved, and how to execute it flawlessly. Whether you’re a seasoned science enthusiast or a parent looking for engaging activities for your children, the Magic Milk Experiment promises fun and learning combined. Let’s dive into what makes this experiment such a spectacular choice for anyone interested in a splash of color and science!
Why You’ll Love This Experiment
The Magic Milk Experiment is more than just a captivating activity. Here are a few reasons why it deserves a spot on your to-do list:
- Easy to Do: You don’t need advanced science skills or obscure equipment. Most of the ingredients are everyday household items.
- Visually Stunning: The explosion of colors creates a mesmerizing display that can captivate anyone’s attention.
- Educational Value: While it’s fun, the experiment also provides insights into chemistry concepts like surface tension and emulsification.
- Safe for Kids: All the materials used are non-toxic and safe for children, making it a worry-free activity.
- Great for Groups: This experiment can be performed with varying group sizes, making it perfect for classrooms or family gatherings.
These attributes create opportunities for engaging discussions about science, and they'll surely make anyone appreciate the beauty of physical chemistry!
Preparation and Cooking Time
Preparing for the Magic Milk Experiment is hassle-free and doesn’t take much effort. Here’s a breakdown of the time needed:
- Preparation Time: 10 minutes
- Experiment Duration: About 15 minutes (for the actual experiment)
- Total Time: Approximately 25 minutes
This timeframe might vary slightly based on how organized you are, but in general, you can accomplish this mesmerising activity in a short amount of time.
Ingredients
- 1 cup whole milk (or any milk)
- 3-4 drops of various food coloring
- 1 teaspoon dish soap (preferably clear)
- A shallow dish or plate
- Cotton swabs or toothpicks for swirling
Step-by-Step Instructions
To achieve the stunning results of the Magic Milk Experiment, follow these steps carefully:
- Prepare Your Workspace: Start by gathering all your ingredients and materials on a flat surface. A clean table or countertop works well.
- Pour the Milk: In your shallow dish, pour enough milk to cover the bottom (about 1 cup). You want a nice pool of milk for the colors to play in.
- Add Food Coloring: Next, add 3-4 drops of different food coloring into the milk. Place them in various spots, but don’t overdo it; a little goes a long way!
- Prepare Your Soap: Dip a cotton swab or toothpick into the dish soap. You can also pour a tiny amount of soap into the center of the milk if that’s easier.
- Make the Magic: Touch the soapy end to the surface of the milk. Watch as the colors explode and swirl away! If you’re using a cotton swab, use it to stir gently for an even more vibrant display.
How to Serve
While the Magic Milk Experiment isn’t a meal to serve per se, you can enjoy it in a few fun ways:
- Create an Art Display: After completing the experiment, consider allowing everyone to create their colorful masterpiece on paper or canvas using the colors. The blending and swirling can create beautiful designs that can be framed!
- Document the Process: Take photos or videos of the experiment as it unfolds. Share them with family or friends to showcase the mesmerizing science in action.
- Discuss the Science: After the activity, hold a quick discussion on what happened. Talking about surface tension and how soap disrupts the milk's surface tension can amplify the educational experience.
- Try Different Variations: Experiment with different types of milk (whole, skim, or alternative milks) and see how they affect the results. You can also explore the effects of different dish soaps.
- Follow Up with Related Experiments: Using the excitement and curiosity generated by this experiment, plan subsequent activities exploring related science concepts. Consider mixing baking soda and vinegar or making slime to maintain their engagement!
By considering these creative twists, you can ensure that your Magic Milk Experiment becomes a memorable and educational experience for everyone involved.
Additional Tips
- Experiment with Colors: Try using different food coloring combinations to see how the colors interact. This can lead to even more remarkable visuals.
- Use Whole Milk: For the most vibrant results, stick with whole milk as it has a higher fat content, which enhances the color movement.
- Try Different Soaps: While dish soap works wonderfully, you can experiment with other types of liquid soap to observe varying reactions.
- Safety First: Always supervise young children during the experiment to ensure they handle the materials safely.
Recipe Variation
You can modify the Magic Milk Experiment to keep things fresh and exciting. Here are a few variations to consider:
- Rainbow Effect: Instead of just 3-4 drops of food coloring, utilize a full set of rainbow colors for an even more spectacular display.
- Alternative Milks: Experiment with almond, coconut, or oat milk for different results. Each milk type will react uniquely.
- Scented Soaps: Use scented liquid soaps to add an olfactory element to the experiment. Kids can enjoy scents while visualizing the chemistry!
- Color Bombs: Instead of using liquid food coloring, try adding drops of gel food coloring for a more intense color output.
Freezing and Storage
While the Magic Milk Experiment is best enjoyed fresh, here are some tips if you want to store leftovers or re-create aspects of the experiment later:
- Storage: Any leftover milk mixture should be discarded right after the experiment. It’s not advisable to keep it due to its perishable nature.
- Preparation for Next Time: If you plan to repeat the experiment, you can prepare your materials in advance. Pre-measure the food coloring and soap into small containers for future use.
Special Equipment
This experiment does not require specialized equipment, but a few basic tools can enhance the experience:
- Shallow dish or plate
- Cotton swabs or toothpicks
- Measuring spoons for precise soap quantities
- A camera for capturing the magic of swirling colors!
Frequently Asked Questions
How does the dish soap affect the milk?
Dish soap breaks down the fat molecules in the milk, reducing the surface tension and causing the colors to move and swirl spectacularly.
Can I use other liquids instead of milk?
Yes, you can try various liquids like cream or even yogurt. Keep in mind that the visuals might vary in intensity.
What happens if I add too much food coloring?
Adding excessive food coloring can muddy the effect and result in less distinct colors. It’s best to start with a few drops and add more if needed.
Is the experiment safe for young children?
Yes, the materials used are safe and non-toxic. However, adult supervision is recommended.
How long does the magic last?
The initial spellbinding effect of the colors will last a few minutes before they start to settle, so enjoy it while it lasts!
Conclusion
The Magic Milk Experiment is not just an educational activity; it’s a celebration of color and chemistry. By engaging in this enchanting experiment, you will open your children's eyes to the wonders of science, all while enjoying colorful dynamics in your kitchen. With its ease of preparation and incredible results, this experiment is sure to become a favorite in your household.
Draw inspiration from these guidelines and variations, and make the Magic Milk Experiment a captivating experience for all ages. It’s a delightful way to combine learning with creative fun!