How to Make Rainbow Soap Foam: A Step-by-Step Guide to Colorful Fun
Hello, fellow crafters! Today, I am thrilled to share with you one of my favorite DIY projects: making Rainbow Soap Foam. This vibrant, bubbly creation is not only visually stunning but also incredibly fun for all ages. Whether you’re looking for an engaging activity for your kids, a unique sensory experience, or an eye-catching creation for a party or event, Rainbow Soap Foam is the way to go!
Why Rainbow Soap Foam?
You may be wondering, “What makes Rainbow Soap Foam so popular?” As a seasoned crafter, I can tell you that its appeal lies in its mesmerizing colors, the delightful textures, and the sheer creativity it inspires. Each layer of color brings joy, making it perfect for birthday parties, science experiments, sensory play sessions, or simply a therapeutic crafting moment at home.
This project can be enjoyed year-round, whether you’re celebrating spring with bright pastels or spicing up a winter day with rich jewel tones. Plus, it’s an excellent opportunity to teach kids about colors and mixing, and let’s be real—the joy of playing with foam is universal!
What You’ll Need
Before we dive into the steps, let’s gather all our supplies. Here’s a comprehensive list of materials needed for this bubbly adventure:
- Liquid dish soap (1 cup)
- Warm water (1 cup)
- Food coloring (multiple colors)
- Bowl or container (for mixing)
- Electric mixer or whisk (for whipping)
- Measuring cups
- Optional: essential oils (for a fragrant touch)
- Plastic squeeze bottles (if you want to store the foam for later use)
- Apron (to avoid any spills on your clothes)
Step-by-Step Tutorial
Step 1: Prepare Your Workspace
First and foremost, I like to set up my workspace to prevent any messes. Lay down some old newspapers or a tablecloth to catch any foam that escapes during the mixing process. Make sure you have everything within arm's reach because once you start mixing, it's hard to pause!
Step 2: Mixing the Soap and Water
In your mixing bowl, combine 1 cup of liquid dish soap with 1 cup of warm water. This specific ratio is vital because using too much soap can lead to a thick, gloopy consistency rather than the fluffy foam we desire! Stir the mixture gently until the soap is well dissolved in the water. Be careful not to create bubbles just yet; we want a smooth base.
Tip: If you notice some soap clumps, use your whisk to break them up—this makes your foam smoother!
Step 3: Adding Color
Now comes the fun part—color! Divide your soapy mixture into separate bowls, as many as you want colors. I usually stick with the primary colors: red, yellow, and blue. Feel free to add whatever colors you like! Using a dropper or a toothpick, add a few drops of food coloring into each bowl and gently mix until the colors are vibrant and well combined.
Personal Anecdote: The first time I made this with my niece, I let her choose the colors. We ended up with some interesting combinations (let’s just say, purple and green aren’t always a hit), but the laughter we shared was priceless!
Step 4: Whipping Up the Foam
Place your mixed soapy solution into your electric mixer. Here’s where the magic happens! Begin mixing on a low speed to incorporate air until the foam develops. Then, increase to a high speed, whipping until it resembles soft peaks. This should take about 3-5 minutes.
Important Note: If you over-whip, you might just create soap bubbles instead of foam. If this happens, don’t despair! Just add a touch more water to loosen it up and mix again.
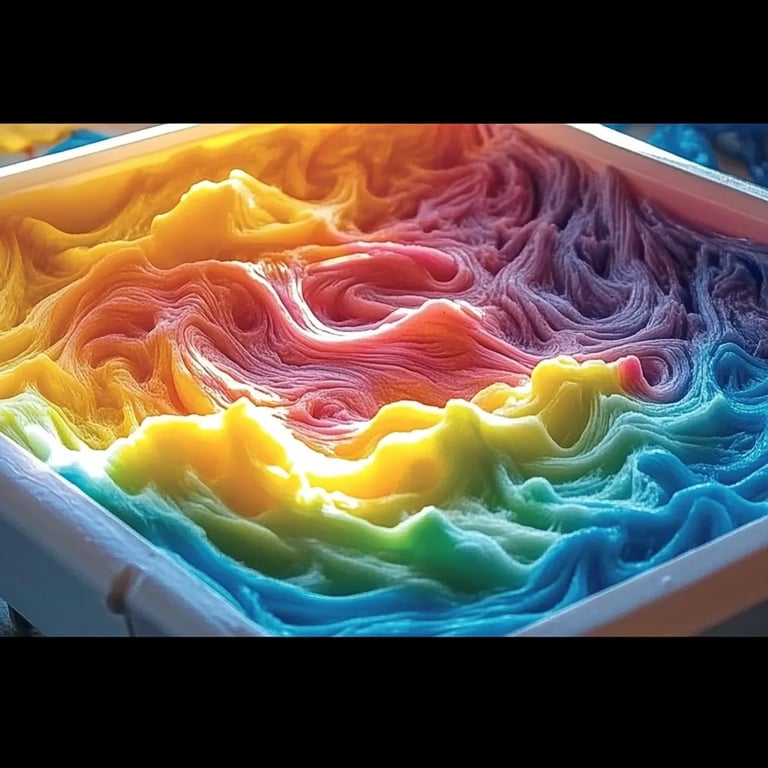
Step 5: Layering the Foam
Once your soaps are whipped into foamy goodness, it’s time to layer your colors! You can either use your hands (for a more tactile experience) or a spatula to layer the foam into a clear container. Begin with your lightest color at the bottom and work your way up to the darkest color. This creates that beautiful rainbow effect.
Safety Warning: As you layer, be mindful of overfilling your container, as the foam can overflow!
Step 6: Play and Explore
Now, the best part—playtime! You can either use the foam immediately or store it in plastic squeeze bottles. I love to set up a crafting station outdoors during warm weather so everyone can enjoy the colorful fun while staying clean!
Creative Variations
If you’re feeling extra adventurous, here are a few variations to take your Rainbow Soap Foam to the next level:
- Scented Foam: Add a few drops of essential oils like lavender or citrus to the soap mixture for a refreshing scent.
- Glow-in-the-Dark: Try using glow-in-the-dark food coloring for a magical nighttime play experience.
- Craft Paints: Instead of food coloring, you can experiment with non-toxic craft paint for more vivid colors.
- Bubble Popping Game: Fill a kiddie pool with the foam and have a bubble popping contest with plastic toys.
Conclusion
With just a few simple ingredients and steps, you’ve now created your own Rainbow Soap Foam! This colorful concoction can bring joy to your home and create memorable moments with family and friends. Remember, crafting is all about experimentation, so don’t hesitate to try alternative colors or scents, and embrace any delightful accidents that happen along the way!
I hope you find as much joy in making and playing with Rainbow Soap Foam as I have. Happy crafting, and don’t forget to share your creations and variations with your fellow crafters!