How to Make Puffy Sidewalk Paint: A Crafter’s Guide to Fun and Creativity
Hello, fellow crafters! Today, I’m thrilled to share one of my all-time favorite DIY projects: Puffy Sidewalk Paint. This vibrant, textured paint is a fantastic way for kids (and adults!) to express their artistic side outdoors. Think of it as a magical combination of art and play – the colors are bright, the texture is fluffy, and, best of all, it easily washes away with the rain or a garden hose, making cleanup a breeze.
In recent years, Puffy Sidewalk Paint has gained popularity for family gatherings, outdoor birthday parties, and creatively engaging summer afternoons. Whether you're looking to get messy with the kids or want a creative way to decorate your driveway, this project is not to be missed. Let’s dive in and create some puffy magic!
What You Need for Puffy Sidewalk Paint
Before we get started, let’s gather our materials. The beauty of this project is how accessible and simple it is! You likely have most of these items around your home.
Materials:
- Cornstarch (1 cup): This is the main ingredient that gives our paint its puffy texture.
- Water (1 cup): Helps to blend everything and adjust the consistency as needed.
- Food coloring or washable paint: Use your favorite colors to create vibrant artwork. I recommend liquid food coloring for bright pastels, while washable paint offers deeper hues.
- Containers (like plastic cups or small bowls): For mixing the paint.
- Whisk or spatula: To stir and combine the ingredients.
- Old towels or tarps: Lay these down to protect your work area (and keep cleanup simple).
Optional:
- Squeeze bottles or paintbrushes: For more precise painting.
- Baking soda (for an extra puffy effect): Some people like to add a teaspoon for added texture.
Step-by-Step Tutorial: Making Puffy Sidewalk Paint
Let’s roll up our sleeves and get started! Follow these steps meticulously to ensure your Puffy Sidewalk Paint comes out just right.
Step 1: Combine Cornstarch and Water
In a mixing bowl, combine 1 cup of cornstarch with 1 cup of water. The cornstarch is what gives our paint its fluffy, puffy quality. It’s essential to add the water slowly to avoid clumps.
Why This Matters:
- The ratio of cornstarch to water is crucial for achieving the desired texture. Too much water will result in a runny paint, while too little will make it difficult to mix.
Potential Problem: Clumps
If you notice clumps forming, simply keep whisking! Using a whisk can help break them down. If you’re struggling, feel free to use a blender for a smoother consistency.
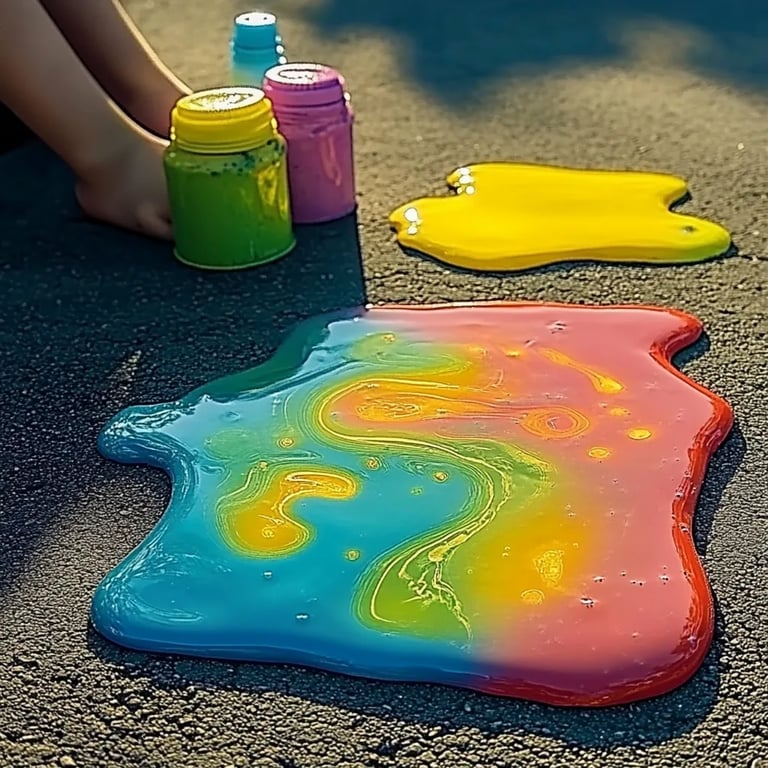
Step 2: Add Color
Once your corn starch and water mixture is smooth, it’s time to bring in the fun! Add your liquid food coloring or washable paint. You can start with around 10 drops of food coloring for each cup of paint. Mix until you achieve the desired shade.
Why This Matters:
The excitement of Puffy Sidewalk Paint is in the colors! Be generous and mix multiple colors in different bowls to keep it lively and creative.
Color Tips:
If you want to create more hues, consider blending colors. For instance, mix blue and yellow to create green, or red and blue for a fun purple.
Step 3: Mix Until Uniform
Use your whisk or spatula to mix everything together until the color is uniform. If the paint seems too thick for your liking, gradually add a little more water until it reaches your preferred consistency.
Why This Matters:
A well-mixed paint allows for better application and helps maintain the fluffiness once applied to the sidewalk.
Consistency Check:
Aim for a thick, creamy texture—almost like cake batter. Too thin, and it will run off; too thick, and it won’t puff up.
Step 4: Create Your Art!
Now comes the exciting part—painting! You can use your hands or paintbrushes, or if you’re a fan of precision, transfer your paint into squeeze bottles. I love the texture of using my fingers to paint, as I can feel the fluffiness of the paint.
Why This Matters:
Experimenting with application methods can lead to different textures and effects.
Safety Warning:
This paint is non-toxic, but as with any crafting activity, supervise young children, particularly if they tend to put things in their mouths.
Creative Variation:
Consider mixing in glitter or sand to add an extra magical touch to your creations. Experimenting with different surfaces—like old cardboard or wooden planks—can yield interesting results too!
Step 5: Enjoy and Wash Away
Once you’re done creating your masterpiece, let the paint dry for a bit. It will puff up and harden slightly, creating a 3D effect. And when you’re ready to clean up, simply let the rain do its work or use a spray hose for quick removal!
Fixes for Common Issues
- Too Thick? Add more water gradually and mix thoroughly.
- Too Thin? Add a bit more cornstarch to thicken it up.
- Colors Mixing Too Much? Try separating colors with crisp lines and careful brush techniques.
Tips for Success and Conclusion
As an experienced crafter, I’ve learned a few tricks over the years:
- Time Your Project: Puffy Sidewalk Paint is best for dry days. If it’s too humid, it may not puff up as effectively.
- Experiment Freely: Let your creativity guide you. Try using stencils, experimenting with patterns, or even layering colors for depth.
- Storage Tips: If you have leftover paint, you can store it in an airtight container for a couple of days, although I highly recommend using it fresh for the best results.
Crafting should be fun, messy, and filled with joy. I hope you enjoyed this guide on making Puffy Sidewalk Paint and that you feel inspired to get outside and create some sidewalk magic with your loved ones. Remember, art is about expression, so don’t worry about perfection—just enjoy the process! Happy painting!