How to Make Pressed Flower Lanterns: A Detailed Guide from My Crafting Heart to Yours
Hello, dear crafters! Today, I am excited to share a wonderfully whimsical project that I adore: pressed flower lanterns. These enchanting decorations not only illuminate your space but also capture the beauty of nature, turning simple flowers into exquisite art. Whether used for a cozy evening outdoors, a romantic dinner, or a magical celebration, these lanterns can add a unique touch to your ambiance.
As a long-time crafting aficionado, I've found that pressed flower lanterns are increasingly popular with DIY enthusiasts and flower lovers alike. Their versatility allows for personal expression, making them perfect for any season or occasion—be it a spring soirée, summer picnic, fall gathering, or a winter celebration. Plus, there’s something so warm and inviting about the soft glow of light filtering through delicate petals. So, grab your crafting supplies, and let’s embark on this creative journey together!
What You'll Need
Before we dive into the tutorial, let's gather our materials. Don’t worry; you likely already have most of these at home:
Essential Materials:
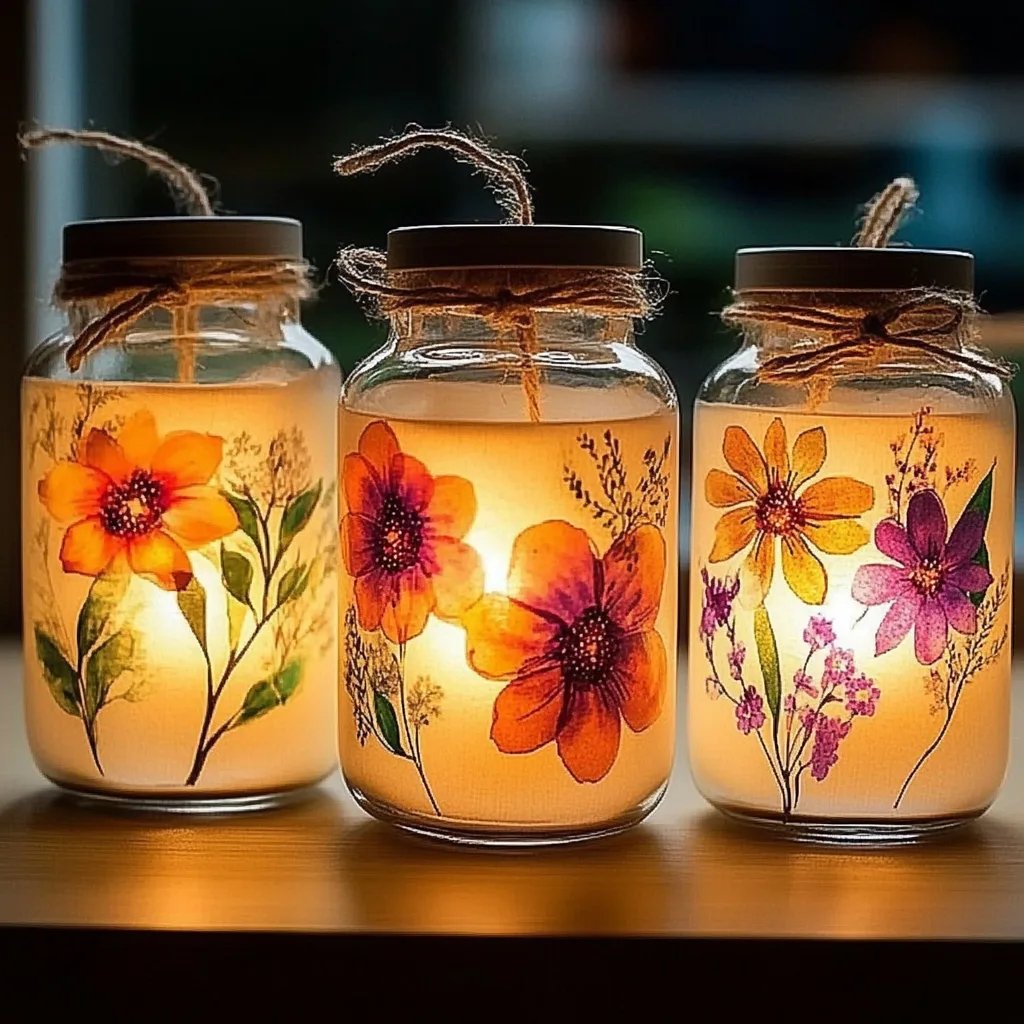
- Pressed Flowers: Any variety you love—daisies, pansies, violets, or ferns work beautifully.
- Glass Lanterns or Vases: Clear glass jars with an opening wide enough to fit your hand in are perfect.
- Mod Podge or PVA Glue: This will serve as your adhesive and sealant.
- Paintbrush: To apply the glue.
- LED Tea Light Candles: These are safer than real candles and work wonderfully for this purpose.
- Wax Paper or Plastic Wrap: To protect your work surface.
Optional Materials:
- Twine or Ribbon: For embellishing the lanterns.
- Spray Sealant: If you want your creation to last longer or be weatherproofed.
- Scissors: To trim your flowers if necessary.
- Tweezers: For careful placement of flowers.
Step-by-Step Tutorial
Step 1: Gather and Press Your Flowers
Why this step matters: Selecting and pressing flowers is foundational for creating stunning lanterns.
- Choose Your Flowers: In early morning or late afternoon, when the flowers are hydrated, gather your favorites. Look for those that are flat and not too bulky.
- Pressing:
- Place your flowers between two sheets of wax paper or inside a heavy book. You can also use a flower press if you have one. The key is to ensure they're flat and even.
- Allow them to press for at least 1-2 weeks. Patience is vital, but you can check them earlier if you’re in a hurry.
Step 2: Prepare Your Workspace
Why this step matters: A clean and organized workspace means a successful crafting session!
Find a flat surface and cover it with wax paper or plastic wrap to catch any spills. Have your materials close at hand, as this makes the process more enjoyable.
Step 3: Apply Glue to Your Lantern
- Brush the Glue: Using your paintbrush, apply a thin layer of Mod Podge or PVA glue on the section of the glass where you want to attach your flowers. Remember, a little goes a long way!
What could go wrong: Applying too much glue can lead to a messy appearance. If this happens, just dab with a paper towel to remove the excess, then retry.
Step 4: Place the Flowers
- Arrange Your Flowers: Use tweezers if necessary to position your pressed flowers onto the glue. Place them thoughtfully to ensure a lovely composition.
- Adhering the Flowers: Once you're happy with the placement, gently brush another thin layer of glue over the flowers to seal them in place. Let it dry for 15-20 minutes.
Tip: Don’t be afraid to overlap flowers; it creates texture and interest.
Step 5: Add Additional Layers
If you desire, apply more flowers using the same method, layering until you achieve your desired look. Ensure they are completely dry before moving onto the next layer.
Step 6: Seal Your Lantern
Once you’re satisfied with your design, apply a final coat of Mod Podge over everything to ensure it’s secure and somewhat weatherproof if you choose to use it outdoors.
Safety Warning: Avoid introducing direct sunlight to your lantern for long periods, as it can fade the colors over time.
Step 7: Final Touches and Light It Up!
- Insert Your LED Tea Light: Place the light source inside your lantern.
- Embellish (Optional): If you wish, tie a piece of twine or ribbon around the opening for a rustic touch. This step can personalize your lantern even more!
Step 8: Enjoy Your New Lantern!
Find a perfect spot for your lantern—be it your dining table, patio, or even as a part of your holiday decor.
Personal Anecdote: My First Experience
I recall the first time I crafted a pressed flower lantern. I was hesitant, not knowing if I could achieve the delicate look I envisioned. But as I watched the light shine through the petals, illuminating every petal and bringing forth colors I had only dreamed of, I was hooked. It became a part of my home, a conversation starter, and a reflection of my personality. Remember, crafting should be fun, so let your creativity flow!
Creative Variations
Feel free to experiment! Here are some variations to consider:
- Seasonal Themes: Use autumn leaves, pine needles, or even winter florals for candles in colder months.
- Different Lighting: Try using colored LED lights for a vibrant effect.
- Layer with Textures: Incorporate lace or burlap into your design for added charm.
Conclusion
I hope this detailed guide inspires you to embark on your own pressed flower lantern adventure. There’s nothing quite like seeing your artistic touch come to life in the glow of a lantern. Keep in mind that every creation is unique, just like you! So, don’t stress about perfection—focus on the joy of crafting.
Whether you're prepping for a special occasion or simply embracing your love for nature, these lanterns will bring charm and warmth into your life. Happy crafting, and may your flowers shine bright!