How to Make Glue Suncatchers: A Step-by-Step Guide to Colorful Creations
As an experienced crafter, I can hardly contain my excitement every time I think about making glue suncatchers. These delightful crafts are not only simple to create but also something to behold when sunlight streams through them, casting a kaleidoscope of colors in your space. Perfect for a rainy day activity, a classroom project, or even a festive decoration, glue suncatchers offer an opportunity for creativity and imagination to shine brightly.
In this guide, I’ll share my comprehensive process for making glue suncatchers that you can enjoy making with your family or friends. From selecting the materials to hanging your stunning creations in the window, I will walk you through each step with tips, tricks, and personal anecdotes to help you along the way.
What Are Glue Suncatchers?
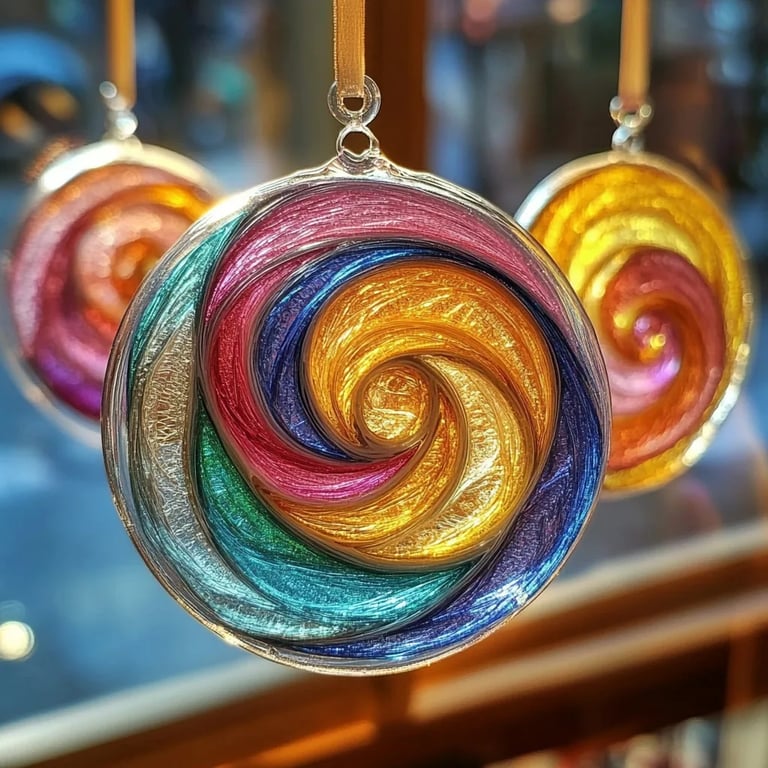
Glue suncatchers are colorful, translucent designs made from ingredients that commonly include glue, food coloring, and parchment paper. They can be crafted into various shapes, such as hearts, flowers, or even abstract designs. When hung in a window, they catch sunshine and create dazzling displays and reflections throughout your home.
The popularity of suncatchers comes from their versatility. They are ideal for all ages, allowing children to express their creativity and adults to indulge their artistic side. I love using them to spruce up my windows for every season—from floral motifs in spring to snowflakes in winter.
Materials You'll Need
Before we dive into the crafting process, here’s your materials checklist:
- Clear PVA glue (craft or school glue works well)
- Food coloring (various colors for vibrant designs)
- Parchment paper or wax paper
- Cardstock (for templates if desired)
- Scissors
- Paintbrushes (one for each color is handy)
- Bowl or tray (to mix the colors)
- Squeegee or a credit card (for spreading glue)
- String or fishing line (for hanging)
Step-by-Step Tutorial
Step 1: Prepare Your Workspace
Start by organizing your workspace. Lay down some newspaper or an old tablecloth to protect your surfaces from glue spills. Gather all the materials and tools you need.
Tip: It’s always a good idea to have wet wipes or paper towels handy for quick clean up. Kids can often be messy, and that’s part of the fun!
Step 2: Create Your Design Template
If you're not confident in free handing your shapes, trace out your desired designs onto cardstock to create templates. You can draw simple shapes or print outlines for advanced designs from the internet. Without templates, free drawing can be a fun and challenge, which adds to the creative process!
Note: Keep in mind that more intricate shapes may be harder to work with, especially for little hands.
Step 3: Mixing Your Glue and Color
In a bowl or tray, mix clear PVA glue with your chosen food coloring. The more food coloring you add, the bolder your colors will be! For a pastel effect, use less coloring.
- Why this step matters: The glue acts as the base for your suncatcher, while the food coloring brings life and vibrance to your artwork.
Tip: Experiment with different color combinations! I once made a lovely sunset suncatcher using yellow, orange, and pink—it's one of my favorites.
Step 4: Apply the Glue Mixture
Cut your parchment paper into manageable sizes, typically around 8×10 inches. Place the parchment on a flat surface, and start applying the glue mixture using a paintbrush or your finger (gloved, if you prefer). Spread out the mixture, creating a thin, even layer.
What could go wrong: If your layer is too thick, it may not dry clear and can become cloudy. If this happens, you can scrape it off and start again!
Tip: Use different colors side by side or even layer them to create a marbled effect—it can be stunning!
Step 5: Drying Process
Once you’re satisfied with your suncatcher’s design, carefully lift it and place it on a flat surface to dry. This can take anywhere from six hours to overnight, depending on the thickness of your glue.
What to watch for: To avoid blemishes, keep it away from drafts and airflow, as they may cause the glue to lift or crack while drying.
Step 6: Cutting Out Your Design
Once everything is dry, it’s time to cut out your suncatcher! Use scissors to cut around the design, maintaining a uniform edge.
Tip: Leave a slight border of parchment if you’re worried about edges lifting.
Step 7: Hanging Your Suncatcher
Use a hole punch to create a hole at the top of your suncatcher. Then thread your string or fishing line through the hole. Hang it in a sunny window where it can capture the light.
Alternative methods: Instead of hanging, you can glue your suncatcher onto solid surfaces, like the inside of a glass door!
Safety Warnings and Considerations
- Supervision with young crafters: Ensure kids are using scissors only with adult supervision.
- Be cautious with food coloring: It can stain surfaces, clothes, and skin; wearing old clothes is advisable.
Personal Anecdotes
One of my fondest memories involves a rainy summer afternoon spent making glue suncatchers with my young niece. We spent hours mixing colors and giggling as we got glue on everything. The colorful masterpieces that adorned her window became a symbol of our time together—every time the sun would shine through, it brightened her room and created joyful memories once more.
Creative Variations
- Layering Technique: Try applying multiple layers of colored glue, allowing each to dry before adding the next. This creates a striking depth of color.
- Nature-Inspired: Press leaves or flowers into your design for added texture, creating a beautiful nature-themed suncatcher!
- Seasonal Themes: Craft suncatchers aligning with holidays—think pumpkins for Halloween or stars for Fourth of July.
In Closing
Making glue suncatchers embodies the spirit of creativity and togetherness. By following these steps, you can create your own personal masterpieces that can brighten any day! Whether you keep them for yourself, gift them to loved ones, or use them in festive decorations, these suncatchers hold the potential for endless fun and heartfelt creation.
Now, gather your materials and let your imagination shine through your next crafting session. I can’t wait to hear about your colorful creations! Happy crafting!