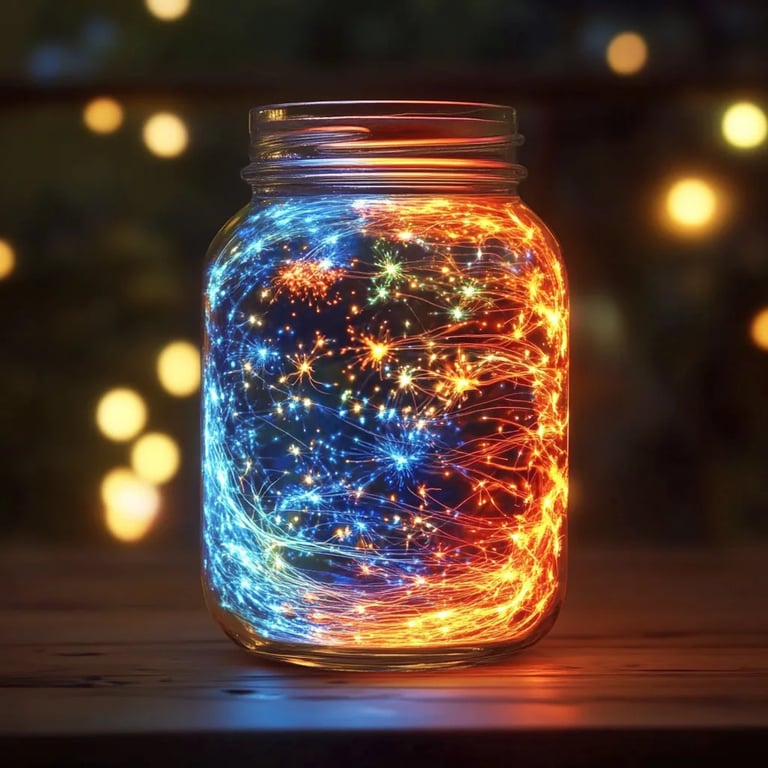
How to Make Fireworks in a Jar: A Sparkly Crafting Adventure
As a seasoned crafter, I’m always on the lookout for fun and vibrant projects that ignite creativity. One such dazzling craft is the mesmerizing “Fireworks in a Jar.” This simple DIY project brings the thrilling explosion of colors and lights of fireworks right to your own home—minus the noise and danger. Whether you’re celebrating a special occasion, ringing in the New Year, or simply want to add a pop of color to a gathering, these captivating jars are a fantastic centerpiece or gift that will awe your guests and spark joy in any space.
In this detailed guide, I’ll walk you through the process of creating your own Fireworks in a Jar, sharing tips, tricks, and insights from my personal experience. You’ll learn what materials to use, how to execute each step effectively, and even some creative variations to customize your fiery creation. So, grab your crafting supplies, roll up your sleeves, and let’s get started!
Why Are Fireworks in a Jar So Popular?
The beauty of the “Fireworks in a Jar” project lies in its visual appeal and the excitement it brings. Children and adults alike are mesmerized by the swirling colors that resemble bursting fireworks. These jars not only serve as fantastic decorations but also offer an educational twist. It’s a wonderful way to demonstrate liquid density and the effects of oil and water—making it a perfect science experiment for kids, too!
When to Use Fireworks in a Jar
- Celebratory Occasions: New Year’s Eve, Fourth of July, or birthday parties
- Decorative Centerpieces: For events, home decor, or seasonal decorations
- Gifts: Handmade gifts for family and friends that show thoughtfulness
- Educational Tool: A fun way to teach kids about science and color mixing
Materials Needed
Here’s a comprehensive list of materials you will need for this exciting craft. Most of these should be accessible from your local grocery store or crafting supply store.
Basic Ingredients
- Water: The base of your fireworks.
- Vegetable Oil: This will create the stunning fireworks effect.
- Food Coloring: Choose vibrant colors like red, blue, green, and yellow.
- Clear Glass Jar or Container: Use any clear jar to showcase your creation beautifully.
- Bowl: For mixing the oil and food coloring.
- Toothpick or Skewer: Optional for swirling the colors further.
Optional Additions
- Glitters: To add an extra sparkle to your fireworks.
- Essential Oils: For a pleasant scent.
- Plastic Syringe or Dropper: For more controlled dispensing of the dye.
Step-by-Step Tutorial
Step 1: Prepare Your Workspace
Before diving into the crafting process, I recommend setting up a clean, well-lit workspace. Lay down some newspaper or an old cloth to catch any spills, as things can get a little messy—and we all know that cleanup can be a hassle afterward!
Step 2: Fill the Jar with Water
Begin by filling your clear glass jar about three-quarters full with water. This will serve as the backdrop for your fireworks. It’s essential to use clear water so that the colors stand out vibrantly!
Step 3: Make Your Colored Oil Mixture
In a separate bowl, pour a few tablespoons of vegetable oil. Then, take your food coloring and add a few drops into the oil—one at a time! Here’s where you can get creative; mix different colors; red with yellow for orange, or blue and green for a teal effect.
Why This Step is Important:
The oil and food coloring react interestingly due to their differing densities. The oil will float on top of the water. If you add too much food coloring at once, you might make a color blob rather than the spectacular fireworks effect.
Step 4: Create the Fireworks Effect
Using a toothpick or skewer, gently swirl the oil and food coloring mixture so that it’s mixed but not overly blended. You want to create small droplets of color rather than a uniform mix.
Tip:
When you’re adding the colored oil to the water, you can either drizzle it in or let it drop down from a height for a more dramatic effect!
Step 5: Pour the Color into the Jar
Now, slowly drizzle the colored oil mixture into the jar filled with water. Watch in amazement as the colored droplets sink, burst, and create stunning fireworks-like patterns!
What Could Go Wrong:
Sometimes, the colors won't disperse well if you’ve added too much oil or food coloring. The fix? Simply add more plain vegetable oil until you achieve the desired look.
Step 6: Add Optional Sparkles
For an enchanting touch, sprinkle some glitter into the jar. The glitter will catch the light and add an extra layer of magic to your fireworks display.
Step 7: Display and Enjoy
Your Fireworks in a Jar is complete! Place it somewhere that catches the light to truly appreciate its beauty. Shake it gently before displaying for an entirely new burst of colors!
Safety Warnings
- Avoid Skin Contact: Food coloring can stain your skin and clothes, so wear an apron and gloves if you’re concerned.
- Supervision for Kids: If you're crafting with children, supervise them closely, especially when using glass jars.
Creative Variations
- Themed Colors: For the Fourth of July, use red, white, and blue. For Halloween, think orange and black!
- Layered Fireworks: After creating one layer, let it settle, and then add another layer of water and continue to create different colored bursts.
- Scented Fireworks: Add a few drops of essential oil into the oil mixture to give your jars a lovely aroma.
Final Thoughts
Crafting Fireworks in a Jar has brought so much joy into my home and I hope it inspires you as well. This project is more than just a stunning decoration; it’s a vibrant explosion of creativity that you can easily master, regardless of your crafting experience.
So gather your materials, summon your inner artist, and revel in the mesmerizing beauty of your creation. Remember, the only limit is your imagination, so don’t hesitate to experiment and make it your own. Happy crafting!