How to Make Edible Aquarium Terrariums: A Step-by-Step Guide
Introduction
Welcome to the world of edible aquarium terrariums! There’s something undeniably delightful about these whimsical creations—a playful twist on the traditional terrarium, combining the beauty of an aquatic environment with the sweetness of a dessert. As an experienced crafter—and someone who has spent countless evenings experimenting with colorful candies and gelatin—I can tell you these stunning edible terrariums aren’t just visually captivating; they’re also incredibly fun to make and enjoy. Perfect for parties, birthday celebrations, or as unique gifts, these treats turn heads and taste buds alike.
Why are Edible Aquarium Terrariums So Popular?
In recent years, the trend of edible terrariums has taken the culinary world by storm. They provide a unique way of blending art and edibility. Each terrarium is customizable, allowing you to personalize it based on themes, colors, and flavors. Plus, they are ideal for various occasions—from children’s parties to adult gatherings, or as a fun weekend project with friends.
Materials You Will Need
Before we dive into the crafting process, let’s gather our supplies:
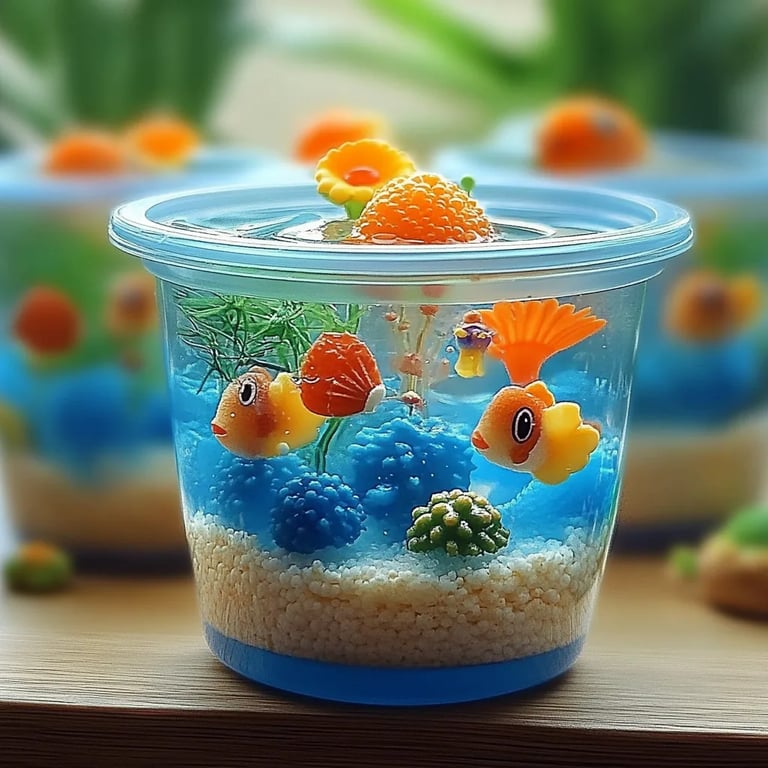
- Clear Glass Container: A fishbowl or a clear vase works wonderfully.
- Flavored Gelatin: I prefer using blue raspberry or lime for its aquatic feel.
- Water: You’ll need this for the gelatin.
- Gummy Candies: Fish, sea creatures, or colorful rocks add a playful touch.
- Whipped Topping or Whipped Cream: To mimic “waves.”
- Food Coloring (optional): If you want to enhance the colors of the water or “sand.”
- Spoon or Small Scissors: For precise placements.
- Straws: Can be used for fun “bubbles.”
- Crushed Graham Crackers or Candy Sand: For a sandy effect at the bottom.
Step-by-Step Tutorial
Step 1: Prepare the Gelatin
Start by making your flavored gelatin.
- Why It Matters: This foundational layer creates the "water" for your aquarium.
- boil water: Bring 2 cups of water to a boil.
- Mix in the gelatin: Add your gelatin powder and stir until fully dissolved.
- Cool Down: Allow your mixture to cool slightly. If you're using food coloring to add a fun twist, this is your chance to mix it in!
Tips to Avoid Common Pitfalls:
- If your gelatin mixture is too hot, it may cause your gummies to melt. Let it cool to a warm temperature before the next step. If you accidentally melt some gummies, don’t fret; simply cut those sections into more whimsical shapes!
Step 2: Assemble the Base
Now that your gelatin mixture is ready, it's time to assemble the base.
- Layer the Bottom: Pour a layer of crushed graham crackers or cookie crumbs into your clear glass container. This represents the “sand” on the ocean floor.
- Why It Matters: This base layer adds structure and an aesthetic appeal, mimicking how actual aquariums have a substrate.
- Pour in the Gelatin: Gently pour the gelatin mixture over the crushed crackers. Fill it to about halfway, leaving room for additional layers.
Potential Issues and Fixes:
- If the gelatin is too thick when you pour it, create air bubbles. If needed, heat it slightly to make it easier to pour. If you've poured too much, simply remove some with a spoon.
Step 3: Add Your Edible Decorations
While the gelatin is still somewhat jiggly (not fully set), it’s time to add your aquatic creatures.
- Insert Gummy Candies: Carefully place your gummy fishes, sea turtles, or other decorations into the gelatin. Push them in enough to be stable but not so much that they sink completely to the bottom.
- Personal Tip: I love using multicolored gummy candies to represent different “aquatic plants.”
Step 4: Let It Set
Place your terrarium in the refrigerator. This will allow the gelatin to fully set.
- When to Check: In about 2-4 hours, check if it has solidified.
Step 5: “Wave” Decoration
Once the gelatin is fully set, it’s time to give it a wave effect!
- Top with Whipped Cream: Carefully add a layer of whipped cream or whipped topping on top of your terrarium mixture to mimic the ocean’s foam.
- Why Do This? It not only enhances the ocean aesthetic but adds a delightful creaminess.
Step 6: Final Touches
Now for a little fun!
- Add Straws: Insert colorful straws to create “bubbles” in your aquarium.
- Garnish with Extra Gummies: You can add extra gummies or even sprinkle in some edible glitter for added sparkle.
Creative Variations
- Beach Theme: Use crushed cookies as “sand” and scatter tiny candy shells for a beach effect.
- Fruit-Flavored Gelatin: Experiment with different flavored gelatin bases to suit your party theme.
- Tropical Twist: Include tropical gummies like pineapple, coconut, or watermelon to create a beachy oasis.
Safety and Storage Tips
- Food Allergies: Always ensure that your ingredients are allergy-safe, especially for gatherings.
- Storing: These terrariums can be kept in the fridge for up to 3 days, but they are best enjoyed fresh.
- Mess Management: If you’re working with children, lay down newspapers to make cleanup easier after crafting.
Final Thoughts
Creating edible aquarium terrariums fills me with joy, and I hope you find the same thrill in crafting yours. Remember, crafting is all about experimentation and having fun, so don’t stress if things don’t go perfectly the first time. Embrace the creativity, add your personal touch, and you’ll surely create a stunning treat that delights both the eyes and the palate.
Enjoy your crafting, and happy terrarium making!