How to Make DIY Nature Suncatchers: A Step-by-Step Guide to Bringing Nature Indoors
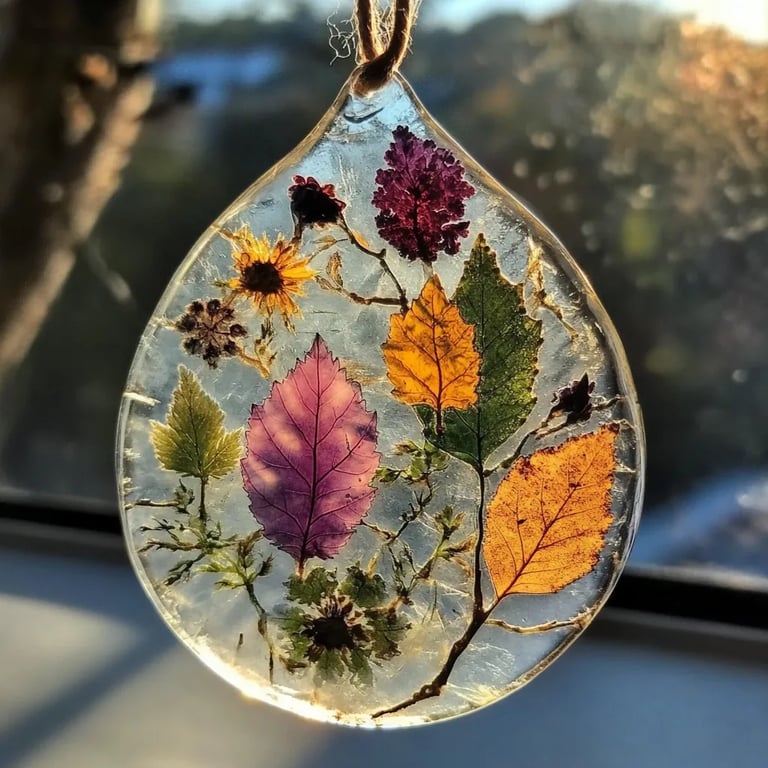
As an avid crafter and a lover of all things nature, I am excited to share with you one of my all-time favorite DIY projects: Nature Suncatchers! These beautiful creations not only bring a touch of the great outdoors into your home but also create mesmerizing displays of light when the sun shines through. Whether you hang them in windows, use them as garden decorations, or even present them as heartfelt gifts, nature suncatchers are versatile and satisfying to make. Today, I’ll take you through the entire journey of crafting your very own, with tips, insights, and plenty of enthusiasm to inspire you along the way!
Why Nature Suncatchers?
Nature suncatchers are particularly popular among crafters because they’re a fantastic blend of creativity and sustainability. Using materials that you can source from your backyard or local park, these suncatchers highlight the beauty of natural elements while transforming them into art. Plus, they’re perfect for all seasons and occasions: hang them to celebrate spring blooms, summer sunshine, autumn leaves, or even winter frost.
The calming act of creating with nature's gifts is incredibly rewarding, and the end result creates a delightful ambiance in any space.
Materials You’ll Need
Before we begin, let’s gather our supplies. Almost all of these components are accessible and inexpensive—making this project ideal for crafters of all ages!
- Translucent Material:
- Wax paper
- Clear plastic (like salad containers or plastic wrap)
- Contact paper
- Natural Elements:
- Dried flowers, leaves, twigs, or seeds
- Small pebbles or sand (optional)
- Adhesive:
- PVA glue or a glue stick
- A little patience!
- Scissors
- Acrylic or tempera paints (optional)
- String or twine for hanging
- An iron (for wax paper method)
Step-by-Step Tutorial
Step 1: Gather Your Materials
Take a leisurely walk in your garden or local park and collect your natural materials. Pay attention to colors, shapes, and textures that appeal to you. While you're at it, consider seasonal picks—think bright, vibrant flowers in spring and earthy leaves in autumn. The key is to pick items that press well and hold their shape.
Tip: Avoid collecting flowers that are toxic to pets or humans—check local guidelines if you're unsure!
Step 2: Prepare the Base
Using Wax Paper:
- Cut your wax paper: Decide on the shape and size of your suncatcher. I usually go for a simple circular form with a diameter of about 10 inches.
- Layer your wax paper: Cut two pieces of wax paper and layer them on top of each other. The wax paper will protect your decorations and hold them together once sealed.
Step 3: Arrange Your Natural Elements
Lay out the dried foliage and flowers on the bottom sheet of wax paper. It’s essential to arrange them in a way that pleases the eye. Don’t overcrowd them; a few striking pieces often work better than a cluttered assortment.
Common Pitfall: Make sure not to go too wild with the glue; too much adhesive can seep through and form visibility issues.
Creative Hint: If you find yourself with extra decorative items, you could always create smaller suncatchers or even a mobile!
Step 4: Secure the Elements
Once you're satisfied with your layout, carefully "paint" the back of each element with your glue, or simply use a glue stick. Once they are glued down, cover the design with the second piece of wax paper.
Step 5: Iron the Suncatcher
Important: Make sure you set your iron to a low heat and place a thin cloth over the wax paper. The goal here is to melt the wax slightly to create a seal, so go slow. When you touch it, it should feel warm, not hot.
Safety Warning: Be careful not to burn the wax or your hands, and always supervise kids during this step!
Step 6: Cut Out the Shape
After cooling for a few minutes, carefully cut around the suncatcher, leaving a small border of wax paper. This will ensure the design remains intact while allowing light to shine through freely.
Step 7: Create a Hanging Mechanism
Using your string or twine, make a small loop at the top of your suncatcher, gluing or tying it securely. This allows you to hang it in a window where the light can illuminate your masterpiece.
Step 8: Admire Your Work!
Now that you’ve created your very own nature suncatcher, hang it in a sunny spot and watch how the light refracts through your design, creating beautiful patterns and colors. You’ve not just made art; you’ve encapsulated a piece of nature!
Troubleshooting
Sometimes crafting doesn’t go as planned. Here are a few things that could go wrong and how you can address them:
- Issue: Flowers wilt or discolor.
- Fix: Try pressing the flowers for a few days before use. Alternatively, use press flowers from a craft store.
- Issue: Wax paper sticks to the iron.
- Fix: Always ensure the iron is set to low and use a cloth barrier; this prevents adhesion.
- Issue: Your suncatcher lacks definition.
- Fix: Consider layering colors in your natural materials—darker shades can add depth.
Personal Anecdotes and Variations
One of my fondest memories was crafting suncatchers with my daughter on a sunny afternoon. We found all sorts of treasures—from delicate violets to lush ferns. I’ll also let you in on a secret: using a few dabs of acrylic paint to "dye" your flowers before placing them adds an extra magic—think pastels for spring or rich autumn tones.
If you're feeling especially adventurous, consider creating themed suncatchers. You could do an "ocean" theme with sand and seashells or a "forest" theme with different shades of green leaves. The possibilities are truly endless!
Conclusion
DIY nature suncatchers are a wonderful craft to connect with nature and unleash your creativity. I hope this guide encourages you to step outside, gather materials, and express your artistic vision. Trust me; the serenity you’ll feel while creating and the joy of seeing your handiwork bathed in sunlight is worth the effort!
So, gather your supplies and let your crafting journey begin. Remember, every suncatcher is unique—just like each moment you spend outdoors! Happy crafting!