How to Make Colorful Glow Candy Apples: A Step-by-Step Guide
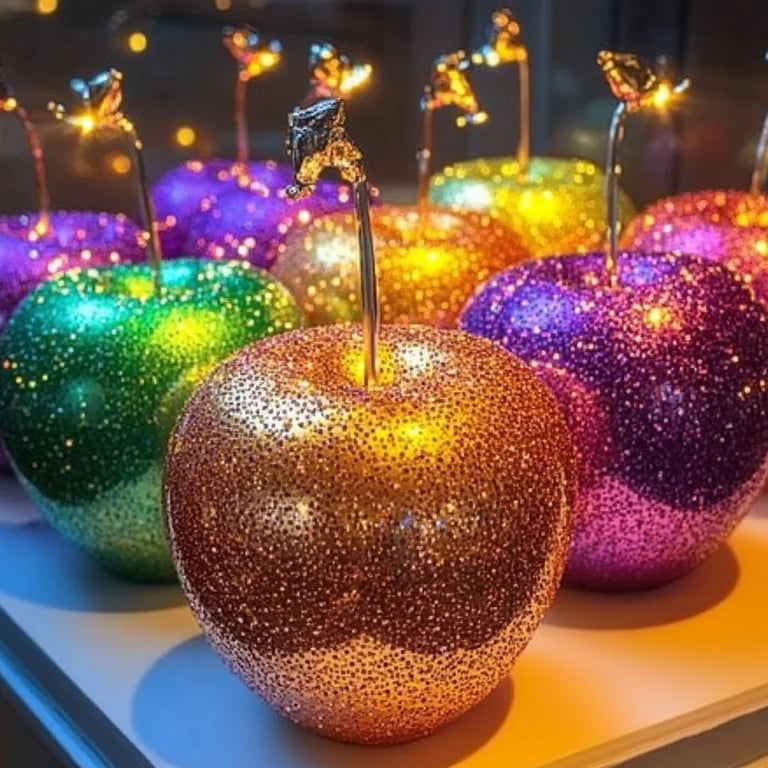
Hello, fellow crafters! Today, I am excited to share with you my delightful journey into the world of Colorful Glow Candy Apples. These stunning treats have not only charmed my taste buds but have also become a celebrated centerpiece at parties, fairs, and family gatherings. So why have they captured everyone's hearts (and taste buds)? It's simple—they are a feast for the eyes and the palate! With their vibrant colors and enchanting glow, they embody creativity and indulge the sweet tooth.
Whether you're looking for an eye-catching dessert for Halloween, a whimsical addition to a birthday party, or simply a fun project for a rainy day, colorful glow candy apples are bound to impress. With this guide, I'll take you through my tried-and-true process, sharing personal tips and experiences that will ensure your candy apples are not only beautiful but delicious too!
Ingredients and Supplies You Will Need
Before we dive into the steps, let’s gather our supplies. Here’s what you’ll need:
Apples:
- 4 medium-sized apples (I prefer Granny Smith for their tartness, but any firm apple works well)
Candy Coating:
- 2 cups granulated sugar
- 1/2 cup corn syrup
- 3/4 cup water
- 1 teaspoon food coloring (gel is preferred for vibrant shades)
- 1 teaspoon flavor extract (like vanilla or almond, optional)
Glow-in-the-Dark Element:
- 1 tablespoon tonic water or fluorescent food coloring (this is the secret ingredient for glow!)
Tools:
- Heavy-bottom saucepan
- Candy thermometer
- Wooden skewers or lollipop sticks
- Baking sheet lined with parchment paper
- Heatproof bowl for mixing
- Spoon or whisk for stirring
Step 1: Preparing the Apples
Before we start with the candy coating, proper preparation is crucial. Rinse the apples under cold water to remove any wax or residue. Dry them thoroughly with a clean towel; moisture can cause the candy coating to become clumpy.
Tip: If you want your apples to look even more polished, you can dip them in boiling water for a few seconds, then dry them. This helps remove any wax more effectively.
Once dry, insert a wooden skewer into the top of each apple, pushing it about halfway in. This is where your finger will hold the apple, so make sure it’s secure.
What could go wrong? If the skewer doesn’t go in easily, you might be using the wrong apples. Use fruits that are firm and crisp—those are key for a successful candy apple.
Step 2: Making the Candy Coating
In a heavy-bottom saucepan, combine the sugar, corn syrup, and water. Stir the mixture over medium heat until the sugar dissolves completely, then stop stirring and allow it to boil.
Safety Tip: Be careful! The hot sugar syrup can cause burns if it comes into contact with skin. Always handle with care, and keep children away while you’re cooking.
Why is this step important? The candy needs to reach at least 300°F (hard crack stage). Use your candy thermometer to monitor the temperature closely—this ensures the candy hardens properly when it cools.
As the sugar heats, you can now prepare your glow factor. If you’re using tonic water, ensure you add it after the candy reaches 300°F. Otherwise, if you’re using fluorescent food coloring, mix it in at the same stage.
Tip: Adding neon food coloring to your syrup can give a more vibrant glow!
Step 3: Coloring the Candy Coating
Once the sugar mixture reaches the required temperature, it’s time to remove it from heat. This is where we can unleash our creativity! If you want multiple colors, separate the syrup into different bowls and mix in the food coloring.
What could go wrong? If the candy syrup hardens too quickly while you're working, it may become difficult to coat your apples. Keep the mixture warm by placing it back onto low heat, but don’t let it get too hot, or it may burn.
Step 4: Dipping the Apples
Now comes the fun part—dipping the apples! Hold an apple by the skewer and quickly dip it into the syrup, turning the apple to ensure even coverage. Lift it out and let any excess syrup drip off before placing it on the parchment-lined baking sheet.
Why does this matter? Ensure you work swiftly—once the candy starts to harden, it won’t adhere properly to the apple.
Tip: If you notice that the coating isn’t smooth or shiny, the syrup may have cooled too much. Gently reheat it while stirring until it reaches the right consistency again.
Step 5: Creating the Glow Effect
Now that your apples are coated and have cooled slightly, it’s time for the enchanting glow! If you’ve opted for the tonic water, the apples can glow in black light. Simply place your finished apples under a black light to see the magical effect. Alternatively, if you used fluorescent food coloring, the magical glow will happen under UV light as well.
Step 6: Creative Variations
Now that you've mastered the basics, let your creativity shine! You can add fun toppings like crushed nuts, sprinkles, or coconut before the candy coating hardens. For an even more colorful experience, use multiple colors of candy coating on one apple!
Personal anecdote: The first time I made these, I tried to layer different colors on an apple, and while it turned into a mess, it was a beautiful, colorful “mess”! Don’t be afraid to experiment.
Step 7: Storing Your Candy Apples
Once your candy apples have cooled completely, store them in a cool, dry place. Avoid refrigerating them, as humidity can cause the sugar coating to dissolve.
Conclusion: Enjoy Your Colorful Glow Candy Apples!
With that, you’ve created your very own colorful glow candy apples! I hope you had as much fun making them as I did. They are a delightful treat perfect for any occasion—just add a touch of creativity, and they’ll illuminate the hearts of all who see them.
Remember, crafting is about enjoying the process just as much as it is about the final result. So take your time, get creative, and don’t hesitate to make these candy-coated wonders unique to you! Happy crafting and glowing!