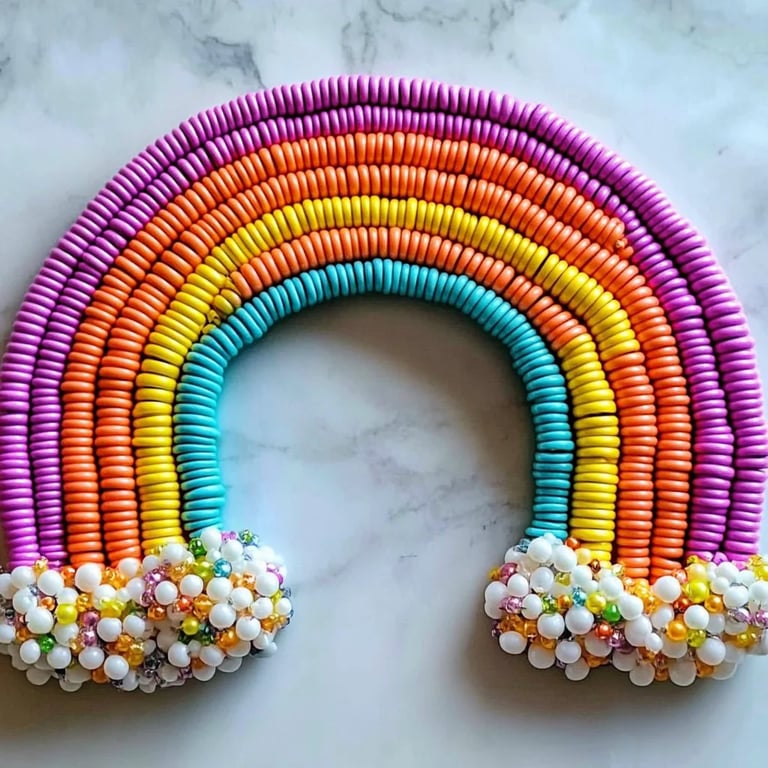
How to Make Beaded Pipe Cleaner Rainbow Craft: A Step-by-Step Guide
Creating art has always been a beautiful way to express creativity, and I’ve found that one of the most delightful and accessible crafts is the Beaded Pipe Cleaner Rainbow. This little project has gained immense popularity across various age groups, from kids to adults, becoming a mainstay in homes, schools, and craft rooms everywhere. Not only is it a fun and vibrant decoration, but it also serves as a wonderful gift, a cheerful addition to a child's room, or even a unique ornament for special occasions.
Why Make a Beaded Pipe Cleaner Rainbow?
The beauty of a beaded pipe cleaner rainbow lies in its simplicity and the joy it brings. Whether you’re looking to add a splash of color to your environment or engage in a meditative activity, this craft fits the bill. Plus, it’s an excellent opportunity for bonding time with kids or friends, as you can all personalize your designs.
Materials You’ll Need
Before we dive into the crafting process, let's gather our materials. Here’s what you’ll need:
- Pipe Cleaners (at least 7 in different colors for a classic rainbow)
- Beads (a mix of colors; I prefer larger, chunky beads for ease of threading)
- Wire Cutters (if you need to trim pipe cleaners)
- Scissors
- A flat surface (like a table or a craft mat)
- Optional: Glitter glue or paint (for added sparkle)
Step-by-Step Tutorial
Step 1: Choose Your Colors
The first step is selecting the colors for your rainbow. Typically, a rainbow has 7 colors: red, orange, yellow, green, blue, indigo, and violet. However, you can always switch it up! I often find myself drawn to pastel colors for a softer look, or even metallic shades for a more sophisticated craft.
*Tip:* When choosing your colors, lay them out in the sequence you intend to work with. This will make the crafting process smoother.
Step 2: Cut the Pipe Cleaners
Cut two pipe cleaners of the same length—about 12 inches works well—for each color. This length allows ample space for bending and manipulation without being too unwieldy.
*Why This Matters:* Uniformity in length helps maintain a symmetrical design, which is key for achieving that classic rainbow arc look.
Step 3: Shape the Pipe Cleaners
Bend each pipe cleaner into a crescent shape to form the arch of the rainbow. I usually fold the ends slightly to help hold everything together later on.
*Tip:* To ensure that your arcs are evenly shaped, you might want to use a small round object (like a jar) as a guide while shaping.
Step 4: Begin Adding Beads
Start threading beads onto each pipe cleaner. I typically use around 10-15 beads per color, depending on their size. Make sure to push them together tightly to create a seamless look.
*Here’s What Could Go Wrong:* Sometimes, the beads don’t slide easily. If this happens, ensure the hole in the beads is wide enough for the pipe cleaner. If not, you might need to find alternative beads or cut a bit of the pipe cleaner thinner.
Step 5: Finish Off the Ends
Once you have added the beads, twist the ends of the pipe cleaner together to secure the beads. This also helps give a polished look to the rainbows. I like to trim any excess pipe cleaner after twisting to keep everything neat.
*Note on Safety:* Be cautious with wire cutters if you're working with kids. Supervise them during this step, as endings can sometimes be sharp.
Step 6: Assemble the Rainbow
Now it’s time to assemble! Layer your colored arcs on top of each other, starting from the outermost arch (red) to the innermost (purple).
*Why This Matters:* Arranging the pieces in the right order not only highlights the rainbow effect but also creates stability in your craft.
Step 7: Secure the Arcs
Once you’re satisfied with the arrangement, you can either twist them together using a separate piece of pipe cleaner or use hot glue for added security (although kids should be supervised with any heat tools!).
*Optional Step:* If you want to amp up the sparkle, apply a few drops of glitter glue in specific areas, or paint the entire piece with a layer of metallic paint. It adds a lovely touch and elevates the craft.
Additional Tips and Variations
- Creative Variations: Try different shapes! Instead of a traditional arch, create a heart or star shape. You could also make multiple smaller rainbows and link them together for a garland effect.
- Safety Warnings: While crafting is meant to be fun and therapeutic, always supervise younger children with tools, and be careful of using scissors and wire cutters.
- Storage Tips: If you want to keep your craft for a while, store it in a box or a hanging display to prevent dust accumulation.
- Personal Anecdote: I remember the first time I crafted a pipe cleaner rainbow with my niece during a rainy weekend. It was a simple activity, but the laughter and the delightful mess of beads spilling everywhere made it special. It became our little tradition, and now she gifts these colorful rainbows to her friends, spreading joy wherever she goes.
Conclusion
Creating a Beaded Pipe Cleaner Rainbow is more than just a craft; it’s a celebration of color, creativity, and connection. It encourages individual expression and is an excellent way to introduce the joy of crafting to newcomers. Whether you complete one rainbow or a whole collection, I hope this guide inspires you to embark on your own crafting adventure. Remember, the process is just as important as the end result. So get cozy, gather those materials, and let your creativity shine as brightly as your colorful rainbows! Happy crafting!