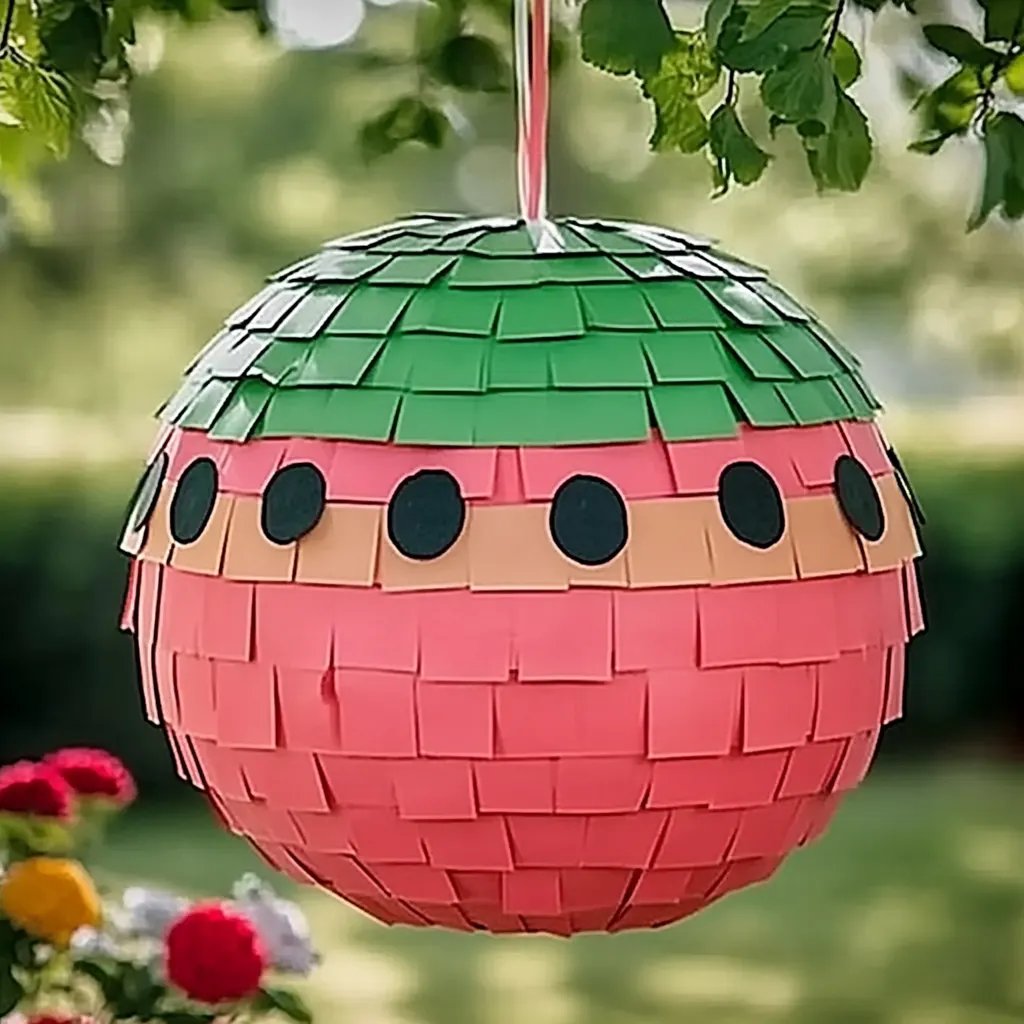
How to Make a DIY Watermelon Piñata: A Fun and Creative Guide
Hello, fellow crafters! Today, I’m excited to share one of my favorite DIY projects: making a watermelon piñata! Watermelon piñatas have become incredibly popular at summer parties and birthdays for their vibrant colors and summer vibes. Whether you’re planning a backyard barbecue, a pool party, or simply looking to bring some whimsy and fun to an event, creating your very own watermelon piñata is not only a delightful activity but also an impressive centerpiece that will surely wow your guests.
Why Choose a Watermelon Piñata?
The watermelon piñata is a great choice for a few reasons. First, it embodies the essence of summer with its bright green rind and juicy pink flesh. Second, piñatas are an interactive party activity that adds excitement and anticipation. It's an engaging way to bring people together, especially for kids, as they take turns trying to break it open and reveal the goodies inside. Lastly, making your own piñata allows you to customize the design and the candy or prizes inside, making it a personal touch for your event.
Materials You'll Need
Before we dive into the step-by-step tutorial, let me list the necessary materials you'll need for your DIY watermelon piñata. Don’t worry if you can't find everything on the list; I’ll provide alternatives and substitutions along the way!
Essential Materials:
- Balloon (large, round) – for the base shape
- Flour (1 cup) – for making the glue
- Water (1 cup) – for making the glue
- Newspaper (or craft paper) – for layering
- Green, pink, and black tissue paper – for the watermelon’s outer shell and inner flesh
- Scissors – for trimming materials
- Paintbrush – for applying glue
- Baking pan – for collecting drips
- String or twine – for hanging the piñata
- Candy or small toys – to fill the inside
- Tape – for securing parts
Optional Decoration Materials:
- Paint – if you want to add extra color
- Stickers – for additional décor
- Sprinkles – for a festive touch
Safety Notes:
- If you're using sharp scissors or painting tools, ensure supervision for younger crafters, and keep tools away from small children.
Now that we've gathered our supplies, let's get started!
Step-by-Step Tutorial
Step 1: Create the Piñata Base
Why It Matters: Starting with a solid base is crucial for your piñata’s structure. A balloon provides a lightweight foundation and helps achieve the desired shape.
- Inflate your balloon. Aim for a size that doesn’t overwhelm the space where you’ll hang or display it—roughly the size of a basketball works well.
- Place the balloon in a bowl or a baking dish to keep it upright while you work.
Step 2: Prepare the Paper Mache Mixture
Why It Matters: The flour and water mixture serves as the adhesive for your newspaper layers, creating a hard shell once dried.
- In a bowl, mix one cup of flour with one cup of water until smooth. This creates a paste; you can adjust the consistency by adding more flour or water as needed.
- Optional: Add a few drops of food coloring to make the paste look more visually appealing, though this doesn’t impact the final product’s appearance.
Step 3: Layer the Newspaper
Why It Matters: Multiple layers of newspaper give your piñata strength. Too few layers will result in a weak structure that could fall apart.
- Tear the newspaper into strips about 1-2 inches wide.
- Dip each strip into the flour mixture and remove excess paste. Apply the strips to the balloon, overlapping slightly. Aim for at least 4-5 layers over the entire balloon.
- Let the first layer dry completely (about 6 hours or overnight) before adding more layers. This is crucial—if layers are applied over wet paste, they won’t adhere properly.
Step 4: Pop the Balloon
Why It Matters: The balloon creates the shape but must be removed eventually to reveal your finished piñata.
- Once all layers are dry, carefully pop the balloon. You can use a pin to poke a small hole at the knot and slowly deflate it—this helps avoid sudden bursts that might damage your piñata.
Step 5: Create the Watermelon Look
Why It Matters: The aesthetic is what makes your piñata special. Using tissue paper gives it a fun, vibrant texture.
- Cut pieces of green tissue paper into strips or zigzag pieces for the rind.
- Attach the green strips to the top half of the piñata using the glue mixture or tape. For the pink flesh, cut strips of pink tissue paper and attach them to the lower half.
- For watermelon seeds, cut the black tissue paper into small teardrop shapes and glue them onto the pink layer.
Step 6: Add the String and Fill
Why It Matters: Adding a string gives you a way to hang the piñata securely; filling it with goodies creates excitement for your guests.
- Use a sharp tool like a scissors tip or razor to cut a small hole at the top for looped string.
- Thread a piece of string or twine through the hole and tie a tight knot inside the piñata.
- Now for the most fun part—fill your piñata with candy, toys, or whatever goodies you’ve chosen!
Step 7: Seal and Final Touches
Why It Matters: Proper sealing will ensure your piñata holds together until it's time to break it open.
- Use additional strips of tissue paper or tape to seal the open hole once filled.
- Double-check that all pieces are securely attached, and feel free to add any extra decoration or touches here.
Tips, Tricks, and Variations for Success
- Space Planning: Make sure you have ample workspace—this project can get messy, and the flour paste doesn’t clean up easily once dried.
- Drying Time: Patience is key! It might be tempting to rush, but allow each layer to dry fully to ensure durability.
- Add a Twist: For a more creative twist, consider adding glitter or drawing faces on the piñata for personality!
- Themed Parties: If you’re hosting a themed summer party, customize your piñata’s theme—think tropical fruits or even sea creatures!
Personal Anecdote
I once tried this project at a family reunion, where everyone from my niece, aged eight, to my grandfather, loved getting involved! We divided into teams for decoration, and I cherished the laughter and creativity that filled the room. It turned into a wonderful bonding experience, with everyone eagerly taking turns to break it open!
Final Thoughts
Now you have a vibrant, fun watermelon piñata ready to bring joy to your celebration! Remember, crafting is not about perfection—it's about creativity and enjoyment. If your watermelon doesn't look as perfect as you imagined, that's perfectly okay! The laughter, the excitement, and the fun will be the highlight once it’s hanging and ready to be enjoyed.
So gather your materials and let’s craft some fun! Happy crafting, and may your watermelon piñata be a hit at your next event!