Glow-in-the-Dark Ocean Jar: An Incredible 7-Step DIY Recipe
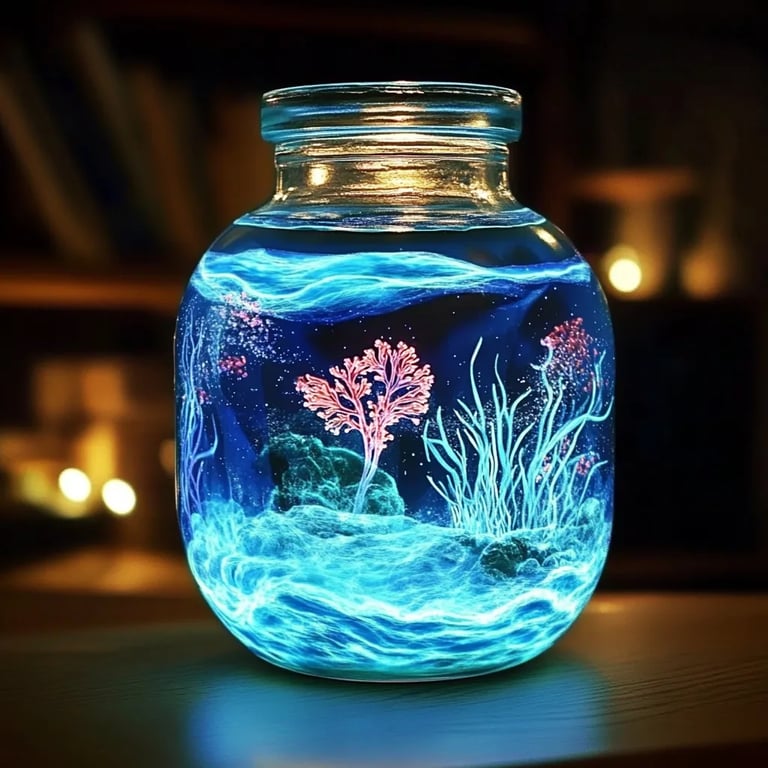
Glow-in-the-Dark Ocean Jar is an amazing project that transforms an ordinary jar into a mesmerizing piece of art. Inspired by the beauty of the ocean, this craft allows both kids and adults to capture the essence of the sea in a glowing display. Imagine creating a unique nightlight that not only illuminates your space but also reflects the calming hues of the ocean. This jar will become a centerpiece in your home, sparking joy and creativity.
Creating a Glow-in-the-Dark Ocean Jar is a delightful activity that combines art and science. The first time you see it glow, you’ll be amazed at how simple materials can result in such a stunning effect. It's not just a craft; it’s an experience that brings the ocean’s tranquility right into your living room. In this guide, you’ll discover why this recipe is so special and how easy it is to make one for yourself or as a gift. Whether you're a seasoned DIY enthusiast or a beginner, this project is suitable for all skill levels, making it a wonderful addition to any crafting repertoire.
Let's dive in and explore how you can create your own Glow-in-the-Dark Ocean Jar, step by step!
Why You’ll Love This Recipe
Creating a Glow-in-the-Dark Ocean Jar offers an array of benefits that make this project truly special. Here are a few reasons why you’ll fall in love with this craft:
- Simple Materials: Most materials can be found at home or easily purchased at any craft store.
- Engaging for All Ages: This project is perfect for children and adults, making it a fantastic family activity.
- Customizable: You can tailor the colors and designs to suit your personal preference or décor.
- Calming Ambiance: The glow creates a soothing atmosphere, perfect for relaxation or as a nightlight.
- Educational Value: It's a fun way to learn about marine life and the science of glow-in-the-dark materials.
- Perfect for Gifting: This charming creation makes a fantastic gift for friends or family.
With these fantastic features in mind, you'll see why crafting a Glow-in-the-Dark Ocean Jar will become a cherished memory for you and those with whom you share it!
Preparation and Cooking Time
Creating your Glow-in-the-Dark Ocean Jar is effortless and won’t take much of your time. Here’s how your time will be allocated:
- Preparation Time: 10 minutes
- Crafting Time: 30 minutes (drying time included)
This quick timeline ensures that you can easily incorporate this project into your day without needing a huge time commitment.
Ingredients
- A clear glass jar (mason jar or another type)
- Glow-in-the-dark paint (or glow-in-the-dark powder)
- Blue and green acrylic paint
- Sand or seashells (optional, for added texture)
- A small battery-operated light (optional, for extra glow)
- Brush or sponge
- Water
Step-by-Step Instructions
Creating your Glow-in-the-Dark Ocean Jar is as easy as following these steps:
- Clean the Jar: Ensure the glass jar is clean and dry. Remove any labels or stickers.
- Paint the Interior: Use the blue and green acrylic paints to create a watery look inside the jar. You can use a brush or sponge to apply the paint, adding layers for depth.
- Add Glow Paint: Once the acrylic paint is dry, apply a layer of glow-in-the-dark paint to the inner sides of the jar. Ensure an even coat for the best glow effect.
- Add Optional Materials: If desired, layer sand or seashells at the bottom of the jar for an ocean-inspired texture.
- Mix Glow Powder: If using glow-in-the-dark powder, mix it with a small amount of water and pour it into the jar for additional glowing effects.
- Seal the Jar: Once everything is arranged to your liking, securely close the jar with its lid. You can leave it open to dry for a few hours or overnight for more vibrancy.
- Light It Up: To enhance the glow, place a small battery-operated light inside the jar. This will give it a beautiful illuminating effect, especially at night!
These steps will guide you in crafting your own Glow-in-the-Dark Ocean Jar easily and effectively.
How to Serve
Serving your completed Glow-in-the-Dark Ocean Jar is all about enhancing its natural beauty and ensuring it shines! Here are several ideas for showcasing your marvelous creation:
- Ideal Placement: Position the jar in locations where its glow can be appreciated, such as on a bedside table, shelf, or in a living room.
- Complimentary Decor: Surround the jar with complementary ocean-themed decorations, like driftwood or small coral pieces, to enhance the ocean ambiance.
- Gift Presentation: If giving as a gift, consider placing the jar in a decorative box, perhaps with a note explaining how it was made.
- Interactive Storytelling: Encourage children to use the jar as a storytelling prop, offering them a creative way to discuss ocean life and stories inspired by the sea.
By putting thought into how you showcase your Glow-in-the-Dark Ocean Jar, you not only elevate its appearance but also create a magical experience for anyone who encounters it!
Additional Tips
- Select the Right Jar: Choose a clear jar that fits your aesthetic. A wider opening makes it easier to paint inside.
- Experiment with Colors: Don’t hesitate to mix different shades of blue and green to mimic various ocean depths.
- Use Glitter: Adding a pinch of biodegradable glitter can enhance the glowing effect and add sparkle to your ocean jar.
- Charge the Glow: For a more vibrant glow, charge the glow-in-the-dark paint under direct sunlight or a bright light source before displaying.
- Protect the Jar: If you plan to use it as a nightlight, ensure it is placed safely to avoid breakage.
Recipe Variation
Feel free to get creative! Here are some variations to inspire you:
- Underwater Scene: Incorporate small toy sea creatures like fish or starfish inside the jar to create a mini aquarium effect.
- Seasonal Themes: Change the colors to suit different seasons. For autumn, use orange and yellow tones. Winter can feature blues and whites to emulate ice.
- Scented Option: Add a few drops of essential oils like ocean breeze or lavender to the water for a pleasant aroma alongside the visual appeal.
Freezing and Storage
- Storage: Keep your Glow-in-the-Dark Ocean Jar in a cool, dry place. Avoid direct sunlight to maintain the integrity of the glow paint.
- Freezing: While not necessary, you can store the jar in the refrigerator if you plan on preserving it for longer periods. Ensure it’s tightly sealed to prevent moisture.
Special Equipment
To craft your Glow-in-the-Dark Ocean Jar successfully, here are a few tools you might find helpful:
- Sandpaper: Optional for smoothing any rough edges on the jar.
- Paintbrushes: Various sizes for detailed work and large areas.
- Mixing Containers: For blending glow powder with water or different paints.
- Tweezers: Handy for placing small decorations or sea creatures inside the jar.
Frequently Asked Questions
How long does the glow last?
The glow can last several hours but may diminish over time. Recharge under a light source for better performance.
Can I use regular paint instead of glow-in-the-dark paint?
Regular paint will not glow in the dark. For the glowing effect, you must use specialized glow-in-the-dark paint or powder.
Will the jar leak if I add water?
As long as you seal the jar properly and the glow powder is used sparingly, there should be no leaks.
Can I use this idea for a sensory jar?
Yes! You can tailor your ocean jar to be a sensory jar by adding items like marbles or glitter, perfect for visual stimulation.
Conclusion
The Glow-in-the-Dark Ocean Jar is not just a fun craft; it transforms into an enchanting piece that brings the beauty of the ocean right into your home. With endless possibilities for customization, each jar becomes a unique creation that reflects your personality and creativity. Enjoy the calm and comfort it brings to your space, and don’t forget to share this enjoyable experience with family and friends!