DIY Under the Sea Jar: An Amazing Ultimate Guide
DIY Under the Sea Jar is a wonderful way to bring a piece of the ocean into your home. This creative project captures the beauty and tranquility of the sea, allowing you to incorporate vibrant colors and unique textures into your space. Whether you're looking for a fun craft to do with your kids or a relaxing solo activity, this DIY project is sure to inspire your inner artist. You can make a stunning ocean-themed decoration that serves as a reminder of your favorite beach moments while adding a touch of elegance to your decor.
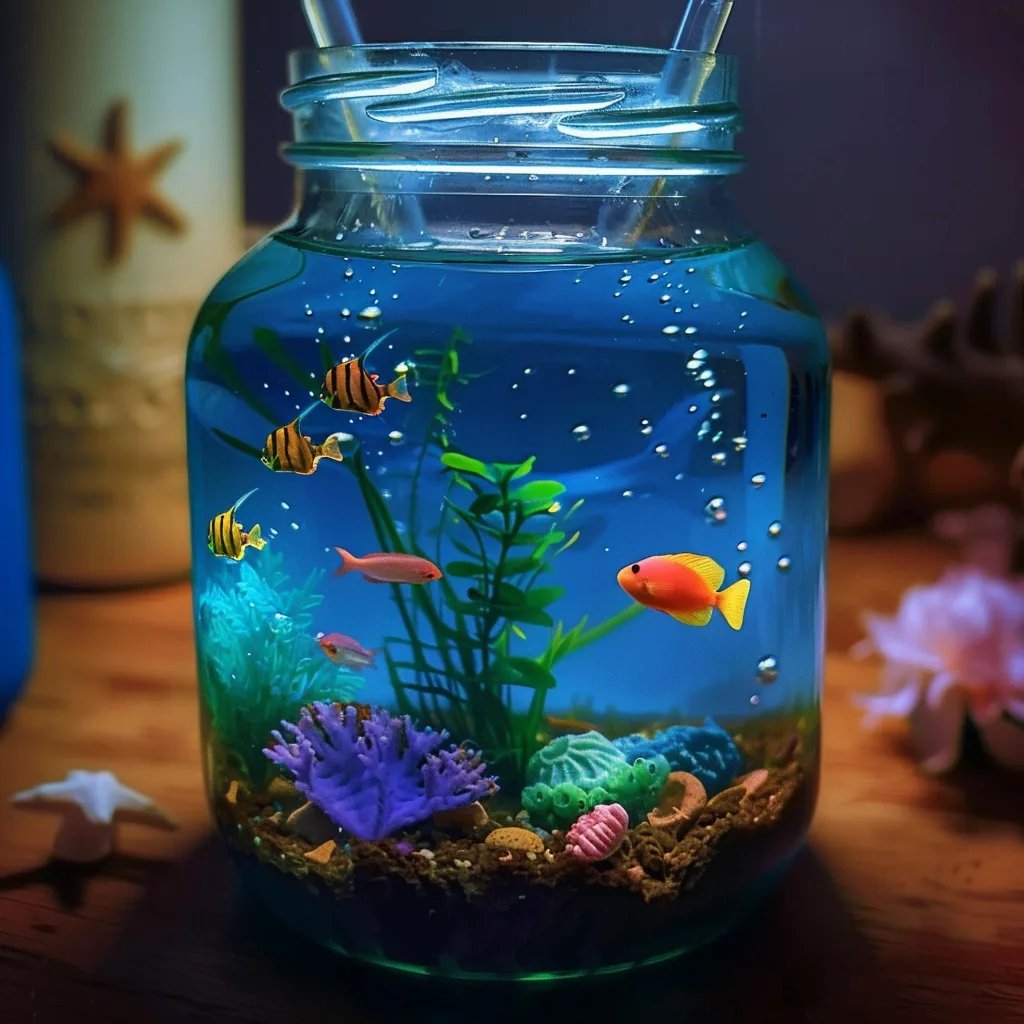
Picture this: a jar filled with shimmering blues, greens, and hints of coral, encapsulating a miniature underwater universe. The charming details, like tiny seashells and faux seaweed, transport you to the depths of the ocean every time you glance at it. Plus, creating this beautiful piece allows you to express your creativity while providing a unique conversation starter for guests. In this article, we will explore the intriguing aspects of crafting an Under the Sea Jar, share everything you need to get started, and guide you through easy step-by-step instructions, making this an enjoyable experience.
Once completed, your DIY Under the Sea Jar will not only beautify your space but also carry memories of the sea and the joy of creating something with your own hands. So, let’s dive into the details of making your own amazing Under the Sea Jar!
Why You'll Love This DIY Project
The DIY Under the Sea Jar is a project that combines creativity with a sense of calm. Here are some compelling reasons why you’ll simply love creating your own ocean masterpiece:
- Endless Creativity: You can personalize the colors, textures, and objects in your jar. No two jars will ever be alike!
- Eco-Friendly Materials: Using natural or recycled materials, such as seashells or twigs, helps to craft something stunning while being kind to the planet.
- Stress Relief: Engaging in such a creative endeavor can be therapeutic. Crafting allows you to disconnect and immerse yourself in a calming activity.
- Ideal for Any Skill Level: Whether you’re a beginner or an expert, this project is approachable and can easily be adjusted to match skill levels.
- Great for All Ages: This project is perfect for kids and adults alike. Family crafting sessions can lead to lasting memories.
- Home Decor Accent: Once finished, your jar becomes a beautiful piece of decor that celebrates your creativity.
With so many benefits, the DIY Under the Sea Jar is not just a craft; it’s an opportunity to showcase your artistic side and create something meaningful.
Preparation and Cooking Time
Preparing to create your DIY Under the Sea Jar is straightforward. Here’s a breakdown of the expected time involved:
- Preparation Time: 15 minutes (gathering materials and setting up your workspace)
- Crafting Time: 30-60 minutes (depending on your creativity and detail)
- Drying Time: 1-2 hours (if using glue or other materials that require drying)
Overall, set aside about 1.5 to 2 hours to ensure you have enough time to enjoy the crafting process.
Ingredients
- Clear glass jar (various sizes)
- Sand (colored or natural)
- Water (optional)
- Faux plants (seaweed or corals)
- Seashells (various shapes and sizes)
- Decorative items (small fish, starfish)
- Food coloring (blue, green)
- Glitter (optional, for added shimmer)
- Hot glue gun (or strong craft glue)
- Paintbrush (if adding color to any elements)
Step-by-Step Instructions
Creating your DIY Under the Sea Jar is simple when you follow these steps:
- Prepare Your Workspace: Lay down newspaper or a craft mat to protect your surfaces.
- Choose the Jar: Pick a clear glass jar that suits the size you want for your project.
- Add Sand: Pour a layer of sand into the bottom of the jar. This will create a base representing the ocean floor.
- Arrange Elements: Start placing your faux plants and seashells into the jar. Arrange them until you are satisfied with the look.
- Incorporate Decorative Items: Add any smaller decorative items, like tiny fish or starfish, ensuring they are well-distributed throughout.
- Mix Water and Food Coloring (optional): If you’d like to add water to your jar, mix some water with a few drops of food coloring to create an ocean-like effect.
- Add Water: Carefully pour the colored water into the jar, making sure not to disturb the sand and decorations too much.
- Seal Your Jar (if desired): Use a hot glue gun to secure the lid if you don't want to change the contents later.
- Add Glitter (if desired): For an extra touch, sprinkle glitter on top of the sand or within the water.
- Let It Dry: If you used hot glue, allow the jar to dry completely before moving it.
These steps will help you craft a beautiful Under the Sea Jar, reflecting ocean themes and your unique artistic expression.
How to Serve
After creating your stunning DIY Under the Sea Jar, let’s talk about how to showcase it effectively:
- Placement: Consider placing it on a windowsill or coffee table where it can catch the light and create a sparkling effect.
- Pair with Other Decorations: Surround your jar with nautical-themed items for a cohesive ocean-inspired display.
- Use in Themed Events: This jar can serve as a centerpiece for beach-themed parties or summer gatherings.
- Gift It: Wrap it creatively and give it as a unique gift to friends or family who appreciate ocean themes.
- Change It Up: Each season, consider updating the contents to reflect new themes, decorations, or colors for fresh looks.
With these creative ideas, your DIY Under the Sea Jar will not only be a beautiful piece to admire but a versatile addition to your home!
Additional Tips
- Personalize Your Design: Consider using different colors of sand or shells to create seasonal themes. Sea-themed jars can vary by holiday or personal preference.
- Experiment with Textures: Incorporate different materials such as glass beads, marbles, or even tiny nautical flags to add layers and interest to your Under the Sea Jar.
- Pair with Lighting: Place an LED tea light inside the jar for a soft, glowing effect. This can enhance the ocean ambiance and make your jar a stunning evening display.
- Share the Experience: Host a DIY Under the Sea Jar crafting session with friends or family. It can be a fun way to bond and create lasting memories.
- Use Real Elements: If you have access to natural beach materials, feel free to use real seashells, sand, or pebbles for a more authentic look.
Recipe Variation
Here are some alternative ideas to experiment with while creating your Under the Sea Jar:
- Tropical Vibes: Instead of traditional ocean colors, use bright pinks, yellows, and purples for a tropical theme. Add miniature palm trees for a beach vibe.
- Winter Wonderland: Create a snowy ocean scene by using white sand and faux snowflakes. Incorporate small winter-themed decorations like icebergs or polar bears.
- Nighttime Ocean: Use dark blue and purple hues to create a nighttime ocean jar. Add fairy lights or glow-in-the-dark paint for an enchanting glow.
- Marine Life Focus: Highlight different marine creatures like jellyfish or turtles instead of utilizing standard seashells and plants. This will add educational value for children.
- Sound of the Sea: If you want an auditory element, consider adding small ocean sound devices that activate when the jar is picked up, enhancing the sensory experience.
Freezing and Storage
- Storage: Keep your Under the Sea Jar in a cool, dry place. Avoid direct sunlight to prevent color fading and preserve the integrity of the materials inside.
- Changing Contents: If you want to refresh your jar, let it sit for a few hours before switching out any decorative elements. This ensures no adhesives or materials remain stuck to the sides.
Special Equipment
For successfully creating your DIY Under the Sea Jar, gather the following tools and materials:
- Hot Glue Gun: Essential for securing any decorative elements that need a stronger hold.
- Spoon or Funnel: Useful for adding sand and other layers to your jar without making a mess.
- Scissors: Necessary for cutting faux plants or other materials to the appropriate size.
- Paintbrush: Ideal for applying any colors or glues if you choose to customize your decorations.
- Clear Containers: Various sizes of containers can help visualize your design before finalizing it in the jar.
Frequently Asked Questions
How can I clean my Under the Sea Jar?
Use a damp cloth to carefully wipe the outside of the jar. Avoid getting water inside to preserve the contents.
Is it safe to use real water in the jar?
While it’s possible to use real water, it can lead to algae growth over time. Consider a clear sealing gel or using faux water for longer-lasting results.
Can I customize the size of the jar?
Absolutely! You can choose any size jar ranging from small mason jars to large terrarium containers depending on your vision.
What if I want to change the look later?
You can replace the contents or simply add more layers and items to refresh the design without needing a complete redo.
Is this grade-safe for kids?
Always supervise children under 5 while crafting. Older children can enjoy the activity independently with proper materials.
Conclusion
Creating a DIY Under the Sea Jar is not just an enjoyable craft; it’s a journey into the beauty of the ocean that you can capture in a jar. This project offers endless creativity, making it a cherished piece of decor or a thoughtful gift. Whether you choose vibrant colors or modest designs, your ocean masterpiece can encapsulate unique memories and provide tranquility to your space.
Dive into crafting your own under-the-sea oasis and let your imagination swim free!