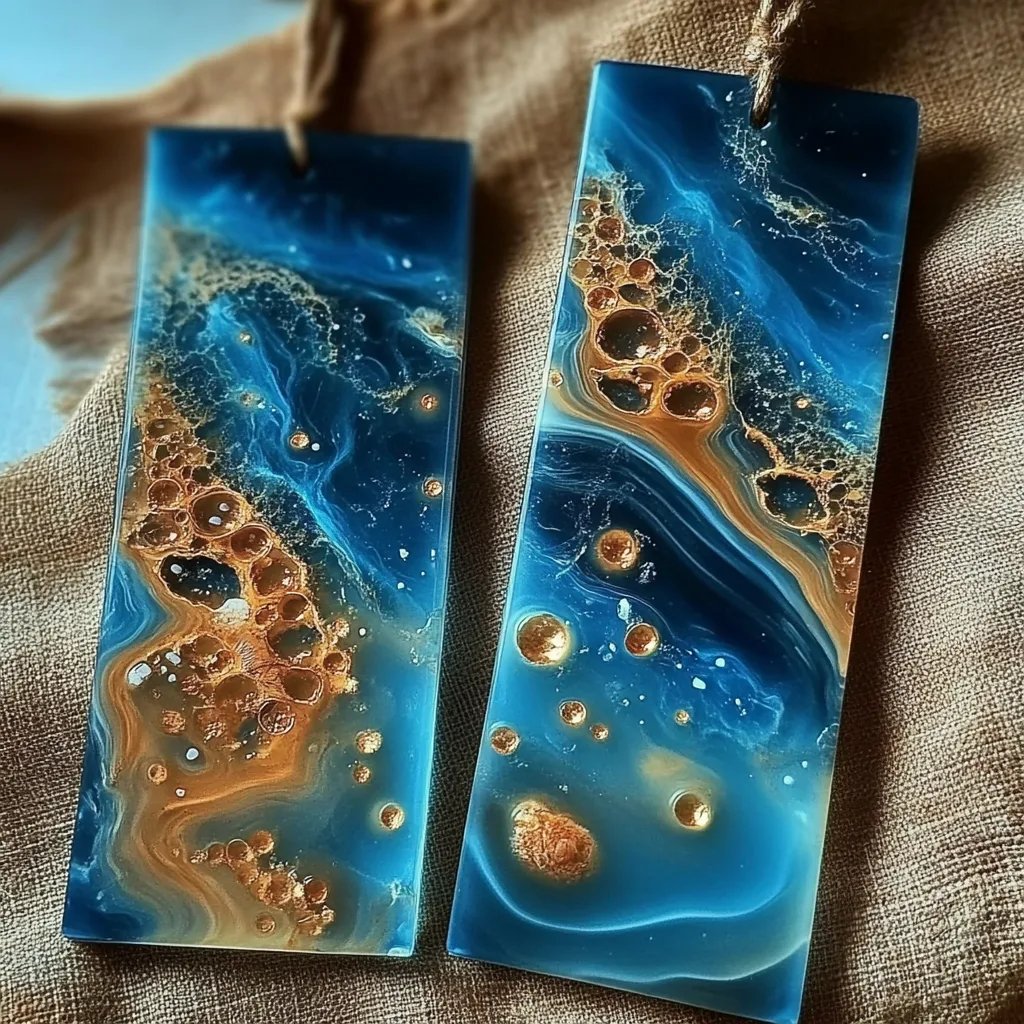
DIY Ocean Resin Bookmarks: A Step-by-Step Guide to Crafting Your Own
Hello, fellow crafters! If you’ve stumbled across this article, chances are you’re as passionate about crafting as I am. Today, I’m thrilled to guide you through the enchanting process of creating your very own Ocean Resin Bookmarks. These stunning accessories not only serve the practical function of holding your place in your favorite book but also double as tiny pieces of art that capture the essence of the ocean. You’ll find that making these bookmarks is both therapeutic and rewarding.
Why Ocean Resin Bookmarks?
Ocean resin bookmarks have surged in popularity for a good reason. They’re visually striking, able to encapsulate the beauty and tranquility of the ocean, and can make thoughtful, personalized gifts for book lovers in your life. Whether you’re curling up with a novel, jotting in a journal, or simply enjoying a cozy reading nook, these elegant bookmarks bring a touch of the seaside to your everyday reading experience.
Ideal Uses for Ocean Resin Bookmarks
- Personal Use: Add a touch of beauty to your reading sessions.
- Gifts: Perfect for birthdays or as a unique ‘thank you’ gift.
- Favors: They make great party favors for beach-themed events or book clubs.
- Home Decor: They can even serve as a charming decoration in your home office.
Materials You’ll Need
Let’s gather our tools and materials. I always encourage using the best quality materials you can afford, as this will affect the final result:
- Epoxy Resin Kit: Look for a clear casting epoxy resin designed for beginners. Some popular brands include ArtResin or Epoxy Resin.
- Silicone Molds: Ocean-themed molds in various shapes (like shells, fish, or wave patterns).
- UV Resin (optional): For quick curing small elements.
- Color Pigments: Blue, green, and white opaque or translucent pigments to create ocean waves.
- Mixing Cups & Sticks: Disposable cups and wooden sticks for thorough mixing.
- Glitter (optional): Fine glitter can add sparkle to mimic sunlight glistening on water.
- Small Shells and Dried Flowers: These natural elements will give your bookmarks a true ocean feel.
- Sandpaper: For finishing touches and smoothing edges.
- Safety Equipment: Gloves, a mask, and goggles to protect yourself during the process.
Preparation Steps
Step 1: Choose Your Workspace
Before diving in, prepare your workspace. Choose a flat, well-ventilated area covered with a plastic sheet or old newspaper. This ensures easy clean-up and protects your workspace from potential spills. I always arm myself with a clean cloth, just in case.
Step 2: Read the Instructions
Each epoxy resin kit comes with specific instructions, including mixing ratios and curing times. Read them carefully as different brands may have different requirements. This step is crucial; failure to follow mixing instructions can lead to tacky bookmarks that never harden properly.
Step 3: Prepare Your Molds
A clean mold is essential. Ensure your silicone molds are free of dust and debris to avoid imperfections in your bookmarks. For easy removal later, you can spray the molds lightly with a mold release spray (optional).
Crafting Your Ocean Resin Bookmarks: The Step-by-Step Process
Step 4: Mix Your Resin
Using your mixing cup, pour equal parts of the resin and hardener as specified in your kit. Mix slowly for at least 3-5 minutes. Rapid stirring can cause air bubbles, which are pesky and not ideal for the visual appeal of your bookmark. Tip: If you see bubbles, let the mixture sit for a few minutes; some will rise and pop on their own.
Step 5: Add Color
Decide how you want your ocean to look. Start with a few drops of your blue pigment and mix until you reach your desired shade. You can create gradients by mixing different shades of blue, green, and white in separate cups. Don’t forget to add a hint of glitter if you want that sunlit sparkle!
Step 6: Pour the Resin
Here's where the fun begins! Pour your colored resin into the mold. Start with your darker blue at the bottom to mimic depths, then pour lighter colors on top. You can use a stir stick to create waves by swirling the colors together. Tip: Pour slowly to avoid overflowing.
Step 7: Add Decorative Elements
Now comes the exciting part—adding small shells, dried flowers, or any other decorative elements. Position them at varying depths by gently pushing them into the resin with a stir stick, ensuring they’re submerged and will remain secure in the bookmark.
Step 8: Let it Cure
Once you’re satisfied with your creation, cover the mold with a dust cover to prevent dust from settling on your resin. Allow it to cure as per the instructions—usually 24 hours. Avoid moving the molds during this time to prevent disrupting the resin.
Finishing Touches
Step 9: Demold the Bookmarks
After the resin has fully cured, carefully flex the mold to release each bookmark. If you find rough edges, use fine sandpaper to smooth them out. Take your time here; it makes a significant difference in the final look of your bookmarks.
Step 10: Final Coating
For added protection and a glossy finish, you might choose to coat the bookmarks with a layer of UV resin. Apply a thin coat and cure it under UV light if you have it. This step enhances the durability and gives your bookmarks an even more polished finish.
Troubleshooting Common Issues
- Tacky Surface: If your bookmarks remain tacky, it could be due to improper mixing or incorrect ratios. You can carefully sand the surface and coat it with another layer of UV resin.
- Bubbles in Resin: If bubbles appear after pouring, use a heat gun or lighter to gently pass over the surface, which encourages bubbles to escape.
- Dust in Your Resin: If dust settles in your resin while it cures, unfortunately, it’s a one-time lesson. Always keep your molds covered during curing.
Alternative Methods and Substitutions
- If you are unable to find silicone molds, you can also use plastic bookmark shapes as a base and pour the resin directly on top, adjusting the design accordingly.
- Instead of traditional sea-themed embellishments, feel free to incorporate themed colors or charms that reflect your personal interests.
Personal Touches and Variations
As someone who has made dozens of these bookmarks, I can tell you that each one has a unique story. You can experiment with different colors, shapes, and decorative items; perhaps, theme your bookmarks based on seasons or your favorite holiday! I once made a summer-themed bookmark that incorporated mini starfish and colorful seashells for a beach trip; they were a hit!
Additionally, consider creating double-sided bookmarks for more customization options. You can use different designs or color themes on each side.
Sharing Your Creations
Once you’ve created your ocean resin bookmarks, I encourage you to share your masterpieces! Whether on social media or within your crafting community, showcasing your creations can inspire others to dive into the world of resin crafting.
Conclusion
Creating Ocean Resin Bookmarks is a delightful blend of artistic expression and functional craft. With a little patience and a willingness to experiment, you’ll produce bookmarks that are not only beautiful but also imbued with your spirit and creativity. So gather your materials, put on some music, and let your unique ocean adventure begin. Happy crafting! 🌊📚