DIY Monster Lantern Jars: An Incredible Ultimate Guide to 7 Creepy Designs
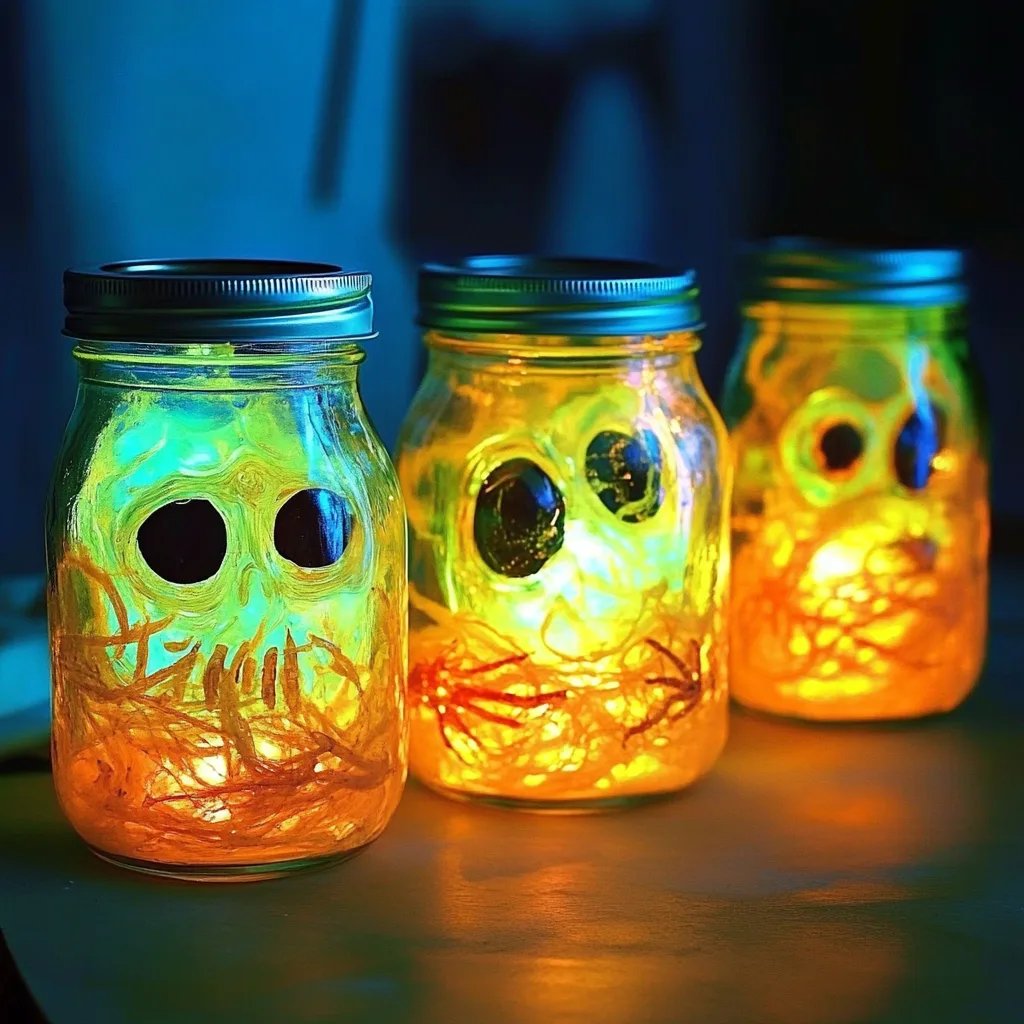
DIY Monster Lantern Jars are an amazing way to light up your Halloween festivities with a creepy yet creative twist. These lanterns not only add an enchanting ambiance but also provide a fun craft activity that can be enjoyed by both kids and adults alike. Whether you are looking to spice up your Halloween decorations, host a spooky party, or create unique gifts, these DIY Monster Lantern Jars are sure to impress. Prepare to unleash your imagination as we delve into an incredible guide on crafting these monster lanterns.
Creating DIY Monster Lantern Jars is more than just a project; it’s an adventure steeped in creativity and fun. Imagine having jars that come alive with terrifying but charming faces, glowing ominously under the moonlight. This craft allows you to combine artistry with practicality while engaging in a fun bonding activity with family and friends. As you gather your materials, let your creative juices flow, and don't be afraid to think outside the box!
Throughout this article, you'll discover how to make these delightful crafts, understand their potential, and learn the best practices for showcasing your work. We will outline simple steps, share tips, and provide insights on variations you can explore. By the end of this guide, you will be fully equipped to create astounding DIY Monster Lantern Jars that will steal the show at any event!
Why You’ll Love This Recipe
Creating DIY Monster Lantern Jars is not just about having fun; it also offers several compelling reasons to get started:
- Easy to Use Materials: Many of the supplies needed for this craft are likely already in your home, making it convenient.
- A Fun Activity for All Ages: From kids to adults, everyone can enjoy the creativity of making these lanterns together.
- Customizable Designs: You can personalize your lanterns by choosing colors and features that match your unique style.
- Glow-in-the-Dark Options: Adding glow-in-the-dark paint makes your lanterns stand out at night, especially during Halloween.
- Budget-Friendly: Most materials are inexpensive, allowing you to create multiple lanterns without breaking the bank.
- Great Conversation Starters: These lanterns will undoubtedly impress guests and serve as fantastic discussion pieces at your gatherings.
Each of these aspects contributes to making this DIY project a fantastic way to unleash your artistic side while celebrating the spooky season!
Preparation and Cooking Time
The preparation time for crafting your DIY Monster Lantern Jars varies, but generally, you can expect the following timeframe:
- Preparation Time: 30 minutes (including gathering materials)
- Crafting Time: 1-2 hours, depending on the complexity of your designs and drying times.
- Drying Time: 30 minutes to 1 hour for paint and glue to set.
These times may vary based on your crafting experience and the number of lanterns you are creating, but the excitement of making them will keep you energized!
Ingredients
- Clean glass jars (mason jars or empty food jars)
- Acrylic paint (various colors)
- Paintbrushes (different sizes)
- Black construction paper (for cutouts)
- Glue or Mod Podge
- Scissors
- LED tea lights or battery-operated candles
- Optional: Glow-in-the-dark paint or stickers
- Optional: Ribbon or twine for decoration
- Optional: Googly eyes (for a fun dimension)
Step-by-Step Instructions
Creating your DIY Monster Lantern Jars is a rewarding process. Follow these steps to make your own:
- Select Your Jar: Choose a clean glass jar to serve as your lantern base.
- Prepare Your Workspace: Lay down some newspaper or an old cloth to protect your surface from paint spills.
- Design Your Monster Face:
- Use black construction paper to cut out monster features like eyes, mouths, and noses.
- Alternatively, you can paint these directly onto the jar.
- Painting the Jar:
- Apply a base coat of acrylic paint using a paintbrush. Bright colors like green, orange, or purple work well for a monster theme.
- Allow the base coat to dry for about 30 minutes.
- Add Features:
- Once the base coat is dry, glue or stick your previously cut paper features onto the jar.
- If drawing, use fine brushes for detailing.
- Embellishments:
- Use glow-in-the-dark paint to add details or an extra layer of monster magic.
- You can also add ribbon or twine around the neck of the jar for a rustic look.
- Insert Light Source:
- Place an LED tea light or a battery-operated candle inside the jar to illuminate your creation.
- Final Touches:
- Check your design for any touch-ups that may be needed.
- Let everything dry entirely before displaying.
- Display:
- Place your lanterns on porches, windowsills, or use them as centerpieces for your Halloween party.
- Remember to keep them out of direct sunlight, especially if using glow-in-the-dark paint.
How to Serve
Now that your DIY Monster Lantern Jars are complete, consider the following tips for showcasing them effectively:
- Placement: Arrange your lanterns strategically around your home or yard to create an inviting spooky pathway.
- Combine with Other Décor: Use your lanterns alongside other Halloween decorations—like fake cobwebs or pumpkins—to enhance the atmosphere.
- Create Groups: Display multiple lanterns together at different heights for a dramatic effect, perhaps on a table or shelf.
- Evening Glow: Light them in the evening for best visual impact. The glow will create a magical ambiance and enchant guests.
- Family Gatherings: Use these lanterns at family gatherings or parties to engage everyone in a crafting experience that they can enjoy.
By thoughtfully showcasing your DIY Monster Lantern Jars, you elevate their presence and create an unforgettable Halloween spirit for yourself and your guests!
Additional Tips
- Experiment with Shapes: Try different jar shapes for varied looks. A round jar offers a classic look, while an oval jar can create a unique monster vibe.
- Use Repurposed Materials: Consider using recycled materials like old glass containers or jars from food products to create your lanterns.
- Layer Colors: For added depth, layer different colors of paint. This can give your monsters a more striking and whimsical appearance.
- Accessorize Creatively: Incorporate additional materials such as feathers, faux fur, or beads to enhance the monster’s features and overall design.
- Make it a Family Event: Host a family craft day where everyone can make their lanterns. This creates lasting memories and allows for individual creativity.
Recipe Variation
Feel free to get creative with these variations on your DIY Monster Lantern Jars:
- Seasonal Themes: Adjust the design elements for different holidays, turning them into pumpkin lanterns for Halloween or festive jars for Christmas.
- Glow-in-the-Dark Effects: Instead of using paint, try adding glow-in-the-dark stickers for a fun twist that makes the lanterns pop at night.
- Different Mediums: Use fabric scraps, yarn, or beads instead of paper for embellishing monster features to make your designs more tactile.
- Themed Characters: Craft lanterns inspired by classic monster movies or famous characters, giving them a playful, recognizable look.
- Personalization: Add names or messages to the jar for a personalized gift or party favor.
Freezing and Storage
- Storage: Keep your completed DIY Monster Lantern Jars in a cool, dry place to avoid any wear or tear. They can last for multiple seasons if handled with care.
Special Equipment
To create the perfect DIY Monster Lantern Jars, having a few specific tools can make your work easier:
- Craft Knife or Scissors: For precise cuts when creating monster facial features or other intricate designs.
- Paint Tray: A palette is helpful for paint mixing and keeping your workspace organized.
- Wax Paper: Useful for drying painted jars without sticking to surfaces, reducing cleanup time after crafting.
- Hot Glue Gun: This can be handy for fast-drying and securing heavier decorations.
- Soft Cloth: For dusting your jars prior to crafting, ensuring that your paint adheres well.
Frequently Asked Questions
What type of paint should I use for the jars?
Acrylic paint is the best choice as it adheres well to glass, dries quickly, and comes in a variety of colors.
Can children help with this craft project?
Absolutely! Kids can enjoy this project with adult supervision. Make sure to provide them with non-toxic supplies.
How can I make my lanterns stand out at night?
Incorporate glow-in-the-dark elements or use brightly colored paints to ensure they shine in the dark.
Can I use regular candles instead of LED lights?
While you can use regular candles, it’s safer to use LED lights, especially in glass jars which may be flammable.
Will the paint wash off if it rains?
Yes, if using regular acrylic paint without a sealant. Consider sealing your lanterns with a clear acrylic spray for outdoor use.
Conclusion
Creating DIY Monster Lantern Jars is a fantastic way to celebrate the Halloween season with creativity and fun. Whether you decide to go spooky or silly, these lanterns serve as eye-catching decorations and engaging crafts suitable for all ages. With just a few materials and some imagination, you can transform ordinary jars into delightful spooky monsters that will thrill your guests and brighten your festivities. So gather your supplies, bring out your artistic flair, and start crafting these enchanting lanterns today!