DIY Glitter Tube Bracelets: A Sparkling Craft Adventure
Hello, fellow crafters! Today, I’m thrilled to share with you one of my absolute favorite DIY projects: glitter tube bracelets! These eye-catching accessories are not only trendy but also incredibly fun to make. Whether you're looking to add a splash of sparkle to your outfit, craft a unique gift for a friend, or host a dazzling craft party, these bracelets are the perfect choice.
Why Glitter Tube Bracelets Are a Must-Try
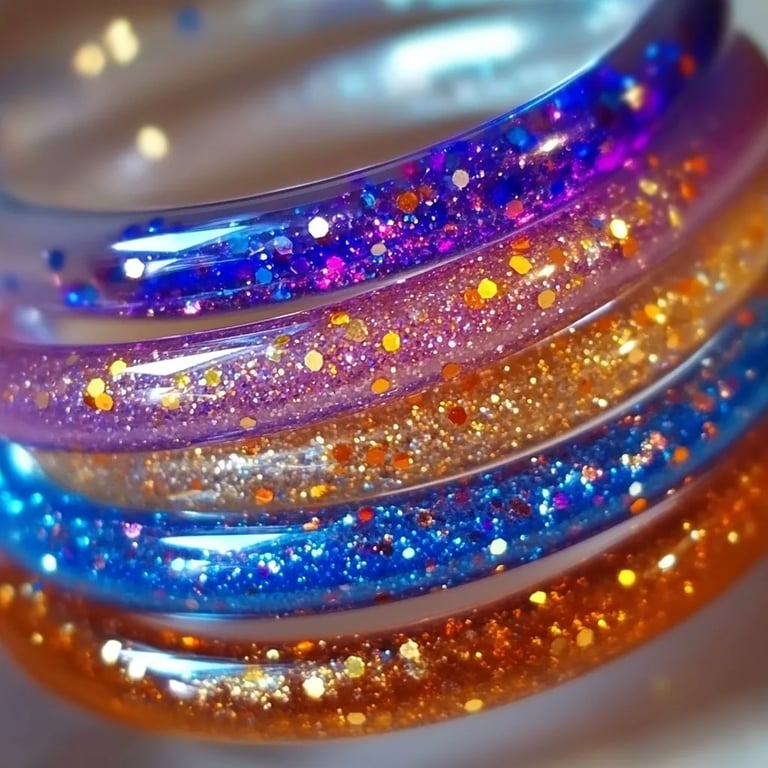
Glitter tube bracelets have gained popularity for good reason. They are versatile, easy to customize, and can suit any occasion, from casual outings to festive celebrations. The shimmer of glitter catches the light beautifully, making these bracelets stand out. Plus, the process of creating your own accessory can be incredibly fulfilling, allowing for both self-expression and the satisfaction of working with your hands.
What You'll Need
Before we dive into the creative process, let’s gather our materials. This project is perfect for beginners, as it requires just a few simple items that are easy to source.
Materials:
- Plastic tubing: You can purchase these at craft stores or use recycled items like empty, clean plastic straws or old tubes from glitter or lip gloss.
- Glitter: Choose your favorite colors and types! I love a mix of fine and chunky glitter for added texture.
- Craft glue or mod podge: This will hold everything together and create a strong finish.
- String or elastic cord: To create a wearable bracelet. Elastic cord is great for stretchiness!
- Scissors: For cutting your string to size.
- Paintbrush: To apply the glue evenly.
- Tweezers: Helpful for placing the glitter inside the tube.
- A paper plate: For managing excess glitter.
Optional:
- Sealer: For a protective finish (especially if you plan to wear your bracelet often).
- Charms or beads: To personalize your bracelet even more.
Step-by-Step Tutorial
Ready to get crafting? Here’s my tried-and-true method for making dazzling DIY glitter tube bracelets.
Step 1: Prepare Your Workspace
First things first: set up a clean, flat workspace. Cover your table with newspaper or a crafting mat to catch any stray glitter. Don’t worry, I’ve made this mistake before, and trust me, glitter can end up in places you’d never expect!
Step 2: Cut Your Plastic Tubing
Using your scissors, cut the plastic tubing to your desired bracelet length. A good rule of thumb is about 7-8 inches for an average wrist size. If you're unsure, you can measure it against your wrist or use a pre-existing bracelet as a guide. Make sure to cut cleanly to avoid sharp edges. If necessary, file the ends down with a nail file to prevent any discomfort when wearing.
Step 3: Apply Craft Glue
Now, it’s time for one of the most crucial steps. Using your paintbrush, apply a generous layer of craft glue to the inside of the plastic tube. It’s essential to get a good, even coat, as this will be what holds the glitter. Be sure to cover all areas—you don’t want any gaps that would leave the tube looking bare.
Tip: I like to start at one end and work my way to the other, ensuring that I have a smooth application.
Step 4: Add the Glitter
Here comes the fun part! Holding the tube over a paper plate (or any catchment surface), pour glitter into the tube. You can use tweezers to help position the glitter and shake the tube gently to ensure it spreads evenly along the sides. Depending on your desired sparkle level, feel free to layer different colors or sizes of glitter.
What Could Go Wrong? Sometimes the glitter doesn’t stick or clumps together. If this happens, just shake out the excess, apply more glue, and add more glitter in the affected areas. Layering is key to achieving a beautiful finish!
Step 5: Seal the Glitter
After you’ve coated the tube with glitter, it’s important to seal the glitter so it doesn’t flake off. Once the glue is completely dry, you can apply a layer of mod podge or a clear spray sealant over the exterior of the tube. This isn’t a mandatory step, but it sure helps in prolonging the life of your bracelet!
Safety Tip: Ensure good ventilation if using spray sealant, and consider wearing a mask to avoid inhaling any particles.
Step 6: Prepare Your Bracelet String
While your tube is drying, you can prepare the string or elastic cord. Cut a piece about 12-14 inches long, which gives enough length for tying knots and looping the bracelet. If you want to add beads or charms, now is the time to do so!
Step 7: Thread Your Tube
Once the glue has dried and your glitter is secure, thread the tube onto the elastic cord. If you’ve added any beads or charms, make sure they slide easily alongside the tube.
Step 8: Tie it Off
After positioning your tube where you want it on the cord, tie a secure knot around both ends. A double knot works best! If you’re using elastic, ensure the knot is snug but not too tight. You want your bracelet to slide on easily while staying secure on your wrist.
Step 9: Trim Your Ends
Use your scissors to trim any excess elastic, but not too close to the knot. We want to make sure it won’t unravel! If you have a little wiggle room, it’s okay—just ensure it won’t poke out too much.
Step 10: Flaunt Your Creation!
Now that your DIY glitter tube bracelet is complete, you can wear it proudly! Enjoy the compliments that come your way, and don’t be surprised if your friends ask you to teach them how to make their own.
Personal Anecdote & Variations
The first time I made these bracelets, I was absolutely dazzled by the finished product and couldn’t stop wearing them to every gathering. I’ve found that different color combinations can change the mood of the bracelet entirely! For example, soft pastels work great for spring parties, while bold, dark colors are perfect for nighttime events.
Consider adding themed decorations, like tiny holiday charms during winter or beach-themed beads in the summer. The possibilities are endless, and that’s what makes this project so exciting!
Creative Tips and Final Thoughts
- Experiment with Shapes: Instead of tubes, try using different shapes or sizes of materials! Small, flat surfaces can be used to create unique statements, too.
- Group Crafting: Make this a crafting party idea. Set up a glitter station and let everyone create their masterpiece.
- Storage Tips: If you end up with extra glitter, store it in tightly sealed containers to prevent it from spilling everywhere.
- Cleaning Up: When you’re finished crafting, I recommend using a lint roller or rubber gloves to handle the inevitable glitter on surfaces.
Crafting brings joy and creativity to my life, and there's nothing quite like seeing a simple idea turn into something beautiful. I hope you enjoy making glitter tube bracelets as much as I do! Happy crafting, and may your DIY journey be filled with sparkle! ✨