DIY Flowers Salt Painting for Kids: A Step-by-Step Guide to Unleashing Creativity
Hello, fellow crafters! Today, I'm excited to share a delightful DIY craft that will not only engage your little ones but also ignite their creativity—DIY Flowers Salt Painting! If you’re searching for a fun and engaging activity to do with kids that is both simple and rewarding, you’ve come to the right place. As an experienced crafter and parent, I’ve seen firsthand how captivating this project is for children. Whether you're looking to brighten up a rainy day, create gifts for friends and family, or simply enjoy a creative afternoon, salt painting is the perfect solution.
What is Salt Painting?
Salt painting is an art technique that combines salt, glue, and paint to create textured artwork, and when it comes to this particular project, we will be focusing on vibrant floral designs. What's so special about salt painting is how it creates a unique and mesmerizing effect as the paint interacts with the salt. It’s a beautiful art form that combines science and creativity, making it perfect for kids aged 5 and up.
You can use this technique for various occasions, such as birthday parties, summer camps, or after-school art sessions. Plus, they make fantastic gifts that showcase each child's unique flair.
Materials Needed
Before we dive into the step-by-step tutorial, let’s gather the necessary materials. You don’t have to break the bank—most of these items can be found around your home or at a local crafts store.
Basic Materials:
- Thick paper or cardstock: This will be the canvas for your artwork.
- White school glue: Make sure it’s washable for easy cleanup.
- Salt: Regular table salt works perfectly. We want to get a generous amount.
- Liquid watercolors or food coloring: For vibrant colors that will interact beautifully with the salt.
- Brushes: Various sizes for different painting techniques.
- Table or tray: To contain the mess.
Optional Materials:
- Spray bottle with water: For extra color blending.
- Glitter: For an extra sparkle.
- Paper towels or wipes: For cleanup.
Step-by-Step Tutorial
Now that we’ve gathered our materials, let’s dive into the process. Follow along closely—I'll share tips along the way to ensure everything goes smoothly.
Step 1: Prepare Your Workspace
It’s important to create a comfortable and inspiring environment. Cover your workspace with newspaper or a plastic tablecloth to catch any spills. Make sure the area is well-lit, and let your little ones know that it might get a little messy!
Step 2: Sketch Your Design
Using a pencil, lightly sketch a flower design on the cardstock. This step is essential as it guides the placement of glue and salt. Encourage kids to draw simple shapes—they can even create imaginative flowers that don't exist in nature! If they’re feeling adventurous, they can try drawing a bouquet.
Tip: If kids are unsure about their drawing skills, print out flower outlines from the internet for them to trace.
Step 3: Outline with Glue
Now comes the fun part! Take the white glue and carefully trace over your sketched design. Make sure to use a generous amount of glue to avoid a sparse effect. The goal is to create an outline that will hold the salt in place.
Important Note: If kids squeeze the glue bottle too hard, it might run everywhere. Remind them to apply gentle pressure as they work.
Step 4: Add the Salt
Immediately sprinkle salt over the wet glue while it's still tacky. This will allow the salt to adhere perfectly. Make sure to cover the entire glue area to achieve a vivid painted effect later. As kids do this, they may accidentally spill salt—don't worry; it adds to the playful experience!
What Could Go Wrong: If the glue dries before adding the salt, it won’t stick. If this happens, just add a little more glue to the area and sprinkle the salt again.
Step 5: Shake Off Excess Salt
Once the salt is added, gently shake off any excess. You can do this over a tray or piece of paper to catch the extra salt for future use. It’s a simple yet satisfying step—the children will love seeing the gleaming grains of salt catch the light.
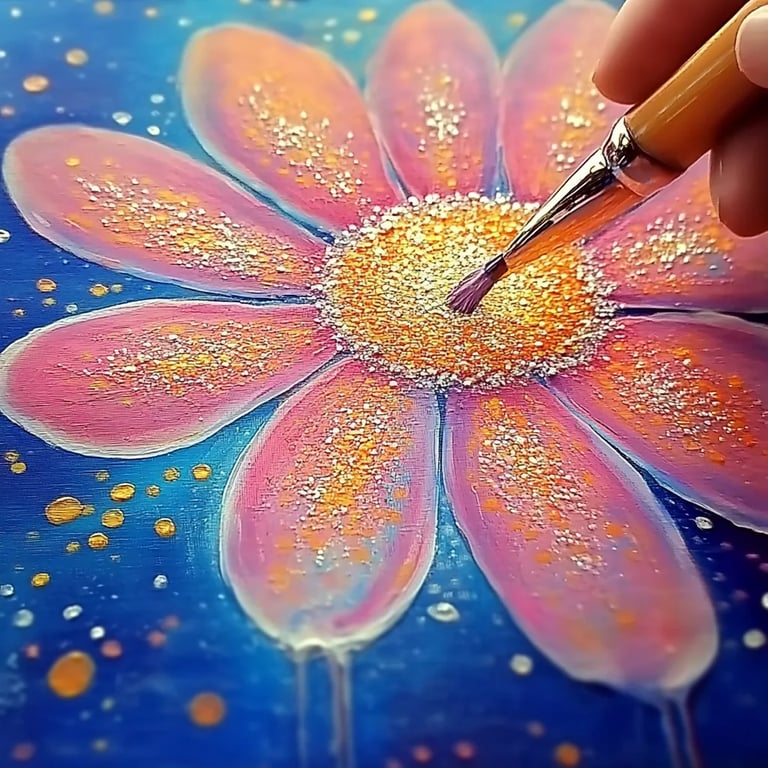
Step 6: Paint with Watercolors
Now for the magical part! Using your brushes, dip them into the liquid watercolors or food coloring. Let kids experiment with different colors as they paint over the salt-covered designs. The beauty of the salt painting project is that the salt will absorb the paint and spread it, creating a stunning effect.
Tip: Encourage kids to try layering colors and see how they mix! A spray bottle filled with water will add a fun element of surprise as they watch the colors run together.
Step 7: Let it Dry
Once the painting is complete, place the artwork somewhere safe to dry. This may take a few hours—teach kids to be patient through the process!
Safety Warning: Ensure that the drying area is away from pets and small children who might be tempted to touch or knock over the artwork.
Step 8: Display Your Masterpieces
Once dry, consider framing their beautiful creations or hanging them on the refrigerator. You can also write a little message at the bottom to give it a personal touch. Kids will love showing off their artwork to family and friends!
Creative Variations
There’s no limit to how you can tweak this project for even more fun:
- Themed Artwork: Instead of flowers, go for holiday themes, like snowflakes for winter or pumpkins for Halloween.
- Nature Collage: Incorporate real petals or leaves into the glue design before adding salt.
- Multi-Layered Effect: Use more than one piece of paper and glue/salt layers to create a 3D effect.
Final Thoughts
Salt painting is not only a creative outlet for kids but also an opportunity for parents to bond with their children over art. The process is packed with learning moments about color mixing, textures, and even a bit of science! As we finished our own salt painting sessions, I was amazed at each child’s unique expression and creativity.
Remember, there’s no right or wrong way to create art—let their imaginations run wild, and enjoy this beautiful journey together.
I hope you find this DIY project as enjoyable as I do. So grab those materials, gather the kids, and let the crafting begin! Happy painting!