Dive into Fun: How to Make an Inspiring Ocean Ice Melt Activity
Have you ever watched kids play and noticed their fascination with anything to do with water? As an experienced crafter and activity planner for both fun and educational experiences, I've seen the joy an ice melt activity can bring, especially when it's themed around the ocean! Today, I'm excited to share how I make an Ocean Ice Melt Activity that not only captivates young minds but also offers a creative way to learn about marine life. This engaging experiment has become a staple in my crafting repertoire, perfect for playdates, birthday parties, or even a quiet afternoon at home.
Why the Ocean Ice Melt Activity is Popular
The Ocean Ice Melt Activity combines the thrill of melting ice with the intrigue of sea creatures. Children love it because it’s hands-on, messy (in a delightful way), and visually stunning. It serves as a fantastic sensory experience, allowing kids to explore their curiosity about ice, water, and marine wildlife while developing fine motor skills and an understanding of the scientific process of melting.
Whether educators are using it in the classroom or parents at home, the versatility of this activity allows it to be adapted for various age groups and settings. Plus, it’s an excellent way to beat the heat during the summer months or bring a slice of the ocean indoors during colder seasons.
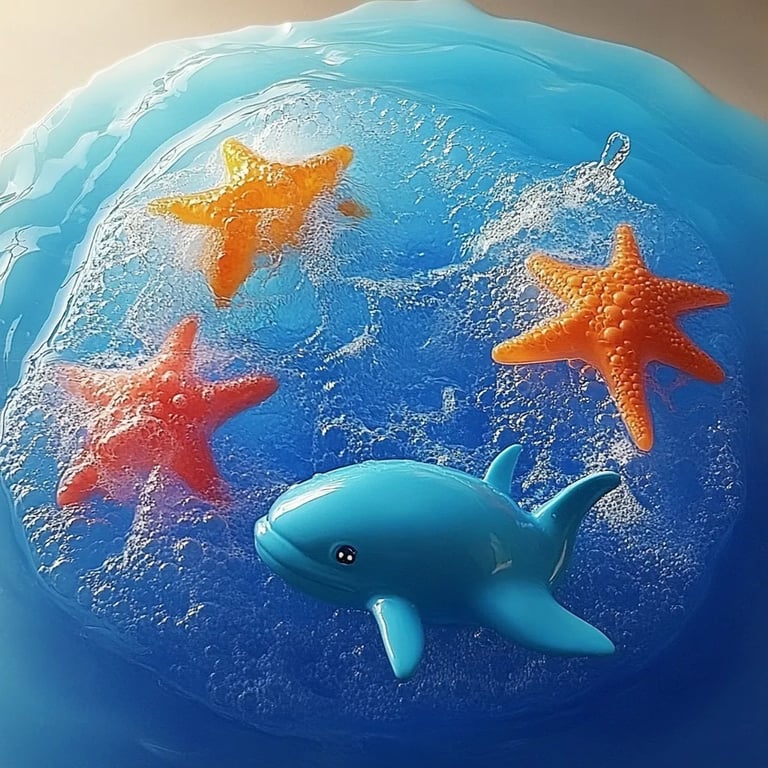
What You’ll Need
Before we dive into the step-by-step guide, let’s gather our crafting supplies. This project is very accessible, using materials you probably already have at home!
Materials:
- Water – You’ll need this to create your ice.
- Plastic ocean-themed toys – Think small sea turtles, fish, or starfish (you can find these at toy stores or online).
- Ice tray or silicone molds – Any shape will do, but ocean-themed molds are a fun choice!
- Food coloring – Blue hues will create a lovely ocean effect, but feel free to get creative.
- Salt – Regular table salt works well.
- Small containers or trays – To set up the activity.
- Watering can or spray bottle (optional) – For added effects during the melt process.
Step-by-Step Tutorial
Step 1: Prepare Your Ice Mold
Start off by filling the ice tray or silicone molds with water. If you want to include food coloring, add a few drops of blue dye to each mold for a vibrant ocean color. Consider blending in some green for a more realistic water tone.
Why It Matters: The food coloring adds visual stimulation, which makes the melting process even more exciting for the kids.
What Could Go Wrong: Avoid overfilling your molds, as water expands when frozen. If you notice spills, simply wipe them up before they freeze.
Step 2: Add the Toys
Once you've filled your mold, carefully place your ocean-themed toys inside. Make sure they’re submerged enough to be frozen in ice—this will make the reveal much funnier when they’re discovered in the melting process.
Tip: To create a suspended effect, fill your molds halfway, freeze for 30 minutes, then add the toys before filling them the rest of the way with water.
Possible Issues: If they float to the top, this is easily fixable. Just adjust their positioning and freeze them a bit longer before adding water.
Step 3: Freeze the Ice
Now, carefully place the filled molds into the freezer and let them freeze for several hours or overnight for best results.
Why This Matters: The freezing solidifies the water into ice, creating the core of our activity.
Step 4: Prepare for the Big Reveal
Once the ice is completely frozen, gather your children (or your crafting buddies!) and set up your activity station. Use small containers or trays to catch drips as the ice melts. Place the ice cubes into the containers.
Anecdote: The first time I did this activity with my niece, the laughter erupted as she eagerly watched for the toys to appear.
Step 5: Begin Melting the Ice
Here's where the fun really begins! Sprinkle some salt over the ice cubes. The salt will lower the freezing point of the ice, causing it to melt faster.
Tip: If you have a spray bottle or watering can, use that to mist some water over the cubes. Watching the combination of elements work together is truly magical.
Step 6: Observe and Discuss
As the ice melts, encourage the kids to observe the process. Ask them questions like, "What happens to the water?" and "How quickly can we see the toys?" This encourages not just observation but critical thinking.
Creative Variation: To extend the activity, set up a "rescue mission" where they must collect the toys as they melt out of the ice.
Troubleshooting Common Issues
- Ice Not Melting Quickly Enough: If the ice isn’t melting fast enough, try adding more salt to the top or using warm water instead of cold for your spray bottle.
- Discolored Water: If your food coloring creates a murky look, consider using less next time. It’s all about balancing the aesthetic and remembering that water should resemble the ocean, not a muddy puddle!
Safety Considerations
While this activity is generally safe, ensure that small parts like toys do not pose a choking risk to younger children. Always supervise during play, ensuring everyone stays safe and engaged.
Alternative Methods and Ingredient Substitutions
If you can't find ocean-themed toys, consider using natural elements like shells or even herbs to mimic ocean sounds. For a twist, you could replace the salt with sand to simulate a beach environment.
Conclusion
My Ocean Ice Melt Activity has brought immense joy to children and transformed playtime into a rewarding educational experience. By blending creativity, science, and fun, you can offer young ones an engaging way to learn about the ocean's depths.
Remember, the world of crafting is about exploration and creativity, so feel free to adapt this idea to suit your child’s interests. Happy melting, and may your crafting adventures be filled with as much joy as mine!
By following these simple steps, you’ll not only create a stunning ocean-themed melting activity but also foster a love for learning in a fun and interactive way. Dive in, and let the creativity flow! 🌊