Discover the Art of Baking Soda Painting: A Step-by-Step Guide
Hello dear readers! As an avid crafter and artist, I'm excited to share one of my favorite DIY activities: Baking Soda Painting. If you're looking for a fun, non-toxic way to unleash your creativity, this is the perfect project for you. Baking soda painting combines the simplicity of baking soda with the creativity of art, resulting in beautiful, textured paintings and a satisfying experience. It's particularly popular among parents and teachers because it’s safe for children, affordable, and incredibly engaging.
Why Baking Soda Painting?
The allure of baking soda painting lies in its accessibility—most people have baking soda at home, which means you can jump right into this creative pursuit. The fizzy reaction with vinegar creates a delightful visual effect, while the colors become vibrant as they dry. Baking soda painting is versatile; you can create art projects, cards, or even seasonal decorations. I often conduct this activity with my kids during rainy afternoons, and it always results in laughter, joy, and lovely art to decorate our home.
What You’ll Need
Before we dive into the process, let’s gather your supplies. I’ve created a simple list of materials that are easy to source:
- Baking Soda: The star of the show, this is your medium.
- White Glue: School glue works perfectly, helping to bind the painting and control texture.
- Water: Necessary to create the paint’s consistency.
- Food Coloring or Liquid Watercolors: These will provide the vibrant shades for your artwork.
- Vinegar: This will facilitate the fun fizzy reaction, so have it handy!
- Paintbrushes: Any art brushes will do, but a variety of sizes can help in achieving different effects.
- Paper: Watercolor paper or heavier weight paper works best to absorb the paint and withstand the fizzing action.
Step 1: Prepare Your Paint
Creating your baking soda paint is the first exciting step in your artistic journey. Start by taking a bowl and mix together:
- 1 cup of baking soda
- 1/2 cup of white glue
- 1/3 cup of water
Mix until it's fully combined into a smooth paste. This mixture should be thick and somewhat elastic. I find that this consistency gives the best texture when painted.
Important Note: If your mixture is too thin, it will run off the paper. Conversely, if it’s too thick, it won’t create the beautiful fizzing effect with the vinegar. Achieving the right texture takes a little practice, but don't worry—if you find it too thick, add a few drops of water, and if it’s too runny, sprinkle in a bit more baking soda.
Step 2: Divide the Paint
After you have your base paint made, it's time to add color! Divide the mixture into small bowls based on how many colors you want to make. I typically create about four to six bowls to have a vibrant palette.
Add a few drops of food coloring or liquid watercolors to each bowl and mix thoroughly until the colors are well incorporated. This is the point where you can really let your creativity shine. You can create pastel shades or even mix colors to come up with unique hues. Consider making some primary colors and then blending them to create secondary ones—this adds an opportunity to discuss color theory if you're crafting with children!
Step 3: Start Painting
Now for the most enjoyable part! Using your paintbrush, start applying the baking soda paint to your paper. You can paint any design you like—abstract swirls, flowers, or even simple shapes. I encourage experimentation! This paint encourages a playful approach, so don’t worry about making it perfect. Just enjoy the process.
Here’s a tip: Think about applying your paint in layers. Start with the lighter colors and build up to darker ones for added depth and texture. Don’t hesitate to let your inner child out!
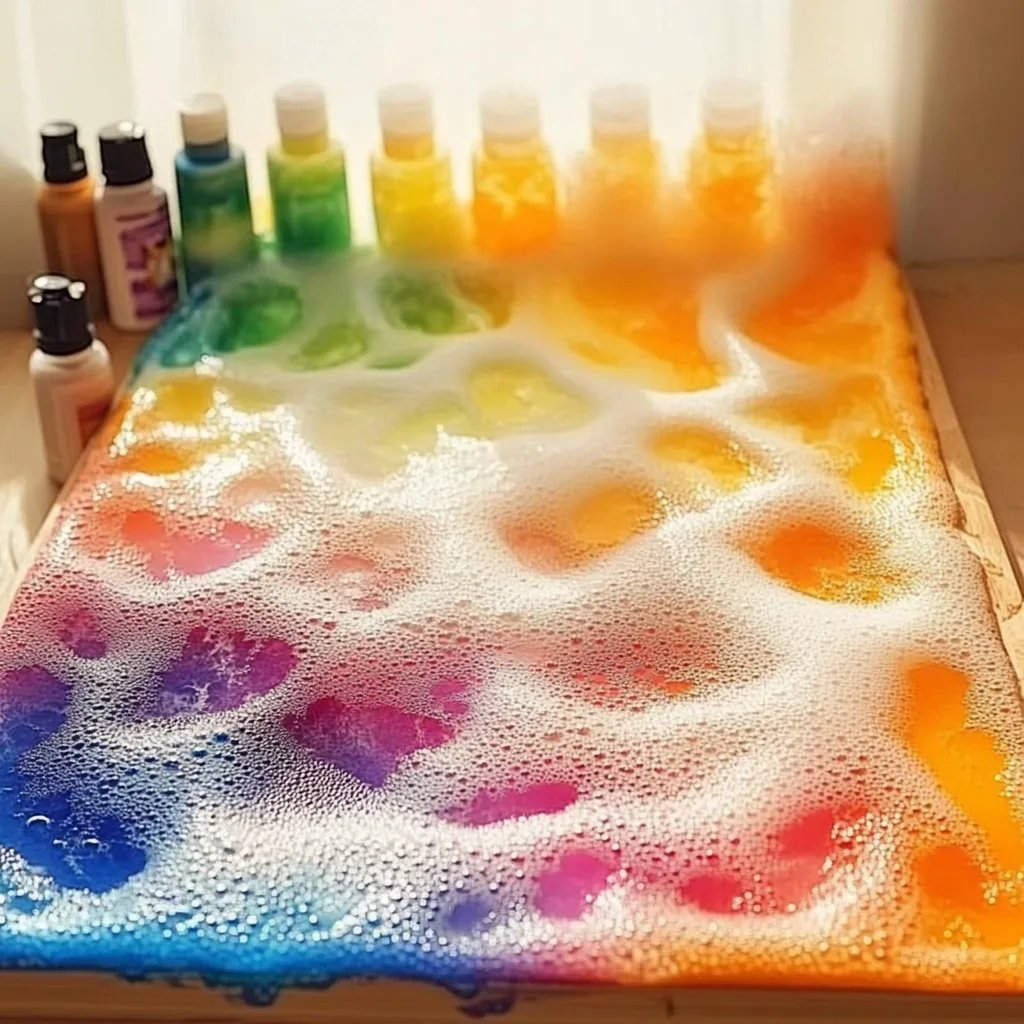
Step 4: The Fizzing Magic
Once you are satisfied with your painted creation, it’s time to bring in the magic of vinegar. In a small cup, pour a little vinegar—about 2-3 tablespoons should be enough. Then, using a dropper or even a teaspoon, apply the vinegar to the dry paint. This part is where the fun truly begins! You’ll witness a fizzy reaction as the vinegar interacts with the baking soda, causing bubbling and a lively texture.
Troubleshooting Tips
- The fizzing reaction is weak: Ensure you are using enough vinegar and that your paint is dried well. If the paint is still wet, the vinegar will dilute it instead of creating a strong reaction.
- Too much fizz expands the paint beyond control: Place a tray or old newspaper underneath your artwork to catch any overflow, preventing any mess.
Step 5: Allow to Dry
Once the fizz has settled down and you’re pleased with the effect, set your artwork aside to dry. Depending on your climate, this could take several hours to a day. Ensure you place it in a dust-free area.
Creative Variations
After you’ve mastered the basics, I encourage you to experiment further. Here are a few of my personal favorite variations:
- Adding Glitter: Before painting, sprinkle a little glitter on the still-wet paint for sparkly, eye-catching results.
- Layering: Use multiple colors adjacent to one another and watch how they react when you apply vinegar over them.
- Use Different Papers: Experiment with canvas, heavier cardboard, or even glass plates for unique effects.
- Themed Projects: Use seasonal or holiday themes to create decorations—think hearts for Valentine's Day or pumpkins for autumn!
Safety Warnings
While baking soda and vinegar are non-toxic, ensure that younger children are supervised during this activity, especially during mixing stages. Be cautious with the vibrant food colors as they can stain clothing and surfaces. I always recommend wearing old clothes and safeguarding workspaces to avoid any unwanted messes!
Final Thoughts
Baking soda painting is not just an art project; it's an experience that builds creativity, engages the senses, and promotes learning through art. I’ve seen firsthand how it fosters imaginative thinking in children and provides a soothing, relaxing activity for adults. It can also be a fantastic way to bond with friends, family, or even a solo mindfulness exercise.
So gather your materials and dive into this joyful world of colors and fizz! Whether you’re crafting with kids, looking to destress, or simply exploring your artistic side, baking soda painting is undoubtedly a recipe for creativity. Happy painting!