Create Colorful Magic Treasure Rocks: A Fun and Engaging Crafting Experience
Welcome to the enchanting world of Colorful Magic Treasure Rocks! As an experienced crafter, I’m excited to share this creative journey with you. These vibrant, textured treasures are not only captivating but also serve multiple purposes. They’re perfect for decorations, gift-giving, kids’ parties, or simply a fun afternoon activity that sparks joy and creativity. Making these colorful rocks has become a cherished activity in my home, and I'm thrilled to guide you through the process!
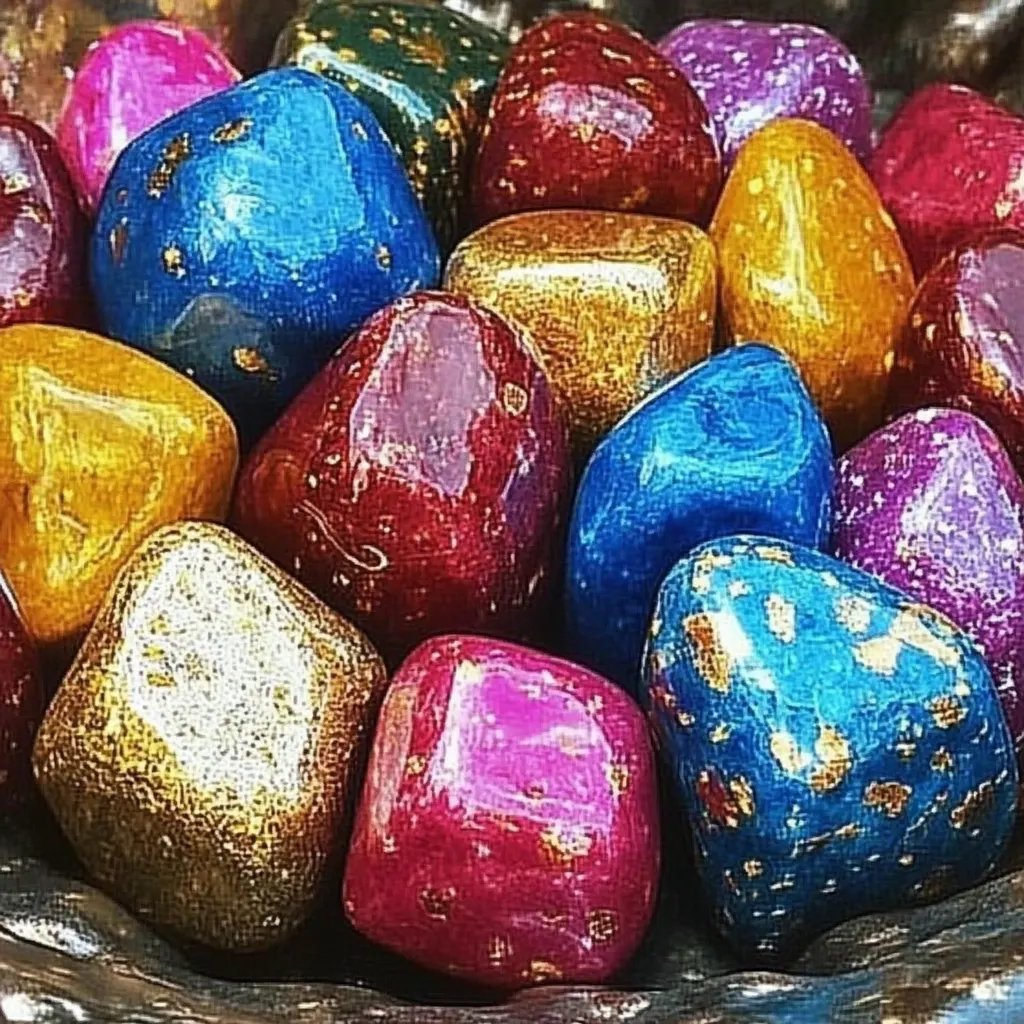
What Are Colorful Magic Treasure Rocks?
Colorful Magic Treasure Rocks are coated stones that sparkle and shimmer, resembling precious gems. Crafted with simple materials, they can be used as decorative pieces throughout your home, unique gifts for friends and loved ones, or playful treasures for kids to find in a scavenger hunt. Their vibrant colors add a pop of excitement to any space, making them a beloved project for all ages.
Why Are They Popular?
This project has gained popularity for several reasons:
- Accessibility: The materials needed are easy to find, often available in your home or at local craft stores.
- Creativity: Each rock can be uniquely crafted, allowing for personal expression and creativity.
- Educational Value: This art project encourages fine motor skills and color recognition, making it a great activity for young children.
- Eco-Friendly: Using natural stones can promote an awareness of sustainability and the environment.
With this knowledge, let’s dive into the step-by-step process of crafting these magical treasures!
Materials You’ll Need
Before you start, gather the following materials:
- Smooth stones: These can be found in your garden, at a riverbank, or purchased from craft stores. Aim for a variety of sizes and shapes!
- Acrylic paint: Choose vibrant colors that appeal to you. The quality of the paint does matter—high-quality acrylics provide better coverage and brighter results.
- Paintbrushes: Select a few different sizes for detailed work and larger surface areas.
- Glitter: Go for assorted sizes and colors for extra sparkle!
- Mod Podge or clear-drying glue: This will act as the adhesive for glitter and a protective coat.
- Sealant: Look for a clear spray sealant or a brush-on gloss finish to protect your rocks from the elements.
- Container for mixing paints: Old cups or bowls work perfectly.
- Paper towels: For cleanup and drying.
- Old newspaper or a plastic sheet: Protect your workspace from paint and glitter spills.
Step-by-Step Tutorial
Step 1: Prepare Your Workspace
Finding the right workspace is key to a successful crafting session. I recommend setting up an area that’s flat, well-lit, and protected from spills. Lay down newspaper or a plastic sheet—trust me, this will save you from endless cleanup later!
Tip: Wear old clothing or an apron, as paint tends to splatter unpredictably.
Step 2: Choose Your Stones
Select smooth stones that will be easy to paint. I often choose a mix of sizes to create a playful collection. Rinse and dry them thoroughly to remove any dirt or debris. This step ensures better paint adhesion, leading to a more durable finish.
What Could Go Wrong: Sometimes, stones have moisture on them that isn’t visible. If your paint peels or chips later, it might be due to this leftover moisture. Always double-check for dryness!
Step 3: Base Coating the Rocks
Pour your chosen base color of paint into a container and start applying it to your stones with a paintbrush. You can either fully paint the rock or just add a base layer for a more natural look with highlights.
Why This Matters: The base coat gives a vibrant backdrop for your glitter or decorative elements. Two to three coats might be necessary, so let the first layer dry for about 15-30 minutes before applying the next.
Safety Warning: Acrylic paint is non-toxic, but avoid ingesting it. If crafting with young children, supervise carefully and ensure they don’t touch their faces or mouth while painting.
Step 4: Add Glitter
Once your base coat is dry, apply a layer of Mod Podge or clear glue to the areas you want to glitter. While the glue is still wet, sprinkle your chosen glitter over it. Mix and match colors for a sparkling effect that catches the light beautifully!
Tip: Use a funnel or a sheet of paper to direct your glitter consistent and reduce waste. If you feel ambitious, try using a gradient effect with different shades of glitter for added depth.
Step 5: Seal Your Creation
After allowing your glitter to dry completely, it’s time to seal your rocks. Use a clear sealant to preserve your work and protect it from scratches and moisture. Spray a light, even coat over the rocks (or brush it on, depending on your sealant).
Personal Anecdote: I once skipped sealing as an experiment, thinking it was unnecessary. After a rainy day, I found my colorful jackpot smudged and dulled. It taught me that sealing is essential—no matter how beautiful they are, your efforts deserve to last!
Step 6: Let It Dry
Allow your rocks to dry completely for several hours or overnight. Place them in a safe, undisturbed area. During drying, find creative ways to integrate your colorful treasures into your environment!
Step 7: Display or Gift
Now that your Colorful Magic Treasure Rocks are complete, it’s time for the fun part—displaying or gifting! Arrange them in a glass jar, use them as table decorations, or hide them in your garden for others to discover.
Alternative Methods or Ingredient Substitutions
Natural Dye Alternatives
If you want to get creative with a more natural approach, consider using beet juice, turmeric, or even coffee grounds as dyes instead of acrylic paint. Just remember that natural materials might provide a softer, less intense hue.
Rock Varieties
For a more rustic look, opt for quartz, granite, or even unpolished stones to add distinct textures to your collection.
Creative Variations
- Holiday Themes: Paint your rocks for special occasions like Halloween, Christmas, or birthdays.
- Inspirational Quotes: Use a fine brush to add positive affirmations or quotes on your rocks, spreading good vibes wherever they go!
- Character Designs: Turn your rocks into beloved characters or animals for children’s play.
Conclusion: Embrace the Magic of Crafting
I hope this journey into the creation of Colorful Magic Treasure Rocks ignites your passion for crafting. The vibrant colors, the joy of creating something beautiful, and the shared moments with loved ones make this project truly magical.
Remember, the beauty of crafting lies in its imperfections and uniqueness. Embrace it and let your creativity flow! Whether you’re making these magical rocks for yourself or to brighten someone else's day, I promise they will bring a smile to your face and warmth to your heart. Happy crafting!