##Crafting Edible Aquarium Fluff: A Step-by-Step Guide to a Fun and Tasty Project
Hello, fellow crafters! Today, I’m excited to share with you one of my all-time favorite projects: creating Edible Aquarium Fluff. If you haven’t heard of it yet, this delightful treat is not only visually stunning but also oh-so delicious! Comprising a fluffy sugar base that resembles the soft, carefree waves of an aquarium, this treat is perfect for birthday parties, themed gatherings, or simply as a fun afternoon craft with the kids.
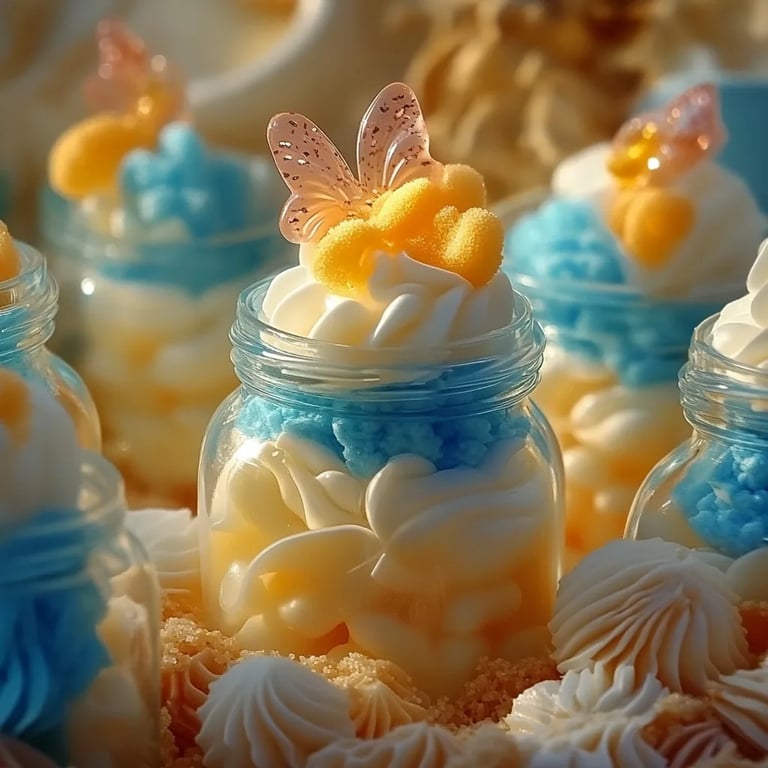
What Is Edible Aquarium Fluff?
Edible Aquarium Fluff is essentially a colorful, airy confection that mimics the look of an underwater scene. You might have seen it featured in vibrant dessert tables or on social media feeds, delighting viewers with its whimsical presentation. The exciting part? It's completely edible! Using simple baking ingredients that are easily found in most kitchens, this project bridges the gap between crafting and cooking, providing a hands-on experience that results in a yummy treat at the end.
I love using Edible Aquarium Fluff to spruce up desserts—think cakes, cupcakes, or even as a stand-alone treat in a fun fishbowl dish. Plus, it's an excellent way to tap into creativity, as you can customize the colors, flavors, and decorations, making each batch unique to you!
Why Is It So Popular?
The popularity of Edible Aquarium Fluff can be attributed to its whimsical nature and versatility. With social media platforms inundated with DIY food ideas, this charming concoction offers a captivating visual while being playful and delicious. It's kid-friendly, making it an ideal project for family bonding time, school projects, or themed events.
What You'll Need
Let’s gather our materials! I assure you, this list is pretty straightforward, and I’ll walk you through where each item fits into the process.
Basic Ingredients:
- 1 cup of granulated sugar: This is the base of your fluff, providing sweetness and structure.
- ½ cup of light corn syrup: This ingredient adds that fluffy texture and helps maintain moisture.
- 1 tsp of vanilla extract: For a touch of flavor.
- A pinch of salt: To balance the sweetness.
- Food coloring (your choice, preferably gel): Variety adds to the visual appeal.
- 1 cup of mini marshmallows: To enhance the fluffy consistency.
- Sprinkles (for decoration): To finish off the oceanic look.
Tools Needed:
- Large mixing bowl
- Electric mixer or whisk
- Silpat mat or parchment paper
- Cookie sheet
- Spatula
- Measuring cups and spoons
Step-by-Step Instructions
Step 1: Preparations and Safety First
Before we begin, it’s essential to prepare our workspace. Ensure your kitchen surface is clean and free of any debris. I recommend wearing an apron—not just for aesthetics, but to keep sugary goo from staining your clothes!
Step 2: Mixing the Sugar and Corn Syrup
In a large mixing bowl, combine the granulated sugar, light corn syrup, vanilla extract, and salt. This mixture will form the base of your Aquarium Fluff.
*Why this matters*: The sugar serves as the structural backbone, while the corn syrup aids in achieving that delightful fluffiness.
*What could go wrong*: If you start mixing too quickly, you might spill mix everywhere! So take it slow.
*Fix it*: If the mixture looks too dry, add a teaspoon of water to help.
Step 3: Whisking for Air
Using an electric mixer (or a good old whisk if you’re feeling powerful), beat the mixture on high speed for about 5-7 minutes until it becomes fluffy and light. You want it to reach a peak similar to whipped cream texture.
*Why this matters*: This process incorporates air into your mixture, making it light and giving it that fluffy texture.
*What could go wrong*: If you’ve mixed too little, your fluff might turn out dense. On the flip side, if overmixed, it could become too stiff.
*Fix it*: Always stop and check the consistency; spin it back in your mixer if it's too thick or give it a sharp whisk by hand if it feels overly loose.
Step 4: Color It Up
Once you've achieved the perfect fluff, it's time to incorporate your food colors. Feel free to divide the mixture into separate bowls if you want multiple colors. Add a few drops of gel food coloring and gently fold it into the fluff with a spatula, taking care not to over-mix.
*Creative variations*: Think outside the box! You can doodle mermaids, seashells, or fish in contrasting colors with piping bags if you want to take it up a notch.
Step 5: Shaping Your Aquarium Fluff
Line a cookie sheet with a Silpat mat or parchment paper. Using your spatula, spread the fluff evenly onto the sheet, creating waves and small peaks for visual interest.
*Why this matters*: It’s not just for presentation—different shapes add texture when you bite into it!
*What could go wrong*: If it's sticky and hard to manipulate, you might want to lightly grease your spatula with non-stick spray.
*Fix it*: If the fluff clings stubbornly, it may just need a bit of a knead with your hands (lightly) to become more workable.
Step 6: Adding the Finishing Touches
Now’s the fun part! Sprinkle edible glitter or colored sprinkles on top to resemble underwater treasures. I love adding gummy fish or edible seaweed to really make it pop!
*Safety warning*: Ensure that none of your decorations contain allergens for guests who may consume your creation.
How to Store Your Edible Aquarium Fluff
Once you have shaped and garnished your fluff, let it sit for about 30 minutes to an hour to set. Store your fluffy masterpiece in an airtight container at room temperature. It should keep its form and flavors for up to a week—if it lasts that long!
Troubleshooting Tips and Common Questions
- Fluff is Sticky: If your edible fluff becomes too sticky, it may need a bit more sugar. Lightly dust your hands when working with it to avoid sticking.
- Flavoring Issues: Noticed your flavor is bland? A few extra drops of vanilla or a sprinkle of your favorite extract can enhance your mix.
- Color Not Bright Enough: If your colors seem dull, remember that gel food coloring is much stronger than liquid versions. Stop adding a little at a time until you reach the desired shade.
My Personal Anecdote
I remember the very first time I created Edible Aquarium Fluff—a birthday party for my son. I had a rainbow of colors sprawled across the kitchen counter, and I couldn't contain my excitement. As his friends gathered around, their eyes widened at the idea of something so fun and edible! We spent hours presenting it in creative ways, and my heart swelled with joy as I watched them indulge in something uniquely crafted by hand. It became a family favorite, and I hope it will resonate with you too.
Final Thoughts
In wrapping up our fun journey of crafting Edible Aquarium Fluff, I hope you feel inspired and empowered to dive into this project yourself! Through creativity, exploration, and a touch of sweetness, we can forge not just amazing culinary delights but cherished memories in our kitchens. So, roll up your sleeves and jump in—let your imagination swim free! Happy crafting!