Crafting a Magical Seashell Glitter Bottle: Your Step-by-Step Guide
Hello, my fellow crafters! Today, I'm excited to share with you one of my all-time favorite DIY projects—creating a Seashell Glitter Bottle. This enchanting craft not only adds a whimsical touch to any space but also serves as a wonderful sensory experience for both kids and adults. Whether you're looking to add some coastal charm to your home decor, create a calming sensory bottle for children, or perhaps add an artistic piece to your crafting collection, this project is perfect for all occasions.
Why Seashell Glitter Bottles are Popular
Seashell glitter bottles have gained immense popularity over the years due to their mesmerizing aesthetic appeal and versatility. These bottles can be used as decorative centerpieces, party favors for beach-themed events, or even as calming tools for mindfulness practices. The gentle shimmer of glitter combined with the natural beauty of seashells encapsulates the serene essence of the ocean, making it a perfect craft for beach lovers and anyone who appreciates the wonders of nature.
What You’ll Need: Simple and Accessible Materials
Before we dive into the crafting process, let’s gather our supplies. You’ll be pleased to know that this project requires common materials that you might already have at home or could easily find at a local craft store.
Materials:
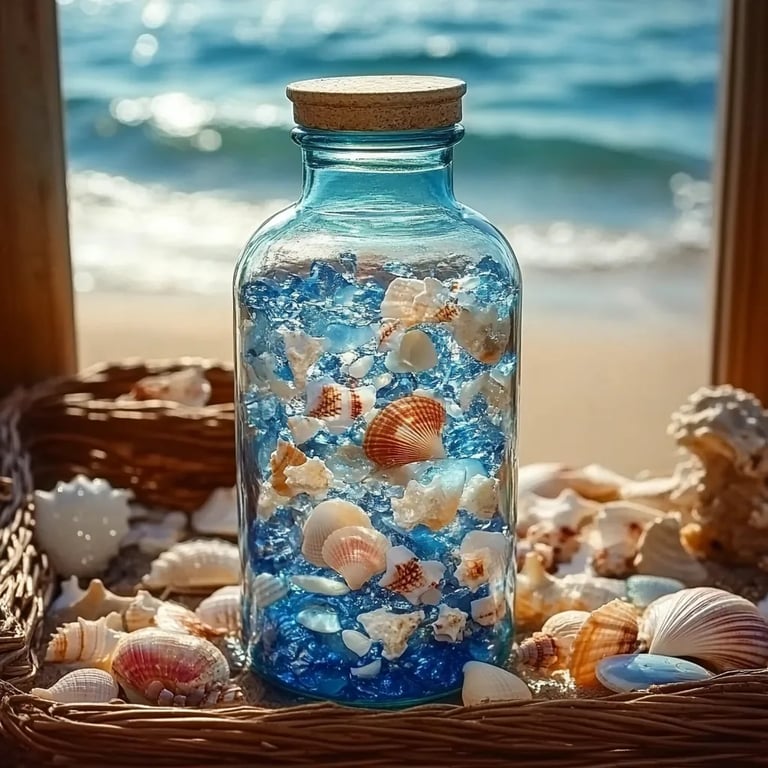
- Clear Glass or Plastic Bottle (16-32 oz) – This will be your glitter bottle's 'canvas.'
- Seashells – Small, colorful seashells work best! You can collect these from the beach or find them at craft stores.
- Glitter – Choose your favorite colors or a mix for an iridescent effect.
- Water – Distilled water is recommended to prevent cloudiness over time.
- Glycerin (Optional) – This thickens the liquid and helps the glitter float more slowly for a relaxing effect.
- Food Coloring (Optional) – If you want to add a bit of magic to your water, this is a fun addition!
- Glue (Hot Glue Gun or Waterproof Craft Glue) – This seals the bottle to prevent leakage.
- Funnel – To make your pouring easier and cleaner.
Safety Equipment:
- Safety Goggles – Protect your eyes, especially if you’re using a hot glue gun.
- Gloves – Optional, but they can keep your hands clean when handling glitter or paint.
Step-by-Step Tutorial to Create Your Seashell Glitter Bottle
Step 1: Prepare Your Bottle
Why This Matters: A well-prepared bottle keeps the focus on your beautiful design rather than distracting imperfections.
Start by cleaning your bottle thoroughly to remove any dust or labels. If you’re working with a glass bottle, you might want to give it a quick rinse with soap and water. Make sure it’s completely dry before you begin crafting.
Step 2: Add Glitter and Seashells
Why This Matters: Mixing the right proportion of glitter and seashells ensures an enchanting visual experience.
Using your funnel, pour a generous amount of glitter into the bottle—about a quarter of the way full. Next, add in your seashells. If you want a more dynamic look, try different sizes and shapes. Once you're happy with the arrangement, you can gently shake the bottle to let the glitter settle around the shells for a captivating effect.
Step 3: Fill with Liquid
Now it’s time to fill your bottle with water. If you’re using glycerin and food coloring, follow this process:
- Water to Glycerin Ratio: Aim for about 3 parts water to 1 part glycerin. Glycerin makes the liquid thicker, allowing the glitter to float gracefully.
- Adding Color: If you’d like to add food coloring, start with one drop and gradually increase until you reach your desired hue.
Pour the mixture into your bottle until it is nearly full, leaving just enough space for the lid.
Step 4: Seal the Bottle
Why This Matters: Sealing the bottle properly ensures that your craft lasts and reduces the risk of spills.
At this stage, it’s crucial to seal your bottle tightly. If you’re using a plastic bottle, simply screw on the lid. For glass bottles, apply a ring of hot glue around the rim before securing the lid. Make sure to wipe away any excess glue for a neat finish.
Step 5: Shake and Observe
Now, the moment we’ve all been waiting for! Give your glitter bottle a good shake and watch as the glitter dances around the seashells. Take a moment to appreciate your beautiful creation—you've done wonderfully!
Tips and Tricks to Enhance Your Craft
- Experiment with Colors: Don’t hesitate to play with glitter colors and shell combinations. Try iridescent glitter for a more magical sparkle!
- Mind the Ratio: If you find that your glitter settles too quickly, adjust the glycerin-to-water ratio; more glycerin will slow it down further.
- Fixing Leaks: If you notice any leaks, use additional glue to reinforce the seal. For plastic bottles, taping around the lid can help as well.
- Personalize: Write a special message or draw designs on the bottle with permanent markers to make it uniquely yours.
- Create a Theme: You can design multiple bottles based on seasons or occasions—think autumn leaves, winter snowflakes, or even Halloween-themed components!
Safety Considerations
While crafting can be immensely fun, it's essential to keep safety in mind. Always use hot glue guns carefully to avoid burns. If crafting with children, supervise closely, and consider using child-safe glue.
Creative Variations
Here are a few ideas to take your Seashell Glitter Bottle to the next level:
- Add Lights: For a truly magical effect, place your bottle over a small LED light for an ethereal glow, especially fantastic for night-time display.
- Themed Bottles: Why not create a whole set of themed bottles? For instance, mix in nautical elements with pieces of driftwood and charm anchors.
- Sound Sensory Bottle: Add small beads or rice along with the glitter to create a gentle shaking sound, perfect for younger children or sensory exploration.
Final Thoughts
Crafting a Seashell Glitter Bottle is not just about creating a beautiful object; it’s about enjoying the process and letting your creativity flow. As I worked on my first glitter bottle, I found it to be a therapeutic experience—one where I could escape to a serene beach with every shake.
I encourage you to embrace this DIY journey with an open heart and mind! Don't hesitate to share your creations, ask questions, or seek advice as you go along. Happy crafting!