Color-Changing Bubbles: An Amazing Ultimate Guide to 7 Incredible Experiments
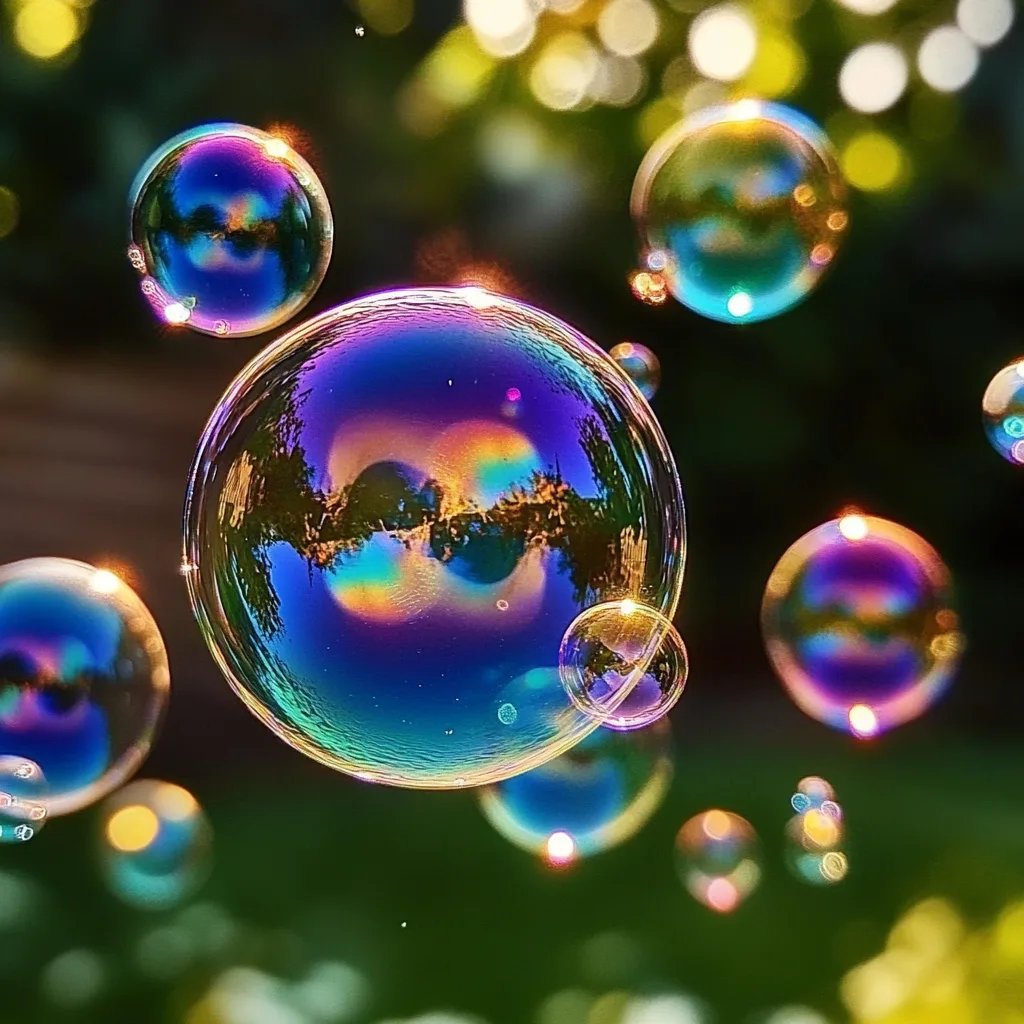
Color-changing bubbles are a mesmerizing sight that captures the imagination of people of all ages. These bubbles, which shift through a spectrum of vibrant hues, offer not just visual delight but also countless opportunities for fun and experimentation. Whether you're a parent looking to engage your children in a captivating science project or an educator in search of hands-on learning activities, color-changing bubbles can fit the bill. With a blend of chemistry and creativity, these bubbles teach us about light, color, and the art of creating something magical.
Imagine the awe on a child’s face as they watch a bubble float in the sunlight, changing colors with every tilt. The phenomenon of color-changing bubbles is not just about making bubbles; it’s about inspiring curiosity and a love for science. But what exactly makes these bubbles change color? What materials do you need to create them? And how can you experiment with them to learn even more? This guide will delve into the science behind color-changing bubbles, provide detailed instructions for creating them, and explore seven exciting experiments you can try at home or in the classroom.
In addition to the sheer excitement that these colorful orbs create, there’s an educational aspect that makes them essential for sparking interest in young minds. When children engage with science through activities like this, they develop critical thinking skills and enhance their understanding of various phenomena. Plus, creating color-changing bubbles is a fantastic way to enjoy quality time, whether it's in your backyard or at a summer picnic. Let’s explore why you’ll love engaging with this vibrant adventure!
Why You’ll Love This Recipe
Color-changing bubbles are not merely about watching colors shift in mid-air; they provide a multitude of benefits and fun-filled experiences. Here are some reasons why these bubbles are a fantastic activity for everyone:
- Engaging Science: This activity introduces children to fundamental concepts in chemistry and physics in a fun, interactive way.
- Sensory Experience: The visual appeal of the bubbles can grab the attention of young kids, making science tangible.
- Easy to Make: Most of the materials needed are common household items, making it easy to start your experiments without extensive preparation.
- Versatile Fun: You can create bubbles in various sizes and shapes, adding an element of creativity to each experiment.
- Grouped Activities: Great for parties or classrooms where collaboration can foster teamwork and shared discovery.
- Educational Potential: Beyond color changes, experiments can include measuring, mixing, and observing reactions.
- Memorable Moments: The laughter and joy shared while creating bubbles can become cherished memories.
With these benefits in mind, engaging in color-changing bubbles is sure to ignite excitement and curiosity in all participants!
Preparation and Cooking Time
Creating color-changing bubbles does not require extensive time, making it perfect for spontaneous fun or well-planned educational sessions. Here’s a breakdown of the preparation time needed for this activity:
- Preparation Time: 5-10 minutes to gather materials and mix solutions
- Activity Time: 30 minutes to 1 hour, depending on the number of experiments conducted
- Cleanup Time: 10-15 minutes
These times may vary, but this framework should provide a good idea of what to expect and allow you to plan accordingly for maximum enjoyment.
Ingredients
- 1 cup of distilled water
- 1 cup of dish soap (preferably clear)
- 2 tablespoons of sugar
- 1 tablespoon of corn syrup
- Food coloring (liquid or gel)
- Clear plastic containers or shallow dishes
- Bubble wands or straws
- Optional: Powdered pigments for more vibrant colors
- Optional: A flashlight or a lamp (for enhancing color transitions)
Step-by-Step Instructions
Creating color-changing bubbles is a straightforward process. Follow these steps to enjoy this fun activity:
- Prepare the Bubble Solution: In a container, mix 1 cup of distilled water with 1 cup of dish soap until well blended.
- Add Sugar and Corn Syrup: Stir in 2 tablespoons of sugar and 1 tablespoon of corn syrup to the soap solution until fully dissolved. This will help stabilize the bubbles.
- Divide the Solution: Pour the bubble solution into several shallow dishes.
- Color the Solutions: Add a few drops of food coloring to each dish to create a variety of colors. For more vibrant shades, use powdered pigments as an alternative.
- Make Your Bubbles: Use bubble wands or straws to blow bubbles in various colors. Observe how the colors change as they float in the air.
- Experiment with Light: Shine a flashlight or place the bubbles under a lamp to see how different lighting conditions can affect the colors you observe.
- Explore and Experiment: Try creating different concoctions, adding more ingredients, or using different types of soap. What happens when you mix colors? How do the bubbles behave in different weather conditions?
By following these steps, you’ll have a stunning display of color-changing bubbles and a fun-filled science experience!
How to Serve
When it comes to enjoying color-changing bubbles, consider the following tips to enhance the experience:
- Outdoor Space: Choose an outdoor area with ample open space for blowing bubbles. This reduces the likelihood of any mess indoors.
- Group Participation: Encourage multiple participants to engage in the activity. It’s more fun together!
- Observation Tools: Prepare notebooks or cameras to document the variations in colors and bubble sizes. Observing and recording can lead to further discussions about the science behind the phenomena.
- Themed Events: Consider hosting a science-themed party where multiple activities revolve around color concepts and mixing solutions.
- Post-Activity Discussion: After the activity, gather participants to talk about their observations and what they learned. It helps reinforce the concepts explored during the bubble-making process.
With these considerations in place, you can ensure that your color-changing bubbles provide not only an extraordinary visual spectacle but also an enriching learning experience!
Additional Tips
- Experiment with Colors: Try using a range of food colors to create vibrant mixtures. You can even use two or more colors at once to achieve a tie-dye effect.
- Better Bubble Wands: Use different materials, such as pipe cleaners or fruit-shaped cutters, to create unique bubble wands for varied shapes and sizes.
- Scientific Exploration: Encourage children to describe what they see as the bubbles pop. Ask questions like, "Why do some colors appear more vivid?" to promote scientific thinking.
- Time of Day: Observing bubbles during different times of the day can yield varying results. Morning sun might create different effects than afternoon light.
- Outdoor Safety: Avoid windy conditions to maintain control over the bubble activity. Calm days are ideal for better results.
Recipe Variation
Feel free to adapt this recipe with these variations:
- Scented Bubbles: Add a few drops of essential oils to create scented bubbles for an elevated sensory experience.
- Glow-in-the-Dark Bubbles: Mix in glow-in-the-dark paint (ensure safety for children) to create floating nocturnal wonders.
- Glitter Bubbles: Include edible glitter to give your bubbles that sparkly finish for an extra magical touch.
- Fruit-Flavored Bubbles: Use flavored extracts like vanilla or almond in the mixture to add delightful scents.
Freezing and Storage
- Storage: Store the bubble solution in airtight containers to prolong its life. It can last for about a week if kept cool and sealed.
- Freezing: Although it’s not common, you can freeze the ingredients separately in small containers. When thawed, they can be mixed and used again, though results may vary.
Special Equipment
While basic supplies are usually enough, having some special equipment can enhance the experience:
- High-Quality Bubble Wands: Invest in professional bubble wands for larger bubbles.
- Safety Goggles: Encourage kids to wear goggles during experiments to protect their eyes from any soap splashes.
- Measuring Cups and Spoons: For precise ratios, especially while experimenting with different mixtures.
- Aprons: Protect clothing, as bubbling solutions can be a little messy.
Frequently Asked Questions
What is the best way to create larger bubbles?
To create larger bubbles, use bubble wands with larger openings and ensure your mixture has a high sugar content for stability.
Can I use homemade dish soap?
Yes, homemade dish soap can be used, although results may vary based on the ingredients.
Are color-changing bubbles safe for kids?
Absolutely! The ingredients used are generally non-toxic, but supervision is always recommended.
How do I keep bubbles from popping too quickly?
Adding sugar and corn syrup to your bubble solution helps create thicker, longer-lasting bubbles.
What happens if it rains during bubble-making?
Rain can dissolve the bubble solution. However, experimenting with bubbles in slightly damp conditions can create interesting results.
Conclusion
Color-changing bubbles offer a delightful blend of science, fun, and creativity for all ages. Through simple materials and a little bit of experimentation, you can create an engaging activity that not only sparks curiosity but also fosters a love for learning. Whether you're hosting a party, teaching in a classroom, or enjoying a simple day outdoors, these bubbles will capture the imagination and create lasting memories. So gather your supplies, unleash your creativity, and explore the magical world of color-changing bubbles!